
🎓 Check Out My Top 25 Udemy Courses (80-90% Discount): My Udemy Courses - Ramesh Fadatare
In the previous tutorial, we have seen the Spring Boot Microservices Communication Example using RestTemplate.
As of 5.0, the RestTemplate class is in maintenance mode and soon will be deprecated. So the Spring team recommended using org.springframework.web.reactive.client.WebClient that has a modern API and supports sync, async, and streaming scenarios.
In this tutorial, we will learn how to use WebClient to make REST API calls (Synchronous communication) between multiple microservices.
In this tutorial, we will learn how to use WebClient to make REST API calls (Synchronous communication) between multiple microservices.
WebClient is a non-blocking, reactive client to perform HTTP requests, exposing a fluent, reactive API over underlying HTTP client libraries such as Reactor Netty.
To use WebClient in our Spring boot project, we have to add Spring WebFlux dependency to the classpath.
To use WebClient in our Spring boot project, we have to add Spring WebFlux dependency to the classpath.
What we will Build?
Well, we will create two microservices such as department-service and user-service and we will make a REST API call using WebClient from user-service to department-service to fetch a particular user department.

Prerequisites
Refer to the below tutorial to create department-service and user-service microservices.
We have created two microservices in the previous tutorial: Spring Boot Microservices Communication Example using RestTemplate.
Step 1: Add Spring WebFlux Dependency
Open the pom.xml file of the user-service project and add the below dependency:
		<dependency>
			<groupId>org.springframework.boot</groupId>
			<artifactId>spring-boot-starter-webflux</artifactId>
		</dependency>
Step 2: Configure WebClient as Spring Bean
package net.javaguides.userservice;

import org.springframework.boot.SpringApplication;
import org.springframework.boot.autoconfigure.SpringBootApplication;
import org.springframework.context.annotation.Bean;
import org.springframework.web.reactive.function.client.WebClient;

@SpringBootApplication
public class UserServiceApplication {

    public static void main(String[] args) {
        SpringApplication.run(UserServiceApplication.class, args);
    }

    @Bean
    public WebClient webClient(){
        return WebClient.builder().build();
    }
}
We have configured WebClient as Spring bean:
    @Bean
    public WebClient webClient(){
        return WebClient.builder().build();
    }
Step 3: Inject and Use WebClient to Call the REST API
Let's inject WebClient and use it to make a REST API call:
        DepartmentDto departmentDto = webClient.get()
                 .uri("http://localhost:8080/api/departments/" + user.getDepartmentId())
                         .retrieve()
                                 .bodyToMono(DepartmentDto.class)
                                         .block();
Here is the complete code of the UserServiceImpl class for your reference:
package net.javaguides.userservice.service.impl;

import lombok.AllArgsConstructor;
import net.javaguides.userservice.dto.DepartmentDto;
import net.javaguides.userservice.dto.ResponseDto;
import net.javaguides.userservice.dto.UserDto;
import net.javaguides.userservice.entity.User;
import net.javaguides.userservice.repository.UserRepository;
import net.javaguides.userservice.service.UserService;
import org.springframework.stereotype.Service;
import org.springframework.web.reactive.function.client.WebClient;

@Service
@AllArgsConstructor
public class UserServiceImpl implements UserService {

    private UserRepository userRepository;
    private RestTemplate restTemplate;
    private WebClient webClient;

    private APIClient apiClient;

    @Override
    public User saveUser(User user) {
        return userRepository.save(user);
    }

    @Override
    public ResponseDto getUser(Long userId) {

        ResponseDto responseDto = new ResponseDto();
        User user = userRepository.findById(userId).get();
        UserDto userDto = mapToUser(user);

        DepartmentDto departmentDto = webClient.get()
                 .uri("http://localhost:8080/api/departments/" + user.getDepartmentId())
                         .retrieve()
                                 .bodyToMono(DepartmentDto.class)
                                         .block();
        responseDto.setUser(userDto);
        responseDto.setDepartment(departmentDto);

        return responseDto;
    }

    private UserDto mapToUser(User user){
        UserDto userDto = new UserDto();
        userDto.setId(user.getId());
        userDto.setFirstName(user.getFirstName());
        userDto.setLastName(user.getLastName());
        userDto.setEmail(user.getEmail());
        return userDto;
    }
}
That's it. Now run both the Microservices and let's test.
Demo: Start Both Microservices
First, start the department-service project and then start a user-service project.
Once both the projects are up and running on different ports. Next, let's call the Get User REST API to test the user-service REST API call to the department-service.
Get User REST API: 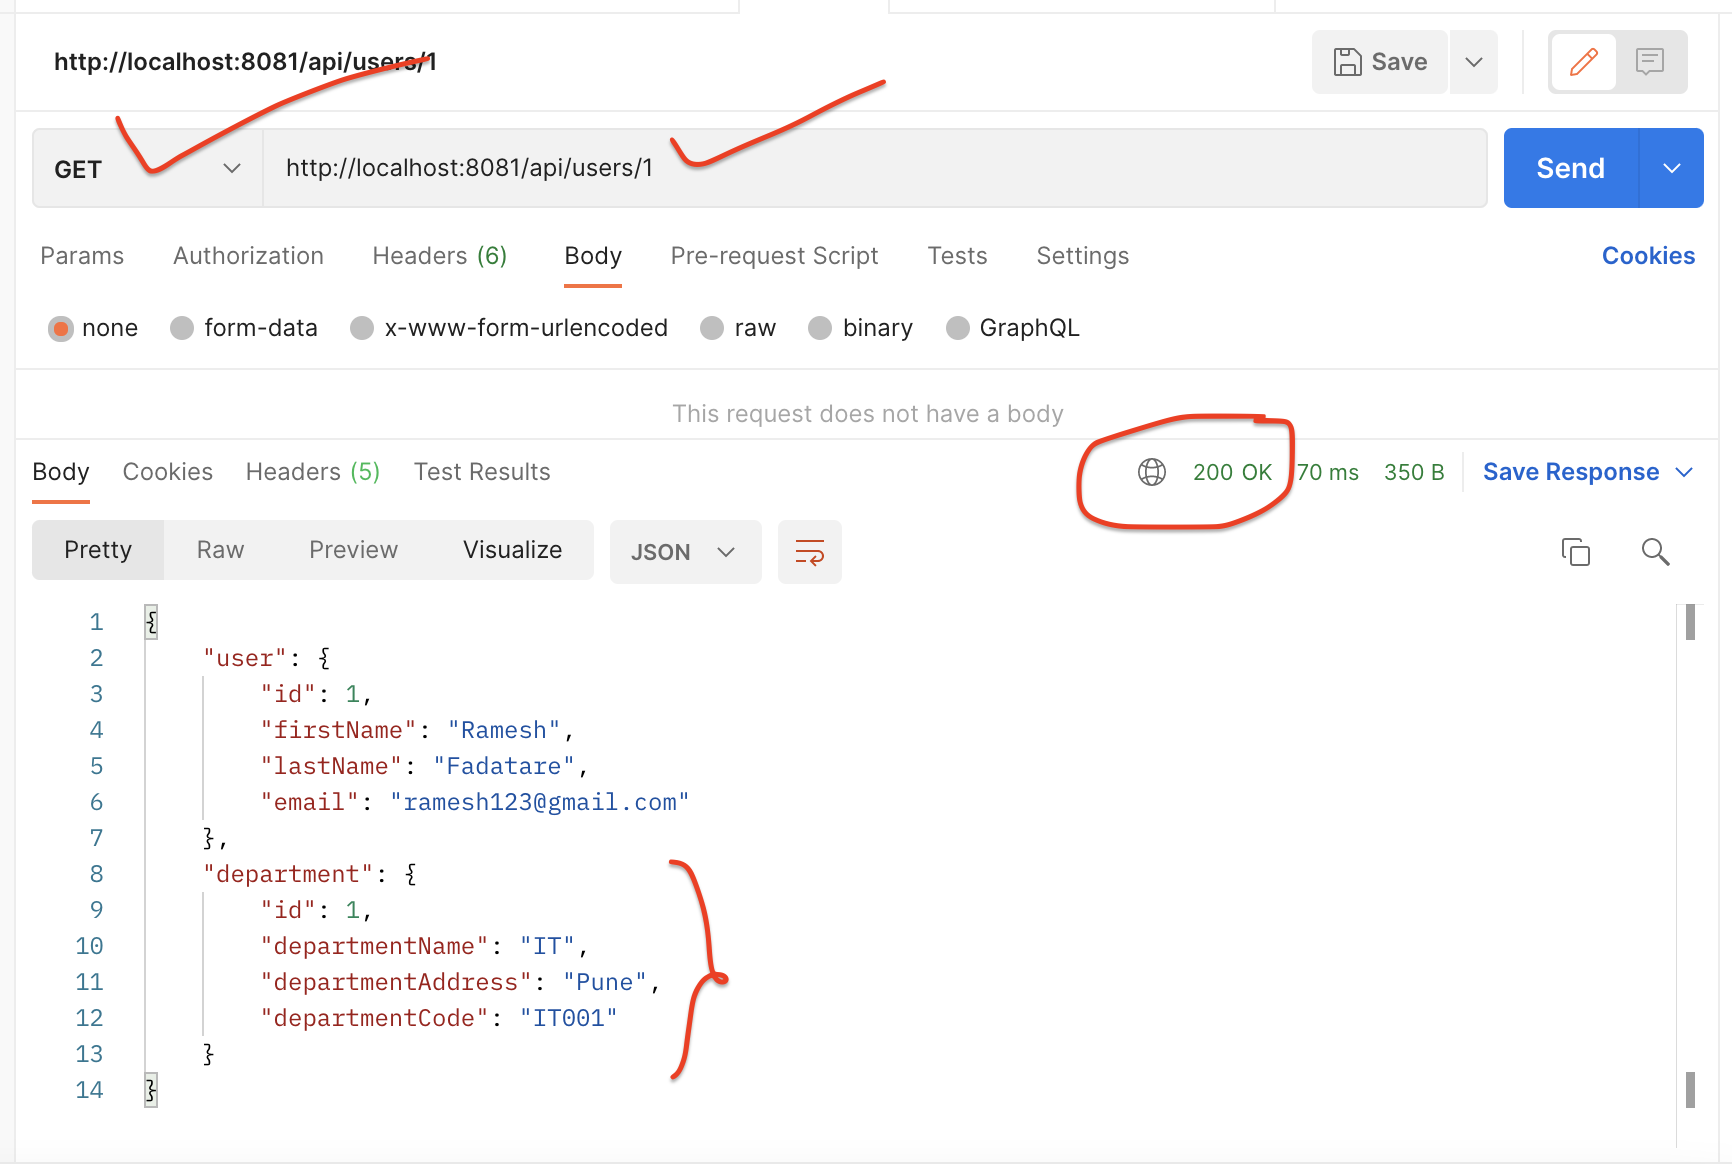

Note that the response contains a Department for a User. This demonstrates that we have successfully made a REST API call from user-service to department-service using WebClient.
Conclusion
In this tutorial, we learned how to use WebClient to make REST API calls (Synchronous communication) between multiple microservices.
Related Tutorials
✅ Spring Boot Microservices Communication Example using RestTemplate
✅ Spring Boot Microservices Communication Example using WebClient
✅ Spring Boot Microservices Communication Example using Spring Cloud Open Feign
✅ Spring Boot Microservices - Spring Cloud Config Server
✅ Spring Boot Microservices - Spring Cloud Netflix Eureka-based Service Registry
My Top and Bestseller Udemy Courses. The sale is going on with a 70 - 80% discount. The discount coupon has been added to each course below:

Build REST APIs with Spring Boot 4, Spring Security 7, and JWT
🆕 High-Demand
80–90% OFF
![[NEW] Learn Apache Maven with IntelliJ IDEA and Java 25](https://img-c.udemycdn.com/course/750x422/6852721_b512_2.jpg "[NEW] Learn Apache Maven with IntelliJ IDEA and Java 25")
[NEW] Learn Apache Maven with IntelliJ IDEA and Java 25
🆕 High-Demand
80–90% OFF

ChatGPT + Generative AI + Prompt Engineering for Beginners
🚀 Trending Now
80–90% OFF
")
Spring 7 and Spring Boot 4 for Beginners (Includes 8 Projects)
🔥 Bestseller
80–90% OFF
Available in Udemy for Business
Available in Udemy for Business

Building Real-Time REST APIs with Spring Boot - Blog App
🔥 Bestseller
80–90% OFF
Available in Udemy for Business
Available in Udemy for Business

Building Microservices with Spring Boot and Spring Cloud
🌟 Top Rated
80–90% OFF
Available in Udemy for Business
Available in Udemy for Business

Java Full-Stack Developer Course with Spring Boot and React JS
🔥 Bestseller
80–90% OFF
Available in Udemy for Business
Available in Udemy for Business

Build 5 Spring Boot Projects with Java: Line-by-Line Coding
🌟 Top Rated
80–90% OFF

Testing Spring Boot Application with JUnit and Mockito
🔥 Bestseller
80–90% OFF
Available in Udemy for Business
Available in Udemy for Business

Spring Boot Thymeleaf Real-Time Web Application - Blog App
🔥 Bestseller
80–90% OFF
Available in Udemy for Business
Available in Udemy for Business

Master Spring Data JPA with Hibernate
🔥 Bestseller
80–90% OFF
Available in Udemy for Business
Available in Udemy for Business

Spring Boot + Apache Kafka Course - The Practical Guide
🎓 Student Favorite
80–90% OFF
Available in Udemy for Business
Available in Udemy for Business


")

Comments
Post a Comment
Leave Comment