
🎓 Top 15 Udemy Courses (80-90% Discount): My Udemy Courses - Ramesh Fadatare — All my Udemy courses are real-time and project oriented courses.
▶️ Subscribe to My YouTube Channel (178K+ subscribers): Java Guides on YouTube
▶️ For AI, ChatGPT, Web, Tech, and Generative AI, subscribe to another channel: Ramesh Fadatare on YouTube
Introduction
Exception handling in Java is a crucial mechanism that allows developers to manage runtime errors gracefully, ensuring the program continues to run or terminates smoothly. This guide will introduce you to the basics of exception handling in Java, covering key concepts, keywords, and examples to help you understand how to handle exceptions effectively.
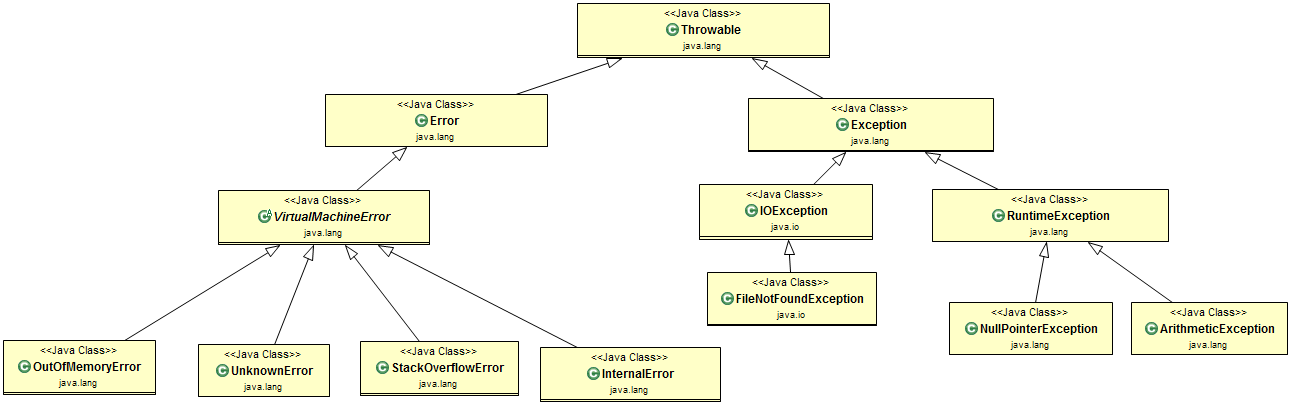
Table of Contents
- What are Exceptions?
- Types of Exceptions
- Checked Exceptions
- Unchecked Exceptions
- Errors
- Exception Handling Keywords
trycatchfinallythrowthrows
- Exception Hierarchy
- Basic Exception Handling Example
- Handling Multiple Exceptions
- Nested
tryBlocks - Custom Exceptions
- Chained Exceptions
- Conclusion
1. What are Exceptions?
Exceptions are events that occur during the execution of a program and disrupt its normal flow. They are objects that represent an error or unexpected behavior. Exception handling provides a way to deal with these events, ensuring the program can recover or terminate gracefully.
2. Types of Exceptions
Checked Exceptions
Checked exceptions are exceptions that are checked at compile-time. These exceptions must be either caught or declared in the method signature using the throws keyword. They represent conditions that a reasonable application might want to catch.
Examples:
IOExceptionSQLExceptionFileNotFoundException
Unchecked Exceptions
Unchecked exceptions are exceptions that are not checked at compile-time. They are subclasses of RuntimeException. Unchecked exceptions represent programming errors, such as logic mistakes or improper use of an API.
Examples:
NullPointerExceptionArrayIndexOutOfBoundsExceptionArithmeticException
Errors
Errors are serious issues that a reasonable application should not try to catch. They are typically conditions that a program cannot recover from and are external to the application.
Examples:
OutOfMemoryErrorStackOverflowErrorVirtualMachineError
3. Exception Handling Keywords
try
The try block contains code that might throw an exception. If an exception occurs, it is thrown to the corresponding catch block.
Syntax:
try {
    // Code that might throw an exception
}
catch
The catch block handles the exception thrown by the try block. Multiple catch blocks can be used to handle different types of exceptions.
Syntax:
try {
    // Code that might throw an exception
} catch (ExceptionType e) {
    // Code to handle the exception
}
finally
The finally block contains code that will always execute, regardless of whether an exception was thrown or caught. It is typically used for resource cleanup.
Syntax:
try {
    // Code that might throw an exception
} catch (ExceptionType e) {
    // Code to handle the exception
} finally {
    // Code that will always execute
}
throw
The throw keyword is used to explicitly throw an exception.
Syntax:
throw new ExceptionType("Exception message");
throws
The throws keyword is used in a method signature to declare that the method might throw one or more exceptions.
Syntax:
returnType methodName(parameterList) throws ExceptionType1, ExceptionType2 {
    // Method body
}
4. Exception Hierarchy
The exception hierarchy in Java is as follows:
java.lang.Object
   └── java.lang.Throwable
       ├── java.lang.Exception
       │   ├── java.io.IOException
       │   ├── java.sql.SQLException
       │   └── java.lang.RuntimeException
       │       ├── java.lang.NullPointerException
       │       ├── java.lang.ArrayIndexOutOfBoundsException
       │       └── java.lang.ArithmeticException
       └── java.lang.Error
           ├── java.lang.OutOfMemoryError
           ├── java.lang.StackOverflowError
           └── java.lang.VirtualMachineError
5. Basic Exception Handling Example
Let's start with a basic example to understand how to handle exceptions in Java.
Example:
public class BasicExceptionHandling {
    public static void main(String[] args) {
        try {
            int result = 10 / 0; // This will throw ArithmeticException
        } catch (ArithmeticException e) {
            System.out.println("Caught exception: " + e.getMessage());
        } finally {
            System.out.println("Finally block executed.");
        }
    }
}
Output:
Caught exception: / by zero
Finally block executed.
Explanation:
- The
tryblock contains code that might throw anArithmeticException. - The
catchblock handles theArithmeticException. - The
finallyblock is executed regardless of whether an exception was thrown.
6. Handling Multiple Exceptions
A method can have multiple catch blocks to handle different types of exceptions separately.
Example:
public class MultipleCatchExample {
    public static void main(String[] args) {
        try {
            int[] numbers = {1, 2, 3};
            System.out.println(numbers[10]); // This will throw ArrayIndexOutOfBoundsException
            int result = 10 / 0; // This will throw ArithmeticException
        } catch (ArrayIndexOutOfBoundsException e) {
            System.out.println("Array index out of bounds: " + e.getMessage());
        } catch (ArithmeticException e) {
            System.out.println("Arithmetic error: " + e.getMessage());
        }
    }
}
Output:
Array index out of bounds: Index 10 out of bounds for length 3
Explanation:
- The first
catchblock handlesArrayIndexOutOfBoundsException. - The second
catchblock handlesArithmeticException. - Only the first exception that occurs (
ArrayIndexOutOfBoundsException) is caught and handled.
7. Nested try Blocks
You can nest try blocks inside each other to handle exceptions that might occur within multiple levels of operations.
Example:
public class NestedTryExample {
    public static void main(String[] args) {
        try {
            System.out.println("Outer try block");
            try {
                int result = 10 / 0; // This will throw ArithmeticException
            } catch (ArithmeticException e) {
                System.out.println("Inner catch: Arithmetic error: " + e.getMessage());
            }
            int[] numbers = {1, 2, 3};
            System.out.println(numbers[10]); // This will throw ArrayIndexOutOfBoundsException
        } catch (ArrayIndexOutOfBoundsException e) {
            System.out.println("Outer catch: Array index out of bounds: " + e.getMessage());
        } finally {
            System.out.println("Outer finally block");
        }
    }
}
Output:
Outer try block
Inner catch: Arithmetic error: / by zero
Outer catch: Array index out of bounds: Index 10 out of bounds for length 3
Outer finally block
8. Custom Exceptions
You can create your own custom exceptions by extending the Exception class or any of its subclasses. Custom exceptions are useful for specific error conditions that are relevant to your application.
class InvalidAgeException extends Exception {
    public InvalidAgeException(String message) {
        super(message);
    }
}

public class CustomExceptionExample {
    public static void main(String[] args) {
        try {
            validateAge(15);
        } catch (InvalidAgeException e) {
            System.out.println("Caught custom exception: " + e.getMessage());
        }
    }

    public static void validateAge(int age) throws InvalidAgeException {
        if (age < 18) {
            throw new InvalidAgeException("Age must be 18 or older.");
        }
        System.out.println("Age is valid.");
    }
}
Output:
Caught custom exception: Age must be 18 or older.
Explanation:
- The
InvalidAgeExceptionclass extends theExceptionclass. - The
validateAgemethod throws anInvalidAgeExceptionif the age is less than 18. - The exception is caught in the
mainmethod.
9. Chained Exceptions
Chained exceptions allow you to relate one exception with another, forming a chain of exceptions. This is useful when an exception occurs as a direct result of another exception.
Example:
public class ChainedExceptionDemo {
    public static void main(String[] args) {
        try {
            method1();
        } catch (Exception e) {
            e.printStackTrace();
        }
    }

    public static void method1() throws Exception {
        try {
            method2();
        } catch (Exception e) {
            throw new Exception("Exception in method1", e);
        }
    }

    public static void method2() throws Exception {
        throw new Exception("Exception in method2");
    }
}
Output:
java.lang.Exception: Exception in method1
    at ChainedExceptionDemo.method1(ChainedExceptionDemo.java:12)
    at ChainedExceptionDemo.main(ChainedException

Demo.java:5)
Caused by: java.lang.Exception: Exception in method2
    at ChainedExceptionDemo.method2(ChainedExceptionDemo.java:17)
    at ChainedExceptionDemo.method1(ChainedExceptionDemo.java:10)
    ... 1 more
Explanation:
method2throws an exception.method1catches the exception thrown bymethod2and throws a new exception with the original exception as the cause.- The
mainmethod catches the exception thrown bymethod1and prints the stack trace, showing the chain of exceptions.
10. Conclusion
Exception handling is a crucial aspect of Java programming that ensures the robustness and reliability of your code. By understanding and effectively using the exception handling keywords (try, catch, finally, throw, and throws), you can handle errors gracefully and ensure your programs continue to run smoothly. Practice these concepts with the examples provided to get a solid grasp of exception handling in Java.
Happy coding!
Related Java Exception Handling Guides
- Java Exception Handling
- How the Exception Handling Works in Java
- Three Types of Exceptions in Java
- Exceptions Hierarchy in Java
- Java Chained Exceptions
- Exception Handling Keywords in Java
- Java try/catch block
- Java throw Keyword
- Java throws Keyword
- Java finally Block
- The try-with-resources Statement
- How to Create Custom Exceptions in Java
- Steps to Create Custom Exception in Java
- Java Checked and Unchecked Exceptions Examples
- Java Exception Handling Best Practices
- How to Fix and Avoid Null Pointer Exceptions in Java
- How to Fix InterruptedException in Java
- throw vs throws in Java with Example
- Checked and Unchecked Exception in Java With Example
- 20 Java Exception Handling Interview Questions and Answers
- throw vs throws in Java with Example
- Checked and Unchecked Exception in Java With Example
- Java Exception Handling Quiz - MCQ - Multiple Choice Questions
- Difference between final, finally, and finalize in Java
- Difference between Error and Exception in Java
- Checked Exception vs Unchecked Exception in Java
My Top and Bestseller Udemy Courses. The sale is going on with a 70 - 80% discount. The discount coupon has been added to each course below:

Build REST APIs with Spring Boot 4, Spring Security 7, and JWT
![[NEW] Learn Apache Maven with IntelliJ IDEA and Java 25](https://img-c.udemycdn.com/course/750x422/6852721_b512_2.jpg "[NEW] Learn Apache Maven with IntelliJ IDEA and Java 25")
[NEW] Learn Apache Maven with IntelliJ IDEA and Java 25

ChatGPT + Generative AI + Prompt Engineering for Beginners
")
Spring 7 and Spring Boot 4 for Beginners (Includes 8 Projects)
Available in Udemy for Business

Building Real-Time REST APIs with Spring Boot - Blog App
Available in Udemy for Business

Building Microservices with Spring Boot and Spring Cloud
Available in Udemy for Business

Java Full-Stack Developer Course with Spring Boot and React JS
Available in Udemy for Business

Build 5 Spring Boot Projects with Java: Line-by-Line Coding

Testing Spring Boot Application with JUnit and Mockito
Available in Udemy for Business

Spring Boot Thymeleaf Real-Time Web Application - Blog App
Available in Udemy for Business

Master Spring Data JPA with Hibernate
Available in Udemy for Business

Spring Boot + Apache Kafka Course - The Practical Guide
Available in Udemy for Business


")

Comments
Post a Comment
Leave Comment