
🎓 Top 15 Udemy Courses (80-90% Discount): My Udemy Courses - Ramesh Fadatare — All my Udemy courses are real-time and project oriented courses.
▶️ Subscribe to My YouTube Channel (178K+ subscribers): Java Guides on YouTube
▶️ For AI, ChatGPT, Web, Tech, and Generative AI, subscribe to another channel: Ramesh Fadatare on YouTube
In this blog post, we will discuss some important Spring Boot interview questions for 2+ years of experienced candidates.

1. What is Spring Boot, and how does it differ from the Spring framework?
Spring Boot is an open-source framework built on top of the Spring framework. It provides a streamlined and opinionated approach to developing Java applications by simplifying the setup and configuration process. While Spring is a comprehensive framework that provides various modules for different functionalities, Spring Boot focuses on making it easier to create standalone, production-ready Spring-based applications with minimal upfront configuration.
Here are the key differences between Spring Boot and the Spring framework:
Configuration: In traditional Spring, the configuration process can be complex and requires explicit XML or Java-based configuration. Spring Boot, on the other hand, follows a convention-over-configuration approach and aims to minimize the amount of configuration required. It provides sensible defaults and auto-configuration, reducing the need for explicit configuration.
Opinionated vs. Flexible: Spring Boot takes an opinionated approach, making decisions and providing defaults to simplify development. It aims to minimize the need for decision-making and configuration choices by providing sensible defaults. Traditional Spring, on the other hand, provides more flexibility and allows for fine-grained customization. Developers have more control over configuring components and can choose from various modules and configurations based on their specific requirements.
Development and Deployment: Spring applications typically require deploying WAR files to an external servlet container. Spring Boot includes an embedded servlet container (Tomcat, Jetty, or Undertow) by default, making it easier to package and deploy applications as standalone JAR files. This simplifies deployment and reduces external dependencies.
Auto-configuration: Spring Boot uses auto-configuration to automatically configure beans based on the classpath dependencies present in the project. It intelligently sets up default configurations for commonly used libraries and frameworks, simplifying the setup process. Traditional Spring requires explicit configuration for each component.
Ease of Setup: Spring Boot simplifies the setup process by providing starters. Starters are a set of opinionated dependencies that encapsulate common configurations and dependencies needed for specific functionalities (e.g., database connectivity, security, web services). They allow developers to add required dependencies with minimal effort and reduce version compatibility issues. In traditional Spring, developers need to manually configure dependencies and manage version compatibility.
Spring Boot Actuator: Spring Boot includes the Spring Boot Actuator, which provides production-ready features out of the box. It allows developers to monitor and manage the application using built-in endpoints for health checks, metrics, logging, and more. Traditional Spring does not provide these features by default.
2. What are the Key features of Spring Boot?
Here are some key features of Spring Boot:
Auto-configuration: Spring Boot provides automatic configuration for various components based on the classpath dependencies present in the project. It eliminates the need for manual configuration, reduces boilerplate code, and simplifies the setup process.
Standalone Applications: Spring Boot allows you to package your application as a standalone JAR file. It includes an embedded servlet container (Tomcat, Jetty, or Undertow) by default, making it easy to deploy and run applications without requiring an external server.
Spring Boot Starters: Starters are a set of opinionated dependencies that simplify dependency management. They encapsulate common configurations and dependencies needed for specific functionalities, such as database connectivity, security, web services, and more. Starters make it easy to add required dependencies with minimal effort and reduce version compatibility issues.
Production-Ready Features: Spring Boot includes several features that are essential for building production-ready applications. The Spring Boot Actuator provides endpoints for health checks, metrics, logging, and monitoring. It allows you to monitor and manage your application in a production environment easily.
Simplified Dependency Management: Spring Boot provides a streamlined approach to managing dependencies. It resolves conflicts and manages version compatibility, reducing the effort required for dependency management and ensuring a smooth development experience.
Externalized Configuration: Spring Boot allows you to externalize configuration properties, such as database connection details, server port, and logging settings. It supports various configuration formats like properties files, YAML files, environment variables, and more. The externalized configuration makes it easier to configure and manage application properties in different environments.
Embedded Databases: Spring Boot supports embedded databases like H2, HSQLDB, and Derby. These databases are lightweight and can be easily integrated into your application, making them convenient for development and testing purposes.
Spring Boot Actuator: Spring Boot Actuator provides production-ready features out of the box. It allows developers to monitor and manage the application using built-in endpoints for health checks, metrics, logging, and more. Traditional Spring does not provide these features by default.
Integration with Spring Ecosystem: Spring Boot seamlessly integrates with the broader Spring ecosystem, including Spring Security, Spring Data, Spring Cloud, and more. It leverages the power of these frameworks to provide additional functionality and simplify the development of complex applications.
These are just a few key features of Spring Boot. The framework continues to evolve, and new features and enhancements are regularly introduced to further improve the developer experience and make it easier to build robust and scalable applications.
3. What is Spring Boot Auto-configuration?
Spring Boot Auto-configuration is a feature that automatically configures the Spring framework and its components based on the dependencies present in the classpath. It aims to minimize the need for manual configuration and reduce boilerplate code.
One more example, If you have any embedded database drivers in the classpath, such as H2 or HSQL, and if you haven’t configured a DataSource bean explicitly, then Spring Boot will automatically register a DataSource bean using in-memory database settings.
4. What are the different ways to create a Spring Boot application?
1. Using Spring Initializr - Create a Spring boot project using Spring Initializr and import in any IDE - Eclipse STS, Eclipse, IntelliJ idea, VSCode, Netbeans
2. Using Spring Starter Project in STS (Eclipse) - You can directly create a Spring boot project in STS using the Spring Starter Project option.
3. Spring Boot CLI - The Spring Boot CLI is a command-line tool that you can use if you want to quickly develop a Spring application.
For example, while developing the REST service or web application; we can use libraries like Spring MVC, Tomcat, and Jackson – a lot of dependencies for a single application. the spring-boot-starter-web starter can help to reduce the number of manually added dependencies just by adding the spring-boot-starter-web dependency.
So instead of manually specifying the dependencies just add one spring-boot-starter-web starter as in the following example:
2. Using Spring Starter Project in STS (Eclipse) - You can directly create a Spring boot project in STS using the Spring Starter Project option.
3. Spring Boot CLI - The Spring Boot CLI is a command-line tool that you can use if you want to quickly develop a Spring application.
5. Explain the steps to build REST API using Spring Boot?
To build a REST API using Spring Boot, you can follow these steps:
Step 1: Set up your development environment
- Install Java Development Kit (JDK) on your machine.
- Set up your preferred Integrated Development Environment (IDE) such as IntelliJ IDEA, Eclipse, or Visual Studio Code.
- Install Apache Maven or use the built-in Maven wrapper provided by Spring Boot.
Step 2: Create a new Spring Boot project
Use your IDE or go to the Spring Initializr website (https://start.spring.io/). Select the necessary dependencies, including "Spring Web" for building REST APIs. Generate the project, download the zip file, and extract it to your desired location.
Step 3: Implement the REST API
Open your project in your IDE. Create a new class "UserController". and annotate the class with @RestController to indicate that it is a REST controller. Implement the desired HTTP methods (GET, POST, PUT, DELETE) using appropriate annotations such as @GetMapping, @PostMapping, @PutMapping, and @DeleteMapping. Define the necessary request mappings, method signatures, and return types for each API endpoint. Implement the business logic and use appropriate data structures or Spring Data JPA for data access.
Step 4: Run and test the REST API
Build your project using Maven or run the Maven wrapper command. Launch the application by running the main method in your Spring Boot Application class. Once the application is up and running, you can test the API endpoints using tools like Postman or cURL. Send requests to the appropriate URLs (e.g., http://localhost:8080/api/users) and verify the responses.
Complete step-by-step example: Spring Boot Tutorial for Beginners Step by Step
6. Explain @SpringBootApplication Annotation?
@SpringBootApplication is a convenience annotation provided by the Spring Boot framework. It is used to bootstrap a Spring Boot application and automatically configures several key components.
Here's what @SpringBootApplication does:
Combines Multiple Annotations: @SpringBootApplication combines three commonly used annotations: @Configuration, @EnableAutoConfiguration, and @ComponentScan. By applying @SpringBootApplication, you don't need to explicitly annotate your main class with these individual annotations.
@Configuration: The @Configuration annotation indicates that the class contains bean configurations and should be processed by the Spring IoC container. It allows you to define beans and their dependencies using annotations like @Bean.
@EnableAutoConfiguration: The @EnableAutoConfiguration annotation enables Spring Boot's auto-configuration mechanism. It automatically configures the Spring application based on the classpath dependencies, project settings, and environment. Auto-configuration eliminates the need for manual configuration and reduces boilerplate code.
@ComponentScan: The @ComponentScan annotation tells Spring where to look for components (such as controllers, services, and repositories) to be managed by the Spring IoC container. It scans the specified packages and registers the annotated classes as beans.
Overall, @SpringBootApplication is a convenient way to enable the essential Spring Boot features in your application. By using this annotation, you can bootstrap your Spring Boot application with minimal configuration and take advantage of auto-configuration, component scanning, and other features provided by Spring Boot.
It's important to note that @SpringBootApplication is typically applied to the main class of your Spring Boot application. This class serves as the entry point for your application and is responsible for starting the embedded server and initializing the Spring context.
Check out the @EnableAutoConfiguration annotation example - Spring Boot @EnableAutoConfiguration Annotation with Example
Check out the @Configuration annotation example - Spring @Configuration Annotation with Example

7. What is Spring Boot dependency management?
The Spring Boot dependency management feature simplifies the process of managing dependencies in a Spring Boot application. It ensures version compatibility, reduces the chances of conflicts and runtime issues, and provides a smooth development experience. By leveraging this feature, developers can focus on building their applications without worrying about intricate dependency management tasks.
8. What are Spring boot starters and name a few important Spring boot starter dependencies?
Spring Boot Starters are a set of convenient dependency descriptors that you can include in your application. You get a one-stop shop for all the Spring and related technology that you need, without having to hunt through sample code and copy-paste loads of dependency descriptors.For example, while developing the REST service or web application; we can use libraries like Spring MVC, Tomcat, and Jackson – a lot of dependencies for a single application. the spring-boot-starter-web starter can help to reduce the number of manually added dependencies just by adding the spring-boot-starter-web dependency.
So instead of manually specifying the dependencies just add one spring-boot-starter-web starter as in the following example:
<dependency>
    <groupId>org.springframework.boot</groupId>
    <artifactId>spring-boot-starter-web</artifactId>
</dependency>
Few commonly used Spring boot starters:
spring-boot-starter: core starter, including auto-configuration support, logging, and YAML
spring-boot-starter-aop: for aspect-oriented programming with Spring AOP and AspectJ
spring-boot-starter-data-jpa: for using Spring Data JPA with Hibernate
spring-boot-starter-security: for using Spring Security
spring-boot-starter-test: for testing Spring Boot applications
spring-boot-starter-web: for building web, including RESTful, applications using Spring MVC.
spring-boot-starter-data-mongodb: Starter for using MongoDB document-oriented database and Spring Data MongoDB
spring-boot-starter-data-rest: Starter for exposing Spring Data repositories over REST using Spring Data REST
spring-boot-starter-webflux: Starter for building WebFlux applications using Spring Framework’s Reactive Web support
You can find all the Spring Boot Starters at Important Spring Boot Starters with Examples
9. How does Spring Enable Creating Production-Ready Applications in a Quick Time?
Spring Boot aims to enable production-ready applications in a quick time. Spring Boot provides a few non-functional features out of the box like caching, logging, monitoring, and embedded servers.spring-boot-starter-actuator - To use advanced features like monitoring & tracing to your application out of the box
spring-boot-starter-undertow, spring-boot-starter-jetty, spring-boot-starter-tomcat - To pick your specific choice of Embedded Servlet Container
spring-boot-starter-logging - For Logging using log back
spring-boot-starter-cache - Enabling Spring Framework’s caching support
10. What is the Minimum Baseline Java Version for Spring Boot 3?
Spring Boot 3.0 requires Java 17 or later. It also requires Spring Framework 6.0.
11. What are Different Ways of Running Spring Boot Application?
Spring Boot offers several ways of running Spring Boot applications. I would like to suggest five ways we can run the Spring Boot Application
- Running from an IDE
- Running as a Packaged Application
- Using the Maven Plugin
- Using External Tomcat
- Using the Gradle Plugin
Read more at Different Ways of Running Spring Boot Application
12. What is the Spring Boot Actuator and its Features?
Spring Boot Actuator provides production-ready features for monitoring and managing Spring Boot applications. It offers a set of built-in endpoints and metrics that allow you to gather valuable insights into the health, performance, and management of your application.Here are some key features provided by Spring Boot Actuator:
Health Monitoring: The actuator exposes a /health endpoint that provides information about the health status of your application. It can indicate whether your application is up and running, any potential issues, and detailed health checks for different components, such as the database, cache, and message brokers.
Metrics Collection: The actuator collects various metrics about your application's performance and resource utilization. It exposes endpoints like /metrics and /prometheus to retrieve information about HTTP request counts, memory usage, thread pool statistics, database connection pool usage, and more. These metrics can be integrated with monitoring systems like Prometheus, Graphite, or Micrometer.
Auditing and Tracing: Actuator allows you to track and monitor the activities happening within your application. It provides an /auditevents endpoint to view audit events like login attempts, database changes, or any custom events. Additionally, Actuator integrates with distributed tracing systems like Zipkin or Spring Cloud Sleuth to trace requests as they flow through different components.
Environment Information: The actuator exposes an /info endpoint that displays general information about your application, such as version numbers, build details and any custom information you want to include. It is useful for providing diagnostic details about your application in runtime environments.
Configuration Management: Actuator provides an /configprops endpoint that lists all the configuration properties used in your application. It helps in understanding the current configuration state and identifying potential issues or inconsistencies.
Remote Management: Actuator allows you to manage and interact with your application remotely. It provides various endpoints, such as /shutdown to gracefully shut down the application, /restart to restart the application, and /actuator to list all available endpoints. These endpoints can be secured using Spring Security for proper access control.
Custom Endpoints: Actuator allows you to define custom endpoints to expose additional management or monitoring information specific to your application. You can create your own custom Actuator endpoints by extending the AbstractEndpoint class or implementing the Endpoint interface.
Spring Boot Actuator is a powerful tool that facilitates the monitoring, management, and troubleshooting of Spring Boot applications. Its features make it easier to gain insights into the health, performance, and behavior of your application, enabling efficient monitoring and effective management in production environments.
Enabling the Actuator
The simplest way to enable the features is to add a dependency to the spring-boot-starter-actuator ‘Starter’. To add the actuator to a Maven-based project, add the following ‘Starter’ dependency:
 <dependency>
      <groupId>org.springframework.boot</groupId>
      <artifactId>spring-boot-starter-actuator</artifactId>
 </dependency>
For Gradle, use the following declaration:
dependencies {
    compile("org.springframework.boot:spring-boot-starter-actuator")
}
13. How to Use Jetty Instead of Tomcat in Spring-Boot-Starter-Web?
Remove the existing default tomcat dependency from spring-boot-starter-web and add the spring-boot-starter-jetty dependency:
<dependency>
    <groupId>org.springframework.boot</groupId>
    <artifactId>spring-boot-starter-web</artifactId>
    <exclusions>
        <exclusion>
            <groupId>org.springframework.boot</groupId>
            <artifactId>spring-boot-starter-tomcat</artifactId>
        </exclusion>
    </exclusions>
</dependency>
<dependency>
    <groupId>org.springframework.boot</groupId>
    <artifactId>spring-boot-starter-jetty</artifactId>
</dependency>
14. What is the default port of the embedded Tomcat server in spring boot?
The default port of the embedded Tomcat server in Spring Boot is 8080. When you run a Spring Boot application with an embedded Tomcat server, it listens for incoming HTTP requests on port 8080 by default.
You can access your application by navigating to http://localhost:8080 in your web browser. If port 8080 is already in use, Spring Boot will attempt to use the next available port (8081, 8082, and so on) until it finds an open port.
You can customize the default port by specifying the desired port number in the application.properties or application.yml configuration file. For example, you can set server.port=9090 to change the default port to 9090.
15. What is the default context path in spring boot?
In Spring Boot, the default context path is /. This means that when you run a Spring Boot application, the root URL will be mapped to the application without any additional path segments. For example, if your application is running on http://localhost:8080, accessing that URL will be equivalent to accessing http://localhost:8080/.
You can configure a different context path by specifying the desired value in the server.servlet.context-path property in the application.properties or application.yml configuration file. For example, setting server.servlet.context-path=/myapp would change the context path to /myapp, and your application would be accessible at http://localhost:8080/myapp.
16. What is the difference between @RestController and @Controller in Spring Boot?
In Spring Boot, both @RestController and @Controller are annotations used to define components that handle HTTP requests. However, there is a slight difference in their behavior and purpose :@Controller: The @Controller annotation is used to mark a class as a Spring MVC controller. It is typically used in traditional Spring MVC applications. Controllers annotated with @Controller are responsible for handling requests and returning a response. These controllers typically return a view name or a ModelAndView object, which is resolved by a view resolver to render the appropriate view.
Example:
Example:
@Controller
public class MyController {
    @GetMapping("/hello")
    public String sayHello() {
        return "hello";
    }
}
@RestController: The @RestController annotation is an extension of the @Controller annotation and is specifically tailored for RESTful web services. It combines the functionality of @Controller and @ResponseBody. Controllers annotated with @RestController return the response directly as the body of the HTTP response, typically in JSON or XML format.
Example:
@RestController
public class MyRestController {
    @GetMapping("/hello")
    public String sayHello() {
        return "Hello, world!";
    }
}
The key difference is that @RestController eliminates the need for annotating individual request-handling methods with @ResponseBody. Every method in a @RestController is assumed to be a @ResponseBody by default, simplifying the process of building RESTful APIs.
17. How to Change Default Embedded Tomcat Server Port and Context Path in Spring Boot Application?
By default, the embedded tomcat server starts on port 8080 and by default, the context path is “/”. Now let's change the default port and context path by defining properties in an application.properties file -
/src/main/resources/application.properties
server.port=8080
server.servlet.context-path=/springboot2webapp

Read more at Spring Boot How to Change Port and Context Path.
18. What Embedded servers does Spring Boot support?
Spring Boot provides support for several embedded servers out-of-the-box. These embedded servers allow you to package your Spring Boot application as a standalone executable JAR file, containing the application and the server runtime.
Here are the embedded servers supported by Spring Boot:
Apache Tomcat: Tomcat is the default embedded server in Spring Boot. It provides a robust and widely used HTTP server and servlet container. Spring Boot uses Tomcat as the default embedded server when you include the spring-boot-starter-web dependency.
Jetty: Jetty is another popular choice for embedded servers. It is lightweight, fast, and has a small memory footprint. Spring Boot provides support for Jetty through the spring-boot-starter-jetty dependency.
Undertow: Undertow is a high-performance web server designed for modern applications. It is known for its scalability and low resource consumption. Spring Boot offers support for Undertow through the spring-boot-starter-undertow dependency.
By default, when you create a Spring Boot application, it uses Apache Tomcat as the embedded server. However, you can easily switch to Jetty or Undertow by excluding the Tomcat dependency and including the desired server dependency in your project's build configuration.
19. How to use logging with Spring Boot?
In Spring Boot, logging is handled by the underlying logging framework, such as Logback, Log4j2, or Java Util Logging (JUL). Spring Boot provides a default logging configuration and makes it easy to configure and customize logging in your application.
Here's how you can use logging with Spring Boot:
Add Logging Dependency: Start by including the logging dependency in your project. Spring Boot includes the spring-boot-starter-logging dependency by default, which provides the necessary logging libraries. You can also add additional logging dependencies based on your preference, such as log back-classic or log4j2.
Configure Logging: Spring Boot allows you to configure logging through the application.properties or application.yml configuration file. You can specify various logging-related properties, such as log levels, log formats, and output destinations. For example, you can set the log level to DEBUG for all loggers using logging.level.root=DEBUG, or configure a specific logger using logging.level.com.example=DEBUG.
Use Logging Statements: In your application code, you can use logging statements to generate log messages. Spring Boot supports the SLF4J (Simple Logging Facade for Java) API, which provides a unified interface for various logging frameworks. You can use the LoggerFactory class to obtain a logger instance and use its methods, such as info(), debug(), error(), etc., to log messages at different log levels. For example:
import org.slf4j.Logger;
import org.slf4j.LoggerFactory;

public class MyClass {
    private static final Logger logger = LoggerFactory.getLogger(MyClass.class);

    public void doSomething() {
        logger.info("This is an informational log message");
        logger.debug("This is a debug log message");
        logger.error("This is an error log message");
    }
}
View Log Output: By default, Spring Boot logs are printed to the console. You can view the log output in your IDE console or the terminal window where you started your Spring Boot application. Additionally, you can configure the log output to be written to a file or forwarded to external log management systems, such as Elasticsearch, Logstash, or Splunk.
Customize Logging Configuration: If you need more advanced logging configuration, you can provide a custom logging configuration file, such as logback.xml, log4j2.xml, or logging.properties, and place it in the classpath. Spring Boot will automatically pick up and use your custom configuration file. By following these steps, you can effectively use logging in your Spring Boot application.
Logging plays a crucial role in monitoring and troubleshooting your application, so it's important to configure it properly and use meaningful log messages to aid in debugging and maintenance.
20. What is the Spring Boot Starter Parent and How to Use it?
The Spring Boot Starter Parent is a special Maven POM (Project Object Model) that provides a pre-configured set of default dependencies and plugins for building Spring Boot applications. It helps to simplify the dependency management and build configuration process by providing a consistent and opinionated setup.By setting the Spring Boot Starter Parent as your project's parent, you inherit its configuration, which includes the following:
- Default plugin configurations, such as the Maven Compiler Plugin, Maven Surefire Plugin, and Spring Boot Maven Plugin.
- Default dependency versions for various Spring Boot dependencies, including Spring Framework, Spring Boot Starter modules, and other related libraries.
- Default repositories for resolving dependencies, including the Maven Central Repository and the Spring Milestone Repository.
- Default resource filtering and packaging configurations.
21. Explain Three-Layer Architecture in Spring Boot Application
In a Spring Boot application, you can implement the Three-Layer Architecture to achieve a modular and maintainable application structure. Here's how you can organize your Spring Boot application based on the Three-Layer Architecture.
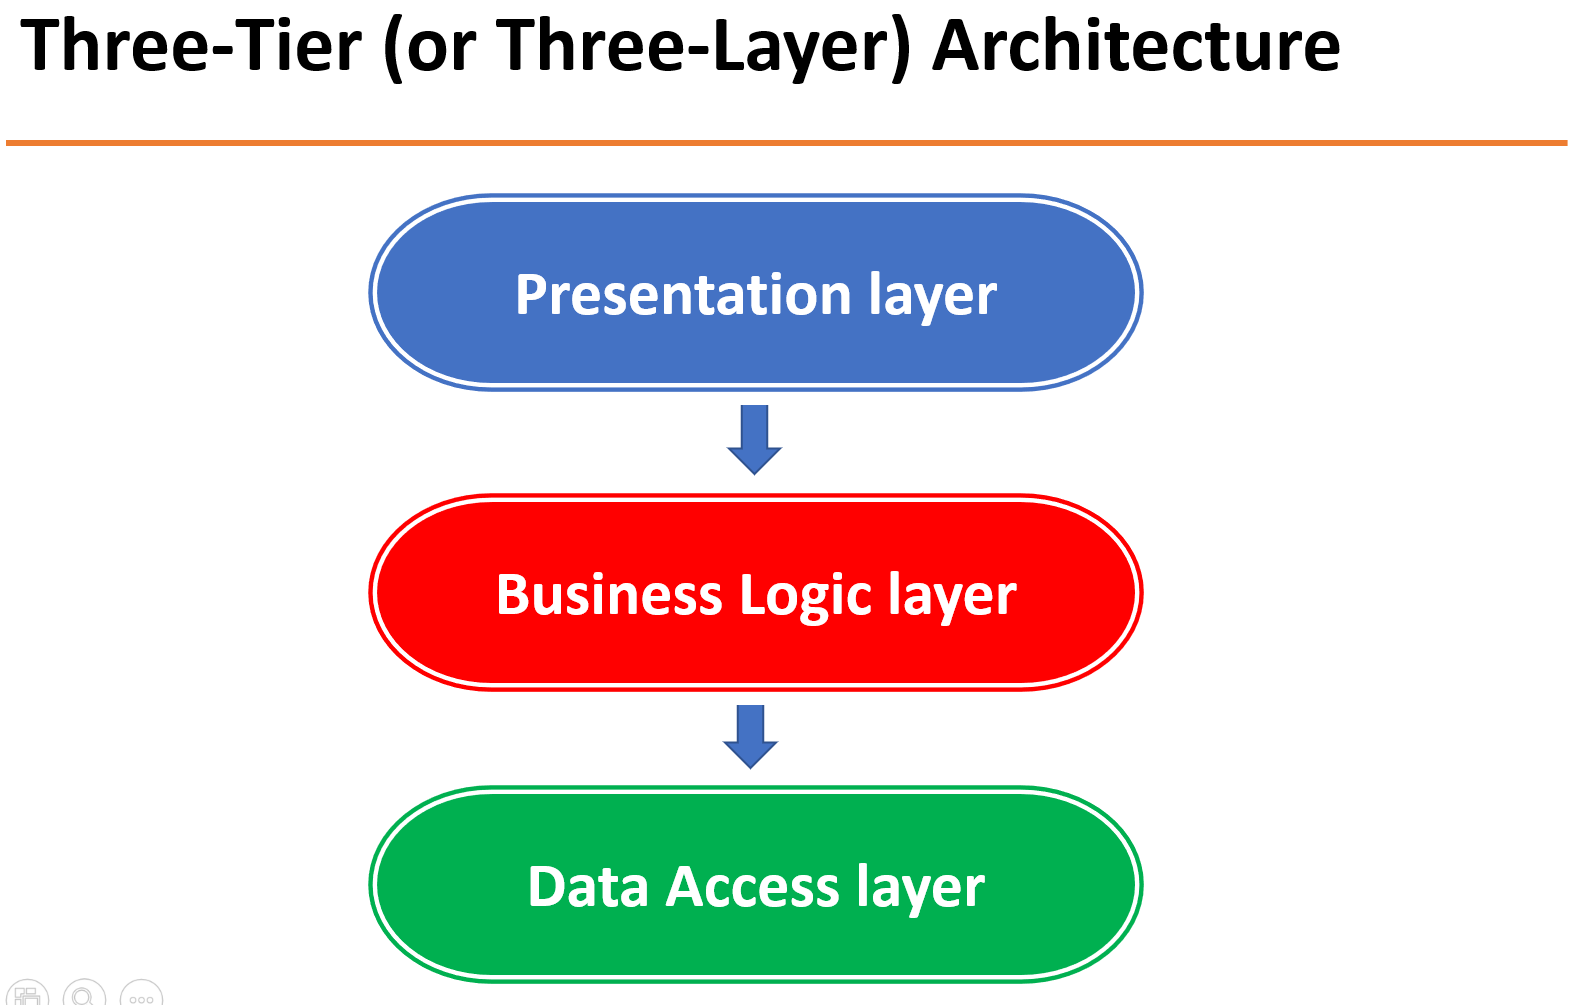
Presentation layer: The presentation layer handles the interaction with users, exposes APIs, and forwards user requests to the appropriate components in the business logic layer.
Business logic (or Application) layer: This layer contains the business logic that drives the application’s core functionalities. Like making decisions, calculations, evaluations, and processing the data passing between the other two layers.
Data access layer (or Data) layer: The data persistence layer handles the interaction with the database or other data sources, performing CRUD operations, querying data, and managing transactions.
22. Explain the Key Difference between Spring and Spring Boot.
Spring is a comprehensive framework for building Java applications, providing various modules for different concerns like dependency injection, MVC, data access, security, etc. Spring Boot, on the other hand, is a framework built on top of Spring that aims to simplify the development process by providing conventions, auto-configuration, and embedded servers.
23. How can you override the default configuration in Spring Boot?
You can override the default configuration in Spring Boot using various methods:
- Providing custom configuration properties in application.properties or application.yml files.
- Creating custom configuration classes and using @Configuration and @Value annotations.
- Using command-line arguments or system properties to override specific configuration properties.
24. What is the purpose of the application.properties (or application.yml) file?
The application.properties or application.yml file is used to specify configuration properties for the Spring Boot application. It allows you to configure various aspects such as the server port, database connection settings, logging configuration, and more.
25. How can you handle exceptions in Spring Boot?
In Spring Boot, you can handle exceptions using @ExceptionHandler methods in your controllers or by implementing the HandlerExceptionResolver interface. Additionally, you can use global exception handling by creating an @ControllerAdvice class and annotating methods with @ExceptionHandler.
26. What is the purpose of the Spring Boot DevTools?
Spring Boot DevTools is a module that provides a set of tools to improve the development experience. It offers features like automatic restart of the application on code changes, live reloading of static resources, and enhanced logging for development purposes.
My Top and Bestseller Udemy Courses. The sale is going on with a 70 - 80% discount. The discount coupon has been added to each course below:

Build REST APIs with Spring Boot 4, Spring Security 7, and JWT
🆕 High-Demand
80–90% OFF
![[NEW] Learn Apache Maven with IntelliJ IDEA and Java 25](https://img-c.udemycdn.com/course/750x422/6852721_b512_2.jpg "[NEW] Learn Apache Maven with IntelliJ IDEA and Java 25")
[NEW] Learn Apache Maven with IntelliJ IDEA and Java 25
🆕 High-Demand
80–90% OFF

ChatGPT + Generative AI + Prompt Engineering for Beginners
🚀 Trending Now
80–90% OFF
")
Spring 7 and Spring Boot 4 for Beginners (Includes 8 Projects)
🔥 Bestseller
80–90% OFF
Available in Udemy for Business
Available in Udemy for Business

Building Real-Time REST APIs with Spring Boot - Blog App
🔥 Bestseller
80–90% OFF
Available in Udemy for Business
Available in Udemy for Business

Building Microservices with Spring Boot and Spring Cloud
🌟 Top Rated
80–90% OFF
Available in Udemy for Business
Available in Udemy for Business

Java Full-Stack Developer Course with Spring Boot and React JS
🔥 Bestseller
80–90% OFF
Available in Udemy for Business
Available in Udemy for Business

Build 5 Spring Boot Projects with Java: Line-by-Line Coding
🌟 Top Rated
80–90% OFF

Testing Spring Boot Application with JUnit and Mockito
🔥 Bestseller
80–90% OFF
Available in Udemy for Business
Available in Udemy for Business

Spring Boot Thymeleaf Real-Time Web Application - Blog App
🔥 Bestseller
80–90% OFF
Available in Udemy for Business
Available in Udemy for Business

Master Spring Data JPA with Hibernate
🔥 Bestseller
80–90% OFF
Available in Udemy for Business
Available in Udemy for Business

Spring Boot + Apache Kafka Course - The Practical Guide
🎓 Student Favorite
80–90% OFF
Available in Udemy for Business
Available in Udemy for Business


")

Comments
Post a Comment
Leave Comment