
🎓 Check Out My Top 25 Udemy Courses (80-90% Discount): My Udemy Courses - Ramesh Fadatare
In this post, I show you how to use JRadioButton class to create a Radio button in Swing-based application.
Check out complete Swing tutorial at https://www.javaguides.net/p/java-swing-tutorial.html.
JRadioButton allows the user to select a single exclusive choice from a group of options. It is used with the ButtonGroup component.
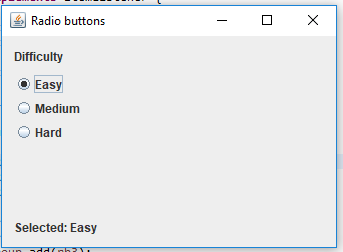
Java Swing Radio Button Example
The example has three radio buttons; the value of the selected radio button is shown in a status bar.
package net.sourcecodeexamples.swingexample.components2;

import javax.swing.ButtonGroup;
import javax.swing.GroupLayout;
import javax.swing.JComponent;
import javax.swing.JFrame;
import javax.swing.JLabel;
import javax.swing.JPanel;
import javax.swing.JRadioButton;
import javax.swing.LayoutStyle;
import java.awt.EventQueue;
import java.awt.event.ItemEvent;
import java.awt.event.ItemListener;

import static javax.swing.LayoutStyle.ComponentPlacement.RELATED;

public class RadioButtonExample extends JFrame
implements ItemListener {

    private static final long serialVersionUID = 1L;
    private JLabel sbar;

    private void initializeUI() {

        JLabel lbl = new JLabel("Difficulty");

        ButtonGroup group = new ButtonGroup();

        JRadioButton rb1 = new JRadioButton("Easy", true);
        JRadioButton rb2 = new JRadioButton("Medium");
        JRadioButton rb3 = new JRadioButton("Hard");

        group.add(rb1);
        group.add(rb2);
        group.add(rb3);

        sbar = new JLabel("Selected: Easy");

        rb1.addItemListener(this);
        rb2.addItemListener(this);
        rb3.addItemListener(this);

        createLayout(lbl, rb1, rb2, rb3, sbar);

        setSize(350, 250);
        setTitle("Radio buttons");
        setLocationRelativeTo(null);
        setDefaultCloseOperation(JFrame.EXIT_ON_CLOSE);
    }

    @Override
    public void itemStateChanged(ItemEvent e) {

        int sel = e.getStateChange();

        if (sel == ItemEvent.SELECTED) {

            JRadioButton button = (JRadioButton) e.getSource();
            String text = button.getText();

            StringBuilder sb = new StringBuilder("Selected: ");
            sb.append(text);

            sbar.setText(sb.toString());
        }
    }

    private void createLayout(JComponent...arg) {

        JPanel pane = (JPanel) getContentPane();
        GroupLayout gl = new GroupLayout(pane);
        pane.setLayout(gl);

        gl.setAutoCreateContainerGaps(true);

        gl.setHorizontalGroup(gl.createParallelGroup()
            .addComponent(arg[0])
            .addComponent(arg[1])
            .addComponent(arg[2])
            .addComponent(arg[3])
            .addComponent(arg[4])
        );

        gl.setVerticalGroup(gl.createSequentialGroup()
            .addComponent(arg[0])
            .addPreferredGap(LayoutStyle.ComponentPlacement.UNRELATED)
            .addComponent(arg[1])
            .addComponent(arg[2])
            .addComponent(arg[3])
            .addPreferredGap(RELATED,
                GroupLayout.DEFAULT_SIZE, Short.MAX_VALUE)
            .addComponent(arg[4])
        );
    }

    public static void main(String[] args) {

        EventQueue.invokeLater(() -> {
            RadioButtonExample radioButtonExample = new RadioButtonExample();
            radioButtonExample.initializeUI();
            radioButtonExample.setVisible(true);
        });
    }
}
Let's understand the above program.
We created three JRadioButtons and placed into the ButtonGroup. The first radio button is preselected.
        ButtonGroup group = new ButtonGroup();

        JRadioButton rb1 = new JRadioButton("Easy", true);
        JRadioButton rb2 = new JRadioButton("Medium");
        JRadioButton rb3 = new JRadioButton("Hard");

        group.add(rb1);
        group.add(rb2);
        group.add(rb3);
All three radio buttons share one ItemListener:
rb1.addItemListener(this);
rb2.addItemListener(this);
rb3.addItemListener(this);
When we select a radio button, two events are actually triggered: one for selection and one for deselection. We are interested in the selection.
if (sel == ItemEvent.SELECTED) {
}
We get the source of the event with the getSource() method and get the text label of the radio button:
JRadioButton button = (JRadioButton) e.getSource();
String text = button.getText();
We build the string and set it to the label:
StringBuilder sb = new StringBuilder("Selected: ");
sb.append(text);
sbar.setText(sb.toString());
Output
Related Swing Examples
- Java Swing Exit Button - In this post, I show you how to exit a Swing application when clicking on the exit button.
- Swing ToolTip Tutorial with Example - In this tutorial, we will learn how to add tooltip text to a Swing component.
- Java Swing BorderLayout Example - In this example, we will learn how to use BorderLayout in GUI/swing based applications.
- Java Swing GridLayout Tutorial with Examples - In this tutorial, we will learn how to use GridLayout in GUI/swing based applications.
- Swing Mouse Move Events using MouseMotionAdapter - In this tutorial, we will learn how to receive mouse motion events using MouseMotionAdapter.
- Java Swing CheckBox Example - In this post, I show you how to use JCheckBox class to create a Radio button in a Swing-based application.
- Java Swing Radio Button Example - In this post, I show you how to use JRadioButton class to create a Radio button in a Swing-based application.
- Java Swing Progress Bar Example - In this post, I show you how to create a progress bar using the JProgressBar component in swing-based applications.
- Java Swing Combo Box Example - In this post, I show you how to create a combo box using a JComboBox component in swing-based applications.
- Java Swing Slider Example - In this post, I show you how to create a slider using the JSlider component in swing-based applications.
- Java Swing Toggle Button Example - In this post, we will learn how to create a toggle button using the JToggleButton component in swing-based applications.
My Top and Bestseller Udemy Courses. The sale is going on with a 70 - 80% discount. The discount coupon has been added to each course below:

Build REST APIs with Spring Boot 4, Spring Security 7, and JWT
🆕 High-Demand
80–90% OFF
![[NEW] Learn Apache Maven with IntelliJ IDEA and Java 25](https://img-c.udemycdn.com/course/750x422/6852721_b512_2.jpg "[NEW] Learn Apache Maven with IntelliJ IDEA and Java 25")
[NEW] Learn Apache Maven with IntelliJ IDEA and Java 25
🆕 High-Demand
80–90% OFF

ChatGPT + Generative AI + Prompt Engineering for Beginners
🚀 Trending Now
80–90% OFF
")
Spring 7 and Spring Boot 4 for Beginners (Includes 8 Projects)
🔥 Bestseller
80–90% OFF
Available in Udemy for Business
Available in Udemy for Business

Building Real-Time REST APIs with Spring Boot - Blog App
🔥 Bestseller
80–90% OFF
Available in Udemy for Business
Available in Udemy for Business

Building Microservices with Spring Boot and Spring Cloud
🌟 Top Rated
80–90% OFF
Available in Udemy for Business
Available in Udemy for Business

Java Full-Stack Developer Course with Spring Boot and React JS
🔥 Bestseller
80–90% OFF
Available in Udemy for Business
Available in Udemy for Business

Build 5 Spring Boot Projects with Java: Line-by-Line Coding
🌟 Top Rated
80–90% OFF

Testing Spring Boot Application with JUnit and Mockito
🔥 Bestseller
80–90% OFF
Available in Udemy for Business
Available in Udemy for Business

Spring Boot Thymeleaf Real-Time Web Application - Blog App
🔥 Bestseller
80–90% OFF
Available in Udemy for Business
Available in Udemy for Business

Master Spring Data JPA with Hibernate
🔥 Bestseller
80–90% OFF
Available in Udemy for Business
Available in Udemy for Business

Spring Boot + Apache Kafka Course - The Practical Guide
🎓 Student Favorite
80–90% OFF
Available in Udemy for Business
Available in Udemy for Business


")

Comments
Post a Comment
Leave Comment