
🎓 Top 15 Udemy Courses (80-90% Discount): My Udemy Courses - Ramesh Fadatare — All my Udemy courses are real-time and project oriented courses.
▶️ Subscribe to My YouTube Channel (178K+ subscribers): Java Guides on YouTube
▶️ For AI, ChatGPT, Web, Tech, and Generative AI, subscribe to another channel: Ramesh Fadatare on YouTube
In this tutorial, we will discuss how to set up a Spring Boot project with WebSocket messaging and Angular 8.
All Angular 8 tutorials and examples at https://www.javaguides.net/p/angular-8-tutorial-with-examples.html
What we will build?
Basically, we will create two projects:
- springboot-websocket (backend): This project is used to develop a WebSocket endpoint at the server-side using spring boot, STOMP, and sock js support.
- angular8-springboot-websocket(frontend): This project is used to develop single-page application using Angular 8 as front-end technology. This Angular 8 client application subscribes and exchanges the messages over a WebSocket.
Let's first create a backend coding part using spring boot 2+.
The source code of this tutorial is available on my GitHub repository(The link has given at end of this tutorial).
Backend - Spring Boot App Development
1. Creating a Spring Boot Application
There are many ways to create a Spring Boot application. You can refer below articles to create a Spring Boot application.
>> Create Spring Boot Project With Spring Initializer
>> Create Spring Boot Project in Spring Tool Suite [STS]
>> Create Spring Boot Project in Spring Tool Suite [STS]
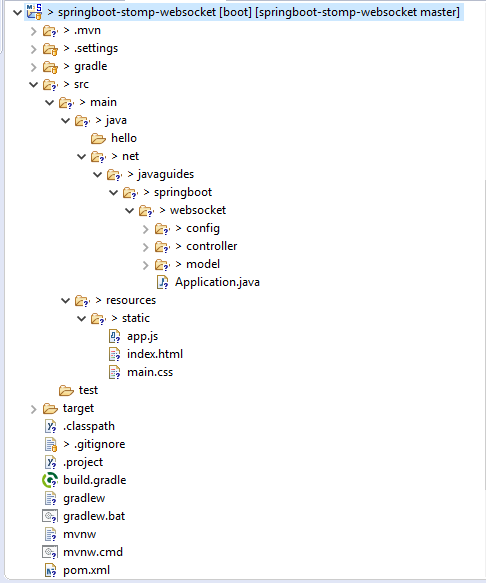
2. Project Structure
Refer to the below screenshot to create a project or packaging structure:
3. Create a resource representation class
We are exchanges message in JSON format over STOMP protocol so let's create two Java classes Greeting and HelloMessage.
HelloMessage
package net.javaguides.springboot.websocket.model

public class HelloMessage {

    private String name;

    public HelloMessage() {}

    public HelloMessage(String name) {
        this.name = name;
    }

    public String getName() {
        return name;
    }

    public void setName(String name) {
        this.name = name;
    }
}
Greeting.java
package net.javaguides.springboot.websocket.model

public class Greeting {

    private String content;

    public Greeting() {}

    public Greeting(String content) {
        this.content = content;
    }

    public String getContent() {
        return content;
    }
}
Spring will use the Jackson JSON library to automatically marshal instances of the type Greeting into JSON.
Next, you’ll create a controller to receive the hello message and send a greeting message.
4. Create a message-handling controller
In Spring’s approach to working with STOMP messaging, STOMP messages can be routed to @Controller classes. For example, the GreetingController is mapped to handle messages to destination "/hello".
package net.javaguides.springboot.websocket.controller;

import org.springframework.messaging.handler.annotation.MessageMapping;

import org.springframework.messaging.handler.annotation.SendTo;
import org.springframework.stereotype.Controller;
import org.springframework.web.util.HtmlUtils;

import net.javaguides.springboot.websocket.model.Greeting;
import net.javaguides.springboot.websocket.model.HelloMessage;

@Controller
public class GreetingController {


    @MessageMapping("/hello")
    @SendTo("/topic/greetings")
    public Greeting greeting(HelloMessage message) throws Exception {
        Thread.sleep(1000); // simulated delay
        return new Greeting("Hello, " + HtmlUtils.htmlEscape(message.getName()) + "!");
    }

}
The @MessageMapping annotation ensures that if a message is sent to the destination "/hello", then the greeting() method is called.
The payload of the message is bound to a HelloMessage object which is passed into greeting().
5. Configure Spring for STOMP messaging
Now that the essential components of the service are created, you can configure Spring to enable WebSocket and STOMP messaging.
Create a Java class named WebSocketConfig that looks like this:
package net.javaguides.springboot.websocket.config;

import org.springframework.context.annotation.Configuration;
import org.springframework.messaging.simp.config.MessageBrokerRegistry;
import org.springframework.web.socket.config.annotation.EnableWebSocketMessageBroker;
import org.springframework.web.socket.config.annotation.StompEndpointRegistry;
import org.springframework.web.socket.config.annotation.WebSocketMessageBrokerConfigurer;

@Configuration
@EnableWebSocketMessageBroker
public class WebSocketConfig implements WebSocketMessageBrokerConfigurer {

    @Override
    public void configureMessageBroker(MessageBrokerRegistry config) {
        config.enableSimpleBroker("/topic");
        config.setApplicationDestinationPrefixes("/app");
    }

    @Override
    public void registerStompEndpoints(StompEndpointRegistry registry) {
        registry.addEndpoint("/ws").setAllowedOrigins("http://localhost:4200").withSockJS();
    }
}
WebSocketConfig is annotated with @Configuration to indicate that it is a Spring configuration class. The @EnableWebSocketMessageBroker enables WebSocket message handling, backed by a message broker.
We have handled the CORS issue with the following code:
We have handled the CORS issue with the following code:
public void registerStompEndpoints(StompEndpointRegistry registry) {
     registry.addEndpoint("/ws").setAllowedOrigins("http://localhost:4200").withSockJS();
}
And that’s it for Back-End! Now we need to create Front-End part of the application to start the socket communication.
Front-End - Angular 8 Client App Development
I assume that you have installed Node.js. Now, we need to check the Node.js and NPM versions. Open the terminal or Node command line then type this commands.
C:\Angular>node -v
v10.15.3

C:\Angular>npm -v
6.9.0
1. Install the latest version of Angular CLI
To install or update Angular 7 CLI, type this command in the Terminal or Node Command-Line.
npm install -g @angular/cli
Now, let's check the latest version of Angular CLI:
C:\angular>ng --version

     _                      _                 ____ _     ___
    / \   _ __   __ _ _   _| | __ _ _ __     / ___| |   |_ _|
   / △ \ | '_ \ / _` | | | | |/ _` | '__|   | |   | |    | |
  / ___ \| | | | (_| | |_| | | (_| | |      | |___| |___ | |
 /_/   \_\_| |_|\__, |\__,_|_|\__,_|_|       \____|_____|___|
                |___/


Angular CLI: 8.0.1
Node: 10.15.3
OS: win32 x64
Angular:
...

Package                      Version
------------------------------------------------------
@angular-devkit/architect    0.800.1
@angular-devkit/core         8.0.1
@angular-devkit/schematics   8.0.1
@schematics/angular          8.0.1
@schematics/update           0.800.1
rxjs                         6.4.0
2. Create Angular 8 client application using Angular CLI
The Angular CLI is a command-line interface tool that you use to initialize, develop, scaffold, and maintain Angular applications.
If you are new to Angular CLI then check out the official documentation at https://cli.angular.io.
Let's use the below command to generate an Angular 8 Client application. We name this project as "angular8-springboot-websocket".
ng new angular8-springboot-websocket
Inside the project we have to install tree libraries with commands:
- npm install stompjs;
- npm install sockjs-client
- npm install jquery (just to quickly access the DOM elements)
3. package.json
This file configures npm package dependencies that are available to all projects in the workspace. Note that angular version 8.0.0 in the dependencies section in the below file.
{
  "name": "angular8-springboot-websocket",
  "version": "0.0.0",
  "scripts": {
    "ng": "ng",
    "start": "ng serve",
    "build": "ng build",
    "test": "ng test",
    "lint": "ng lint",
    "e2e": "ng e2e"
  },
  "private": true,
  "dependencies": {
    "@angular/animations": "~8.0.0",
    "@angular/common": "~8.0.0",
    "@angular/compiler": "~8.0.0",
    "@angular/core": "~8.0.0",
    "@angular/forms": "~8.0.0",
    "@angular/platform-browser": "~8.0.0",
    "@angular/platform-browser-dynamic": "~8.0.0",
    "@angular/router": "~8.0.0",
    "jquery": "^3.4.1",
    "net": "^1.0.2",
    "rxjs": "~6.4.0",
    "sockjs-client": "^1.3.0",
    "stompjs": "^2.3.3",
    "tslib": "^1.9.0",
    "zone.js": "~0.9.1"
  },
  "devDependencies": {
    "@angular-devkit/build-angular": "~0.800.0",
    "@angular/cli": "~8.0.1",
    "@angular/compiler-cli": "~8.0.0",
    "@angular/language-service": "~8.0.0",
    "@types/node": "~8.9.4",
    "@types/jasmine": "~3.3.8",
    "@types/jasminewd2": "~2.0.3",
    "codelyzer": "^5.0.0",
    "jasmine-core": "~3.4.0",
    "jasmine-spec-reporter": "~4.2.1",
    "karma": "~4.1.0",
    "karma-chrome-launcher": "~2.2.0",
    "karma-coverage-istanbul-reporter": "~2.0.1",
    "karma-jasmine": "~2.0.1",
    "karma-jasmine-html-reporter": "^1.4.0",
    "protractor": "~5.4.0",
    "ts-node": "~7.0.0",
    "tslint": "~5.15.0",
    "typescript": "~3.4.3"
  }
}
4. WebSocket API
Let's create a WebSocket API typescript file and add the following code to it:
import * as Stomp from 'stompjs';
import * as SockJS from 'sockjs-client';
import { AppComponent } from './app.component';

export class WebSocketAPI {
    webSocketEndPoint: string = 'http://localhost:8080/ws';
    topic: string = "/topic/greetings";
    stompClient: any;
    appComponent: AppComponent;
    constructor(appComponent: AppComponent){
        this.appComponent = appComponent;
    }
    _connect() {
        console.log("Initialize WebSocket Connection");
        let ws = new SockJS(this.webSocketEndPoint);
        this.stompClient = Stomp.over(ws);
        const _this = this;
        _this.stompClient.connect({}, function (frame) {
            _this.stompClient.subscribe(_this.topic, function (sdkEvent) {
                _this.onMessageReceived(sdkEvent);
            });
            //_this.stompClient.reconnect_delay = 2000;
        }, this.errorCallBack);
    };

    _disconnect() {
        if (this.stompClient !== null) {
            this.stompClient.disconnect();
        }
        console.log("Disconnected");
    }

    // on error, schedule a reconnection attempt
    errorCallBack(error) {
        console.log("errorCallBack -> " + error)
        setTimeout(() => {
            this._connect();
        }, 5000);
    }

 /**
  * Send message to sever via web socket
  * @param {*} message
  */
    _send(message) {
        console.log("calling logout api via web socket");
        this.stompClient.send("/app/hello", {}, JSON.stringify(message));
    }

    onMessageReceived(message) {
        console.log("Message Recieved from Server :: " + message);
        this.appComponent.handleMessage(JSON.stringify(message.body));
    }
}
5. app.component.ts -> AppComponent
Defines the logic for the app's root component, named AppComponent. The view associated with this root component becomes the root of the view hierarchy as you add components and services to your app.
import { Component } from '@angular/core';
import { WebSocketAPI } from './WebSocketAPI';

@Component({
  selector: 'app-root',
  templateUrl: './app.component.html',
  styleUrls: ['./app.component.css']
})
export class AppComponent {
  title = 'angular8-springboot-websocket';

  webSocketAPI: WebSocketAPI;
  greeting: any;
  name: string;
  ngOnInit() {
    this.webSocketAPI = new WebSocketAPI(new AppComponent());
  }

  connect(){
    this.webSocketAPI._connect();
  }

  disconnect(){
    this.webSocketAPI._disconnect();
  }

  sendMessage(){
    this.webSocketAPI._send(this.name);
  }

  handleMessage(message){
    this.greeting = message;
  }
}
6. app.component.html
Defines the HTML template associated with the root AppComponent.
<!--The content below is only a placeholder and can be replaced.-->
<<noscript><h2 style="color: #ff0000">Seems your browser doesn't support Javascript! Websocket relies on Javascript being
  enabled. Please enable
  Javascript and reload this page!</h2></noscript>
<div id="main-content" class="container">

    <div class="row">
        <div class="col-md-12">
           {{ greeting }}
        </div>
    </div>

  <div class="row">
      <div class="col-md-6">
          <form class="form-inline">
              <div class="form-group">
                  <label for="connect">WebSocket connection:</label>
                  <button (click)="connect()" class="btn btn-default" type="submit">Connect</button>
                  <button (click)="disconnect()" class="btn btn-default" type="submit" disabled="disabled">Disconnect
                  </button>
              </div>
          </form>
      </div>
      <div class="col-md-6">
          <form class="form-inline">
              <div class="form-group">
                  <label for="name">What is your name?</label>
                  <input type="text" [(ngModel)]="name" class="form-control" name="name"> <br>
              </div>
              <button (click)="sendMessage()" class="btn btn-default" type="submit">Send</button>
          </form>
      </div>

      <p> {{ greeting }}</p>
  </div>

</div>
<router-outlet></router-outlet>
7. index.html
Here is code for index.html. Add the following code to the index.html file:
<!doctype html>
<html lang="en">
<head>
  <meta charset="utf-8">
  <title>Angular8SpringbootWebsocket</title>
  <base href="/">
  <!-- Latest compiled and minified CSS -->
<link rel="stylesheet" href="https://maxcdn.bootstrapcdn.com/bootstrap/3.3.7/css/bootstrap.min.css"
          integrity="sha384-BVYiiSIFeK1dGmJRAkycuHAHRg32OmUcww7on3RYdg4Va+PmSTsz/K68vbdEjh4u" crossorigin="anonymous">
  <meta name="viewport" content="width=device-width, initial-scale=1">
  <link rel="icon" type="image/x-icon" href="favicon.ico">

  <script>
    if (global === undefined) {
      var global = window;
    }
  </script>
</head>
<body>
  <app-root></app-root>
</body>
</html>
8. app.module.ts
Defines the root module, named AppModule, that tells Angular how to assemble the application. Initially declares only the AppComponent. As you add more components to the app, they must be declared here.
We are using the HTML form to submit the name so add the following code to AppModule:
import { BrowserModule } from '@angular/platform-browser';
import { NgModule } from '@angular/core';

import { AppRoutingModule } from './app-routing.module';
import { AppComponent } from './app.component';
import { FormsModule } from '@angular/forms'

@NgModule({
  declarations: [
    AppComponent
  ],
  imports: [
    BrowserModule,
    AppRoutingModule,
    FormsModule
  ],
  providers: [],
  bootstrap: [AppComponent]
})
export class AppModule { }
Note that we have added FormsModule to work with HTML forms.
9. Running Angular 8 Client Application
Let's run the above-developed Angular App with a command:
ng serve
By default, the Angular app runs on a 4200 port but you can change the default port with the following command:
ng serve --port 4201Demo
Hit this http://localhost:4201/ link in the browser will open below the web page.
Click on the connect button, which will connect o WebSocket (observe in console logs for WebSocket connection)

Now, once you connect with WebSocket, let's enter"Ramesh Fadatare" text in what's your name input field and hit the send button. The server will send a message to the subscribed client via a callback function. The below screenshot demonstrates how the Angular Client app receives a message from the server.
Source Code on GitHub
The source code of this tutorial available on my GitHub repository at https://github.com/RameshMF/angular8-springboot-websocket.
Follow below steps to run front-end Angular application:
> cd front-end/angular8-springboot-websocket
> npm install
> ng serve
Follow the below steps to run the back-end application:
1. Extract the back-end zip file
2. cd back-end/springboot-stomp-websocket
3. mvn spring-boot:run
The source code examples available on my
GitHub Repository.
My Top and Bestseller Udemy Courses. The sale is going on with a 70 - 80% discount. The discount coupon has been added to each course below:

Build REST APIs with Spring Boot 4, Spring Security 7, and JWT
🆕 High-Demand
80–90% OFF
![[NEW] Learn Apache Maven with IntelliJ IDEA and Java 25](https://img-c.udemycdn.com/course/750x422/6852721_b512_2.jpg "[NEW] Learn Apache Maven with IntelliJ IDEA and Java 25")
[NEW] Learn Apache Maven with IntelliJ IDEA and Java 25
🆕 High-Demand
80–90% OFF

ChatGPT + Generative AI + Prompt Engineering for Beginners
🚀 Trending Now
80–90% OFF
")
Spring 7 and Spring Boot 4 for Beginners (Includes 8 Projects)
🔥 Bestseller
80–90% OFF
Available in Udemy for Business
Available in Udemy for Business

Building Real-Time REST APIs with Spring Boot - Blog App
🔥 Bestseller
80–90% OFF
Available in Udemy for Business
Available in Udemy for Business

Building Microservices with Spring Boot and Spring Cloud
🌟 Top Rated
80–90% OFF
Available in Udemy for Business
Available in Udemy for Business

Java Full-Stack Developer Course with Spring Boot and React JS
🔥 Bestseller
80–90% OFF
Available in Udemy for Business
Available in Udemy for Business

Build 5 Spring Boot Projects with Java: Line-by-Line Coding
🌟 Top Rated
80–90% OFF

Testing Spring Boot Application with JUnit and Mockito
🔥 Bestseller
80–90% OFF
Available in Udemy for Business
Available in Udemy for Business

Spring Boot Thymeleaf Real-Time Web Application - Blog App
🔥 Bestseller
80–90% OFF
Available in Udemy for Business
Available in Udemy for Business

Master Spring Data JPA with Hibernate
🔥 Bestseller
80–90% OFF
Available in Udemy for Business
Available in Udemy for Business

Spring Boot + Apache Kafka Course - The Practical Guide
🎓 Student Favorite
80–90% OFF
Available in Udemy for Business
Available in Udemy for Business


")

Thank you for this awesome tutorial
ReplyDeleteHow i will initialize the web socket API if my app component has a lot of services, for example...
ReplyDeleteconstructor(
@Inject(DOCUMENT) private document: any,
private _platform: Platform,
private idle: Idle,
private keepalive: Keepalive,
private router: Router,
private gw: ApiGateway,
private snackBar: SnackBarService,
private userService: UserService
) {
What do u think if i change the handlerMessage with a event emmiter, can get the value directly in app component. Let me know what is ur opinion about?
DeleteThanks a lot for the tutorial
ReplyDeleteI need to send message after updating a record in db to client.
ReplyDeleteHow to achieve this in spring boot.
Spring application will push notifications to client after every change in record
you can use Spring webflux
Deletethat greeting field is not updating after after the success ,can you pls tell me why it is
ReplyDeletefinally i found out the issue
Deletewhat is the issue?
Deletei'd like to know too, can't figure it out
DeleteI'd like to know aswell
DeleteI have this error when trying to connect:
ReplyDeleteAccess to XMLHttpRequest at 'http://localhost:8080/ws/info?t=1576698440026' from origin 'http://localhost:4200' has been blocked by CORS policy: No 'Access-Control-Allow-Origin' header is present on the requested resource.
download and Enable the cors extension from chrome store. this will resolve the issue.
DeleteHello,
ReplyDeleteit's great with the tutorial, thank you so much for good job :-)
I've tried it and works very well by using ng serve -o.
But there is indeed a little bit problem by running it after running
ng build --prod
Within the Directory dist/angular8-springboot-websocket there is an index.html.
The application does not work by opening of it:
Error:
Access to script at 'file:///C:/runtime-es2015.edb2....js' from orgin 'null' has bin blocked by CORS Policy: cross index.html:1 origin requests are only supported for protocol schemes: http,data, Chrome, Chrome-Extension, https.
The same error for other js-files polyfills-es2015..., main-es2015.... and so on
Question: What is wrong and how can this Problem be solved ?
Thanks in advanced
and with best reguards
Mr. Dang
I have a question. How to print the conversation on screen except console.???..
ReplyDeleteBackend folder is empty could you please upload that also
ReplyDeleteHi, this only works for me if I 1)
ReplyDeleteimplement OnInit in step 5:
export class AppComponent implements OnInit { etc etc
and 2) if I do not switch to another port.
(why would you want to change ports in Angular for this? You set it up in the back end to only allow port 4200. If you switch to 4201 you get CORS errors)
I'm using Angular 9 by the way. Although I think both issues would also be present in older versions.
DeleteERROR in ./node_modules/stompjs/lib/stomp-node.js
ReplyDeleteModule not found: Error: Can't resolve 'net' in 'D:\angular8-springboot-websocket\node_modules\stompjs\lib'
you have to install npm "net" package:
Deletenpm install --save-dev net
After hours of trying to print the message to the screen I finally managed
ReplyDeleteJust had to write the handleMessage + connect inside the component i.e -> the connec . subscription part
can you dive a bit further into your solution? It would be great if you can share the code !!
DeleteJust remember what a service and component are meant for
DeleteService gives API access to url and components implements the "methods" and renders the data to the view (e.g .html)
So in the api/service connect func... you can return a stompClient after Stomp.over(ws), and in the component where you'll call the api_connect handle the message output
That's it, two way data binding will handle the rest
Thanks alot . It is so helpful .
Deleteapp.component.ts
Deletebefore...
handleMessage(message){
this.greeting = message;
}
after...
handleMessage(message){
this.greeting = message.body;
}
The port 8080 is common for all or it might be different.
ReplyDeletehttp://localhost:8080/ws
Thanks for the article.
ReplyDeleteWhat if I want to share WebSocketAPI with mutiple components?
_connect service / API must return stompClient after connection to Stomp.over(ws)
DeleteAnd implement the rest in their components
Hi. How about add Auth2 and use wss?
ReplyDeletein reconnect function, this is not accessible, it is appearing as undefined.
ReplyDeleteI need to display the greeting in webpage. No idea how it is
ReplyDeletedid you find any solution ?
DeleteGreat tutorial!
ReplyDeleteI know it's just to show something quickly, but please don't advice people to install jquery in an Angular project, that's really not a good thing to do!
Great tutoriel but i need ti send notification to a specific user(profil) ? any idea
ReplyDelete'this' keyword is undefined on errorCallBack function. Any solution for this
ReplyDeleteadding this.errorCallBack.bind(this) worked for me
Delete