
🎓 Top 15 Udemy Courses (80-90% Discount): My Udemy Courses - Ramesh Fadatare — All my Udemy courses are real-time and project oriented courses.
▶️ Subscribe to My YouTube Channel (178K+ subscribers): Java Guides on YouTube
▶️ For AI, ChatGPT, Web, Tech, and Generative AI, subscribe to another channel: Ramesh Fadatare on YouTube
In this tutorial, we will learn how to create a simple web application using Angular 8 as a front-end framework and Spring boot as a back-end framework to develop Rest API.
Check out Angular 8 CRUD example tutorial:
Check out Angular 8 CRUD example tutorial:
Spring Boot + Angular 8 CRUD Example Tutorial
What we will build?
Basically, we will create two projects:
- springboot-helloworld-application: This project is used to develop simple RESTFul API using Spring Boot 2.
- angular8-helloworld-example-tutorial: This project is used to develop single page application using Angular 8 as front-end technology. This Angular 8 application consumes Restful API developed and exposed by a springboot-helloworld-application project.
Video
This tutorial explained in below video tutorial on our YouTube channel. Subscribe to our youtube channel for future video updates.
REST API using Spring Boot
We’ll build a service that will accept HTTP GET requests at:
http://localhost:8080/greeting
and respond with a JSON representation of a greeting:
{"id":1,"content":"Hello, World!"}
We can customize the greeting with an optional name parameter in the query string:
http://localhost:8080/greeting?name=User
The name parameter value overrides the default value of "World" and is reflected in the response:
{"id":1,"content":"Hello, User!"}Tools and Technologies Used
- Spring Boot - 2.0.5.RELEASE
- JDK - 1.8 or later
- Spring Framework - 5.0.9 RELEASE
- Maven - 3.2+
- IDE - Eclipse or Spring Tool Suite (STS)
Create Spring boot Project
There are many ways to create a Spring Boot application. The simplest way is to use Spring Initializr at http://start.spring.io/, which is an online Spring Boot application generator.
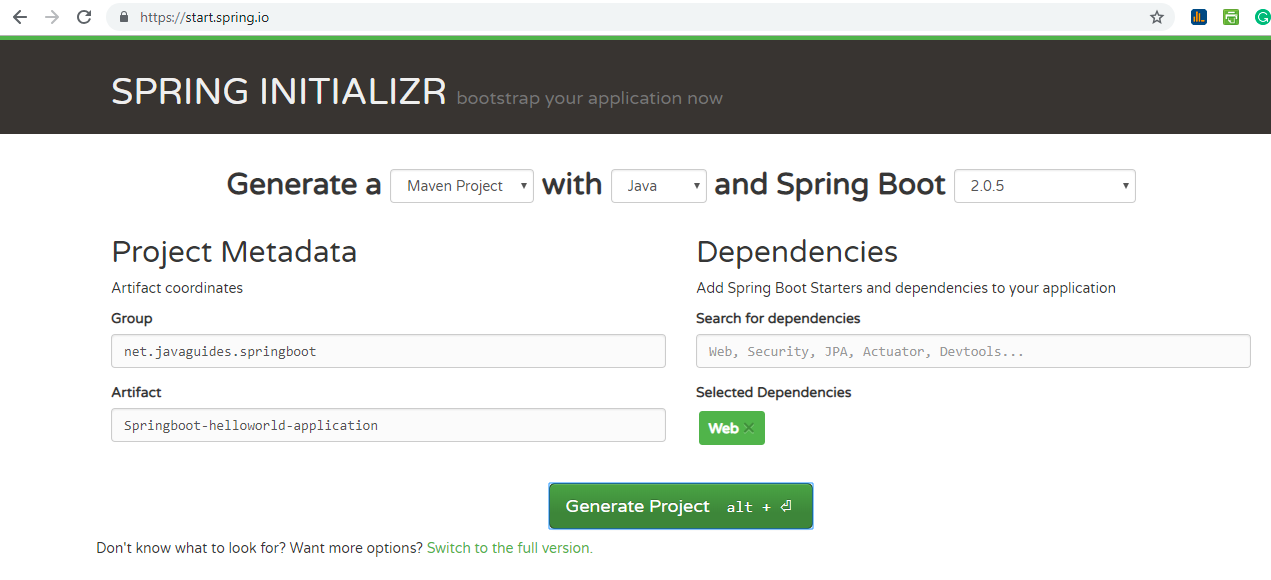
Look at the above diagram, we have specified the following details:
- Generate: Maven Project
- Java Version: 1.8 (Default)
- Spring Boot:2.0.4
- Group: net.javaguides.springboot
- Artifact: Springboot-helloworld-application
- Name: Springboot-helloworld-application
- Description: Rest API using Spring Boot
- Package Name : net.javaguides.springboot.Springboothelloworldapplication
- Packaging: jar (This is the default value)
- Dependencies: Web
Once, all the details are entered, click on Generate Project button will generate a spring boot project and downloads it. Next, Unzip the downloaded zip file and import it into your favorite IDE.
Project Directory Structure
Following is the packing structure of this application for your reference-

The pom.xml File
<?xml version="1.0" encoding="UTF-8"?>
<project xmlns="http://maven.apache.org/POM/4.0.0" xmlns:xsi="http://www.w3.org/2001/XMLSchema-instance"
 xsi:schemaLocation="http://maven.apache.org/POM/4.0.0 http://maven.apache.org/xsd/maven-4.0.0.xsd">
 <modelVersion>4.0.0</modelVersion>

 <groupId>net.javaguides.springboot</groupId>
 <artifactId>Springboot-helloworld-application</artifactId>
 <version>0.0.1-SNAPSHOT</version>
 <packaging>jar</packaging>

 <name>Springboot-helloworld-application</name>
 <description>Demo project for Spring Boot</description>

 <parent>
     <groupId>org.springframework.boot</groupId>
     <artifactId>spring-boot-starter-parent</artifactId>
     <version>2.0.5.RELEASE</version>
     <relativePath/> <!-- lookup parent from repository -->
 </parent>

 <properties>
     <project.build.sourceEncoding>UTF-8</project.build.sourceEncoding>
     <project.reporting.outputEncoding>UTF-8</project.reporting.outputEncoding>
     <java.version>1.8</java.version>
 </properties>

 <dependencies>
     <dependency>
          <groupId>org.springframework.boot</groupId>
          <artifactId>spring-boot-starter-web</artifactId>
     </dependency>

     <dependency>
          <groupId>org.springframework.boot</groupId>
          <artifactId>spring-boot-starter-test</artifactId>
          <scope>test</scope>
     </dependency>
 </dependencies>

 <build>
     <plugins>
         <plugin>
              <groupId>org.springframework.boot</groupId>
              <artifactId>spring-boot-maven-plugin</artifactId>
         </plugin>
     </plugins>
 </build>
</project>
Create a resource representation class - Greeting.java
Now that we’ve set up the project and build system, we can create your web service.
Begin the process by thinking about service interactions.
The service will handle GET requests for /greeting, optionally with a name parameter in the query string. The GET request should return a 200 OK response with JSON in the body that represents a greeting. It should look something like this:
{
    "id": 1,
    "content": "Hello, World!"
}
The id field is a unique identifier for the greeting, and content is the textual representation of the greeting.
To model the greeting representation, you create a resource representation class. Provide a plain old java object with fields, constructors, and accessors for the id and content data:
package net.javaguides.springboot.Springboothelloworldapplication;

public class Greeting {
    private final long id;
    private final String content;

    public Greeting(long id, String content) {
         this.id = id;
         this.content = content;
    }

    public long getId() {
        return id;
    }

    public String getContent() {
         return content;
    }
}
Spring uses the Jackson JSON library to automatically marshal instances of type Greeting into JSON.
Next, we create a resource controller that will serve these greetings.
Create a resource controller - GreetingController.java
In Spring’s approach to building RESTful web services, HTTP requests are handled by a controller. These components are easily identified by the @RestController annotation, and the GreetingController below handles GET requests for /greeting by returning a new instance of the Greeting class:
package net.javaguides.springboot.Springboothelloworldapplication;

import java.util.concurrent.atomic.AtomicLong;
import org.springframework.web.bind.annotation.RequestMapping;
import org.springframework.web.bind.annotation.RequestParam;
import org.springframework.web.bind.annotation.RestController;

@RestController
public class GreetingController {

    private static final String template = "Hello, %s!";
    private final AtomicLong counter = new AtomicLong();

    @RequestMapping("/greeting")
    public Greeting greeting(@RequestParam(value = "name", defaultValue = "World") String name) {
         return new Greeting(counter.incrementAndGet(), String.format(template, name));
    }
}
Let's understand the above Controller with step by step.
- The @RequestMapping annotation ensures that HTTP requests to /greeting are mapped to the greeting()method.
- The above example does not specify GET vs. PUT, POST, and so forth, because of @RequestMapping maps all HTTP operations by default. Use @RequestMapping(method=GET) to narrow this mapping.
- @RequestParam binds the value of the query string parameter name into the name parameter of the greeting() method. If the name parameter is absent in the request, the defaultValue of "World" is used.
- The implementation of the method body creates and returns a new Greeting object with id and content attributes based on the next value from the counter and formats the given name by using the greeting template.
- A key difference between a traditional MVC controller and the RESTful web service controller above is the way that the HTTP response body is created. Rather than relying on a view technology to perform server-side rendering of the greeting data to HTML, this RESTful web service controller simply populates and returns a Greeting object. The object data will be written directly to the HTTP response as JSON.
- This code uses Spring 4’s new @RestController annotation, which marks the class as a controller where every method returns a domain object instead of a view. It’s shorthand for @Controller and @ResponseBodyrolled together.
- The Greeting object must be converted to JSON. Thanks to Spring’s HTTP message converter support, you don’t need to do this conversion manually. Because Jackson 2 is on the classpath, Spring’s MappingJackson2HttpMessageConverter is automatically chosen to convert the Greeting instance to JSON.
Make the application executable - SpringbootHelloworldApplication.java
package net.javaguides.springboot.Springboothelloworldapplication;

import org.springframework.boot.SpringApplication;
import org.springframework.boot.autoconfigure.SpringBootApplication;

@SpringBootApplication
public class SpringbootHelloworldApplication {

    public static void main(String[] args) {
         SpringApplication.run(SpringbootHelloworldApplication.class, args);
    }
}
@SpringBootApplication is a convenience annotation that adds all of the following:
@Configuration tags the class as a source of bean definitions for the application context.
@EnableAutoConfiguration tells Spring Boot to start adding beans based on classpath settings, other beans, and various property settings.
Normally you would add @EnableWebMvc for a Spring MVC app, but Spring Boot adds it automatically when it sees spring-webmvc on the classpath. This flags the application as a web application and activates key behaviors such as setting up a DispatcherServlet.
@ComponentScan tells Spring to look for other components, configurations, and services in the hello package, allowing it to find the controllers.
The main() method uses Spring Boot’s SpringApplication.run() method to launch an application. Did you notice that there wasn’t a single line of XML? No web.xml file either. This web application is 100% pure Java and you didn’t have to deal with configuring any plumbing or infrastructure.
Running the Application
In this article, the two ways we can start the standalone Spring boot application.
- From the root directory of the application and type the following command to run it -
$ mvn spring-boot:run
- From your IDE, run the SpringbootHelloworldApplication.main() method as a standalone Java class that will start the embedded Tomcat server on port 8080 and point the browser to http://localhost:8080/.
Test the service
Before developing an Angular client, let's test this web service.
Now that the service is up, visit http://localhost:8080/api/v1/greeting, where you see:

Provide a name query string parameter with http://localhost:8080/greeting?name=User. Notice how the value of the content attribute changes from "Hello, World!" to "Hello User!":

Now, we will create a step by step Angular 8 Application to consume this web service.
Angular 8 App Development
Let's develop a step by step Web Application using Angular 8 which consume below greeting Rest web service.
http://localhost:8080/hello-world/api/v1/greeting
I assume that you have installed Node.js. Now, we need to check the Node.js and NPM versions. Open the terminal or Node command line then type this commands.
C:\Angular>node -v
v10.15.3

C:\Angular>npm -v
6.9.0
Install the latest version of Angular CLI
To install or update Angular 7 CLI, type this command in the Terminal or Node Command Line.
npm install -g @angular/cli
Now, let's check the latest version of Angular CLI:
C:\angular>ng --version

     _                      _                 ____ _     ___
    / \   _ __   __ _ _   _| | __ _ _ __     / ___| |   |_ _|
   / △ \ | '_ \ / _` | | | | |/ _` | '__|   | |   | |    | |
  / ___ \| | | | (_| | |_| | | (_| | |      | |___| |___ | |
 /_/   \_\_| |_|\__, |\__,_|_|\__,_|_|       \____|_____|___|
                |___/


Angular CLI: 8.0.1
Node: 10.15.3
OS: win32 x64
Angular:
...

Package                      Version
------------------------------------------------------
@angular-devkit/architect    0.800.1
@angular-devkit/core         8.0.1
@angular-devkit/schematics   8.0.1
@schematics/angular          8.0.1
@schematics/update           0.800.1
rxjs                         6.4.0
Create Angular 8 Application using Angular CLI
The Angular CLI is a command-line interface tool that you use to initialize, develop, scaffold, and maintain Angular applications.
If you are new to Angular CLI then check out official documentation at https://cli.angular.io.
Let's use below command to generate an Angular 8 Client application. We name this project as "angular8-helloworld-example-tutorial".
ng new angular8-helloworld-example-tutorialCreate Angular Service & Components
Let's auto-generate service and components using Angular CLI. Change your project directory to angular8-helloworld-example-tutorial\src\app and run the following commands:
- ng g s hello-world
– ng g c hello-world
– ng g c menu
Create a modal folder and run the following command to generate Message.ts typescript class:
– ng generate class MessageAngular Project Structure
Below screenshot shows our angular project structure:

Integrate Bootstrap with Angular
Use NPM to download Bootstrap & JQuery. Bootstrap and jQuery will be installed into the node_modulesfolder.
npm install bootstrap jquery --save
Configure installed Bootstrap & JQuery in an angular.json file:
...

"styles": [
  "src/styles.css",
  "node_modules/bootstrap/dist/css/bootstrap.min.css"
],
"scripts": [
  "node_modules/jquery/dist/jquery.min.js",
  "node_modules/bootstrap/dist/js/bootstrap.min.js"
]

...
If bootstrap.min.css won't work then import this bootstrap.min.css in a style.css file like this:
/* You can add global styles to this file, and also import other style files */
@import url(https://unpkg.com/bootstrap@4.1.0/dist/css/bootstrap.min.css)
hello-world.service.ts -> HelloWorldService
The HelloWorldService will be used to get the data from backend by calling spring boot APIs. Update the hello-world.service.ts file inside src/app directory with the following code to it -
import { HttpClient } from '@angular/common/http';
import { Injectable } from '@angular/core';
import { MessageModel } from '../model/Message';

@Injectable({
    providedIn: 'root'
})
export class HelloWorldService {
    constructor(private http: HttpClient) {
    }
    executeHelloWorldService() {
        return this.http.get<MessageModel>('http://localhost:8080/hello-world/api/v1/greeting');
    }
}
Model -> Message.ts
Let's create a Message model typescript to hold REST API response data and display on HTML template -
export class MessageModel {
    id: number;
    content: string;
    constructor(private _id: number, public message: string) {
        this.id = _id;
        this.content = message;
    }
}
hello-world.component.ts -> HelloWorldComponent
The hello-world.component.ts defines the logic associated with HelloWorldComponent.
import { Component, OnInit } from '@angular/core';
import { Router, ActivatedRoute } from '@angular/router';
import { HelloWorldService } from '../service/hello-world.service';

@Component({
  selector: 'app-hello-world',
  templateUrl: './hello-world.component.html',
  styleUrls: ['./hello-world.component.css']
})
export class HelloWorldComponent implements OnInit {

  welcomeMessage = '';

  constructor(private route: ActivatedRoute,
    private router: Router, private helloWorldService: HelloWorldService) { }

  ngOnInit() {
    this.helloWorldService.executeHelloWorldService().subscribe((res) => {
      this.welcomeMessage = res.content;
    });
  }
}
hello-world.component.html -> HelloWorldComponent
The hello-world.component.html defines the HTML template associated with the HelloWorldComponent.
<div class="container">
  Message from server ->  <h1>{{this.welcomeMessage}}</h1>
</div>
menu.component.ts -> MenuComponent
The menu.component.ts file defines the logic for the menu component, named MenuComponent.
import { Component, OnInit } from '@angular/core';

@Component({
  selector: 'app-menu',
  templateUrl: './menu.component.html',
  styleUrls: ['./menu.component.css']
})
export class MenuComponent implements OnInit {

  welcomeMessage = 'Test';

  constructor() { }

  ngOnInit() {

  }
}
menu.component.html -> MenuComponent
The menu.component.html defines the HTML template associated with the MenuComponent.
<header>
  <nav class="navbar navbar-expand-md navbar-dark bg-dark">
      <div><a href="https://www.javaguides.net" class="navbar-brand">JavaGuides</a></div>
      <ul class="navbar-nav">
          <li><a class="nav-link" href="/hello-world">Hello World Tab</a></li>
      </ul>
  </nav>
</header>
app.module.ts -> AppModule
The app.module.ts file defines the root module, named AppModule, that tells Angular how to assemble the application. Initially declares only the AppComponent. As you add more components to the app, they must be declared here.
Every application has at least one Angular module, the root module that you bootstrap to launch the application. By convention, it is usually called AppModule. Here is the code for AppModule:
import { BrowserModule } from '@angular/platform-browser';
import { NgModule } from '@angular/core';
import { HttpClientModule } from '@angular/common/http';

import { AppRoutingModule } from './app-routing.module';
import { AppComponent } from './app.component';
import { HelloWorldService } from './service/hello-world.service';
import { MenuComponent } from './menu/menu.component';
import { HelloWorldComponent } from './hello-world/hello-world.component';

@NgModule({
  declarations: [
    AppComponent,
    MenuComponent,
    HelloWorldComponent,
  ],
  imports: [
    BrowserModule,
    AppRoutingModule,
    HttpClientModule,
  ],
  providers: [
    HelloWorldService,
  ],
  bootstrap: [AppComponent]
})
export class AppModule { }
app-routing.module.ts -> AppRoutingModule
The app-routing.module.ts file defines the routing configuration in AppRoutingModule for Angular app:
import { NgModule } from '@angular/core';
import { Routes, RouterModule } from '@angular/router';
import { HelloWorldComponent } from './hello-world/hello-world.component';

const routes: Routes = [
  {path: '', component: HelloWorldComponent},
  {path: 'hello-world', component: HelloWorldComponent},
];

@NgModule({
  imports: [RouterModule.forRoot(routes)],
  exports: [RouterModule]
})
export class AppRoutingModule { }
app.component.ts -> AppComponent
The app.component.ts file defines the logic for the app's root component, named AppComponent. The view associated with this root component becomes the root of the view hierarchy as you add components and services to your application.
import { Component } from '@angular/core';

@Component({
  selector: 'app-root',
  templateUrl: './app.component.html',
  styleUrls: ['./app.component.css']
})
export class AppComponent {
  title = 'frontend-spring-boot-angular-hello-world-example';
}
app.component.html -> AppComponent
The app.component.html file defines the HTML template associated with the root AppComponent.
<app-menu></app-menu>
<router-outlet></router-outlet>
Running Angular 8 Application
Let's run the above developed Angular App with a command:
ng serve
By default, the Angular app runs on 4200 port but you can change default port with the following command:
ng serve --port 4204


The source code of this tutorial available on my
GitHub Repository.
My Top and Bestseller Udemy Courses. The sale is going on with a 70 - 80% discount. The discount coupon has been added to each course below:

Build REST APIs with Spring Boot 4, Spring Security 7, and JWT
🆕 High-Demand
80–90% OFF
![[NEW] Learn Apache Maven with IntelliJ IDEA and Java 25](https://img-c.udemycdn.com/course/750x422/6852721_b512_2.jpg "[NEW] Learn Apache Maven with IntelliJ IDEA and Java 25")
[NEW] Learn Apache Maven with IntelliJ IDEA and Java 25
🆕 High-Demand
80–90% OFF

ChatGPT + Generative AI + Prompt Engineering for Beginners
🚀 Trending Now
80–90% OFF
")
Spring 7 and Spring Boot 4 for Beginners (Includes 8 Projects)
🔥 Bestseller
80–90% OFF
Available in Udemy for Business
Available in Udemy for Business

Building Real-Time REST APIs with Spring Boot - Blog App
🔥 Bestseller
80–90% OFF
Available in Udemy for Business
Available in Udemy for Business

Building Microservices with Spring Boot and Spring Cloud
🌟 Top Rated
80–90% OFF
Available in Udemy for Business
Available in Udemy for Business

Java Full-Stack Developer Course with Spring Boot and React JS
🔥 Bestseller
80–90% OFF
Available in Udemy for Business
Available in Udemy for Business

Build 5 Spring Boot Projects with Java: Line-by-Line Coding
🌟 Top Rated
80–90% OFF

Testing Spring Boot Application with JUnit and Mockito
🔥 Bestseller
80–90% OFF
Available in Udemy for Business
Available in Udemy for Business

Spring Boot Thymeleaf Real-Time Web Application - Blog App
🔥 Bestseller
80–90% OFF
Available in Udemy for Business
Available in Udemy for Business

Master Spring Data JPA with Hibernate
🔥 Bestseller
80–90% OFF
Available in Udemy for Business
Available in Udemy for Business

Spring Boot + Apache Kafka Course - The Practical Guide
🎓 Student Favorite
80–90% OFF
Available in Udemy for Business
Available in Udemy for Business


")

Thanks therefore significantly for this! I havent been this particular thrilled with a weblog for any long time period! You’ve got it, what ever which indicates in blogging. Anyway, You’re definitely an individual which has some thing to express which individuals should listen to. Keep up the outstanding job. Maintain upon uplifting the people! 먹튀검증
ReplyDelete