
🎓 Top 15 Udemy Courses (80-90% Discount): My Udemy Courses - Ramesh Fadatare — All my Udemy courses are real-time and project oriented courses.
▶️ Subscribe to My YouTube Channel (178K+ subscribers): Java Guides on YouTube
▶️ For AI, ChatGPT, Web, Tech, and Generative AI, subscribe to another channel: Ramesh Fadatare on YouTube
In this article, we will learn step by step how to develop CRUD REST APIs using integration of Jersey 2.26 with Spring boot 2.0.5 RELEASE, JPA/Hibernate 5 and MySQL as a database.
Jersey RESTful Web Services framework is open source, production quality, a framework for developing RESTful Web Services in Java that provides support for JAX-RS APIs and serves as a JAX-RS (JSR 311 & JSR 339) Reference Implementation.
Spring boot provides support for integration of Jersey with spring boot application using spring-boot-starter-jersey starter dependency:
<dependency>
  <groupId>org.springframework.boot</groupId>
  <artifactId>spring-boot-starter-jersey</artifactId>
</dependency>
Let's create a step by step Spring Boot Jersey CRUD RESTful APIs project.
Table of contents
- What we’ll build?
- Tools and Technologies Used
- Creating and Importing a Project
- Packaging Structure
- Configuring MySQL Database
- Create Jersey Resource - UserResource.java
- Creating a JerseyConfiguration Class
- Create a JPA Entity called User.java
- Create Spring Data JPA Repository - UserRepository.java
- Create ResourceNotFoundException.java Class
- Running the Application
- Testing via Postman Client
1. What we’ll build?
We are developing a CRUD REST APIs using integration of Jersey 2.26 with Spring boot 2.0.5 RELEASE, JPA/Hibernate 5 and MySQL as a database.

2. Tools and Technologies Used
- Spring Boot - 2.0.4.RELEASE
- JDK - 1.8 or later
- Spring Framework - 5.0.8 RELEASE
- Hibernate - 5.2.17.Final
- Maven - 3.2+
- Spring Data JPA - 2.0.10 RELEASE
- IDE - Eclipse or Spring Tool Suite (STS)
- MYSQL - 5.1.47
- Jersey - 2.26
3. Creating and Importing a Project
There are many ways to create a Spring Boot application. The simplest way is to use Spring Initializr at http://start.spring.io/, which is an online Spring Boot application generator.

Look at the above diagram, we have specified following details:
- Generate: Maven Project
- Java Version: 1.8 (Default)
- Spring Boot:2.0.6
- Group: net.guides.springboot2
- Artifact: springboot-jersey-rest-crud-jpa
- Name: springboot-jersey-rest-crud-jpa
- Description: Rest API for a Simple User Management Application
- Package Name : net.guides.springboot2
- Packaging: jar (This is the default value)
- Dependencies: Jersey, JPA, MySQL
Once, all the details are entered, click on Generate Project button will generate a spring boot project and downloads it. Next, Unzip the downloaded zip file and import it into your favorite IDE.
4. Packaging Structure
Following is the packing structure for your reference -

The pom.xml File
<?xml version="1.0" encoding="UTF-8"?>
<project xmlns="http://maven.apache.org/POM/4.0.0"
 xmlns:xsi="http://www.w3.org/2001/XMLSchema-instance"
 xsi:schemaLocation="http://maven.apache.org/POM/4.0.0 http://maven.apache.org/xsd/maven-4.0.0.xsd">
 <modelVersion>4.0.0</modelVersion>

 <groupId>net.guides.springboot2</groupId>
 <artifactId>springboot-jersey-rest-crud-jpa</artifactId>
 <version>0.0.1-SNAPSHOT</version>
 <packaging>jar</packaging>

 <name>springboot-jersey-rest-crud-jpa</name>
 <description>Demo project for Spring Boot</description>

 <parent>
  <groupId>org.springframework.boot</groupId>
  <artifactId>spring-boot-starter-parent</artifactId>
  <version>2.0.5.RELEASE</version>
  <relativePath /> <!-- lookup parent from repository -->
 </parent>

 <properties>
  <project.build.sourceEncoding>UTF-8</project.build.sourceEncoding>
  <project.reporting.outputEncoding>UTF-8</project.reporting.outputEncoding>
  <java.version>1.8</java.version>
 </properties>

 <dependencies>
  <dependency>
   <groupId>org.springframework.boot</groupId>
   <artifactId>spring-boot-starter-data-jpa</artifactId>
  </dependency>
  <dependency>
   <groupId>org.springframework.boot</groupId>
   <artifactId>spring-boot-starter-jersey</artifactId>
  </dependency>

  <dependency>
   <groupId>org.springframework.boot</groupId>
   <artifactId>spring-boot-starter-test</artifactId>
   <scope>test</scope>
  </dependency>

  <dependency>
   <groupId>mysql</groupId>
   <artifactId>mysql-connector-java</artifactId>
   <scope>runtime</scope>
  </dependency>
 </dependencies>

 <build>
  <plugins>
   <plugin>
    <groupId>org.springframework.boot</groupId>
    <artifactId>spring-boot-maven-plugin</artifactId>
   </plugin>
  </plugins>
 </build>
</project>
SpringBootCrudRestApplication.java
This spring boot application has an entry point Java class called SpringBootCrudRestApplication.java with the public static void main(String[] args) method, which you can run to start the application.
import org.springframework.boot.SpringApplication;

import org.springframework.boot.autoconfigure.SpringBootApplication;

@SpringBootApplication
public class SpringBootCrudRestApplication {

 public static void main(String[] args) {
  SpringApplication.run(SpringBootCrudRestApplication.class, args);
 }
}
@SpringBootApplication is a convenience annotation that adds all of the following:
- @Configuration tags the class as a source of bean definitions for the application context.
- @EnableAutoConfiguration tells Spring Boot to start adding beans based on classpath settings, other beans, and various property settings.
- Normally you would add @EnableWebMvc for a Spring MVC app, but Spring Boot adds it automatically when it sees spring-webmvc on the classpath. This flags the application as a web application and activates key behaviors such as setting up a DispatcherServlet.
- @ComponentScan tells Spring to look for other components, configurations, and services in the hello package, allowing it to find the controllers.
The main() method uses Spring Boot’s SpringApplication.run() method to launch an application.
5. Configuring MySQL Database
Configure application.properties to connect to your MySQL database. Let's open an application.properties file and add following database configuration to it.
spring.datasource.url = jdbc:mysql://localhost:3306/users_database?useSSL=false
spring.datasource.username = root
spring.datasource.password = root


## Hibernate Properties
# The SQL dialect makes Hibernate generate better SQL for the chosen database
spring.jpa.properties.hibernate.dialect = org.hibernate.dialect.MySQL5InnoDBDialect

# Hibernate ddl auto (create, create-drop, validate, update)
spring.jpa.hibernate.ddl-auto = update
Change the above configuration such as JDBC URL, username and password as per your environment.
6. Create Jersey Resource - UserResource.java
package net.guides.springboot2.springbootjerseyrestcrudjpa.controller;

import java.util.HashMap;
import java.util.List;
import java.util.Map;

import javax.validation.Valid;
import javax.ws.rs.Consumes;
import javax.ws.rs.DELETE;
import javax.ws.rs.GET;
import javax.ws.rs.POST;
import javax.ws.rs.PUT;
import javax.ws.rs.Path;
import javax.ws.rs.PathParam;
import javax.ws.rs.Produces;

import org.springframework.beans.factory.annotation.Autowired;
import org.springframework.http.ResponseEntity;
import org.springframework.stereotype.Component;
import org.springframework.web.bind.annotation.PostMapping;
import org.springframework.web.bind.annotation.RequestBody;

import net.guides.springboot2.springbootjerseyrestcrudjpa.exception.ResourceNotFoundException;
import net.guides.springboot2.springbootjerseyrestcrudjpa.model.User;
import net.guides.springboot2.springbootjerseyrestcrudjpa.repository.UserRepository;

@Component
@Path("/api/v1")
public class UserResource {

 @Autowired
 private UserRepository userRepository;

 @GET
 @Produces("application/json")
 @Path("/users")
 public List<User> getAllUsers() {
  return userRepository.findAll();
 }

 @GET
 @Produces("application/json")
 @Path("/users/{id}")
 public ResponseEntity<User> getUserById(@PathParam(value = "id") Long userId) throws ResourceNotFoundException {
  User user = userRepository.findById(userId)
    .orElseThrow(() -> new ResourceNotFoundException("User not found :: " + userId));
  return ResponseEntity.ok().body(user);
 }

 @POST
 @Produces("application/json")
 @Consumes("application/json")
 @Path("/users")
 @PostMapping("/users")
 public User createUser(User user) {
  return userRepository.save(user);
 }

 @PUT
 @Consumes("application/json")
 @Path("/users/{id}}")
 public ResponseEntity<User> updateUser(@PathParam(value = "id") Long userId,
   @Valid @RequestBody User userDetails) throws ResourceNotFoundException {
  User user = userRepository.findById(userId)
    .orElseThrow(() -> new ResourceNotFoundException("User not found :: " + userId));

  user.setEmailId(userDetails.getEmailId());
  user.setLastName(userDetails.getLastName());
  user.setFirstName(userDetails.getFirstName());
  final User updatedUser = userRepository.save(user);
  return ResponseEntity.ok(updatedUser);
 }

 @DELETE
 @Path("/users/{id}")
 public Map<String, Boolean> deleteUser(@PathParam(value = "id") Long userId) throws ResourceNotFoundException {
  User user = userRepository.findById(userId)
    .orElseThrow(() -> new ResourceNotFoundException("User not found :: " + userId));

  userRepository.delete(user);
  Map<String, Boolean> response = new HashMap<>();
  response.put("deleted", Boolean.TRUE);
  return response;
 }
}
We have created a UserResource class and used JAX-RS annotations.
@Path is used to identify the URI path (relative) that a resource class or class method will serve requests for.
@PathParam is used to bind the value of a URI template parameter or a path segment containing the template parameter to a resource method parameter, resource class field, or resource class bean property. The value is URL decoded unless this is disabled using the @Encoded annotation.
@GET indicates that the annotated method handles HTTP GET requests.
@POST indicates that the annotated method handles HTTP POST requests.
@PUT indicates that the annotated method handles HTTP PUT requests.
@DELETE indicates that annotated method handles HTTP DELETE requests.
@Produces defines a media-type that the resource method can produce.
@Consumes defines a media-type that the resource method can accept.
You can find all JAX-RS annotations on JAX-RS Tutorial
You might have noticed that we have annotated UserResource with @Component, which is Spring's annotation, and registered it as a bean. We have done so to benefit Spring's DI for injecting the UserRepository class.
While creating REST API's using Jersey the resource naming standard should be entity name suffix with "Resource" string. for example UserResource, EmployeeResource.
7. Creating a JerseyConfiguration Class
We created a JerseyConfiguration class that extends the ResourceConfig from package org.glassfish.jersey.server, which configures the web application. We registered UserResource using resister method. @ApplicationPath identifies the application path that serves as the base URI for all the resources.
package net.guides.springboot2.springbootjerseyrestcrudjpa.config;

import javax.ws.rs.ApplicationPath;

import org.glassfish.jersey.server.ResourceConfig;
import org.springframework.stereotype.Component;

import net.guides.springboot2.springbootjerseyrestcrudjpa.controller.UserResource;

@Component
@ApplicationPath("/boot-jersey")
public class JerseyConfiguration extends ResourceConfig {
 public JerseyConfiguration() {
  register(UserResource.class);
 }
}
8. Create a JPA Entity called User.java
package net.guides.springboot2.springbootjerseyrestcrudjpa.model;

import javax.persistence.Column;
import javax.persistence.Entity;
import javax.persistence.GeneratedValue;
import javax.persistence.GenerationType;
import javax.persistence.Id;
import javax.persistence.Table;

@Entity
@Table(name = "table_users")
public class User {

 @Id
 @GeneratedValue(strategy = GenerationType.AUTO)
 private long id;

 @Column(name = "first_name", nullable = false)
 private String firstName;

 @Column(name = "last_name", nullable = false)
 private String lastName;

 @Column(name = "email_address", nullable = false)
 private String emailId;

 public long getId() {
  return id;
 }

 public void setId(long id) {
  this.id = id;
 }

 public String getFirstName() {
  return firstName;
 }

 public void setFirstName(String firstName) {
  this.firstName = firstName;
 }

 public String getLastName() {
  return lastName;
 }

 public void setLastName(String lastName) {
  this.lastName = lastName;
 }

 public String getEmailId() {
  return emailId;
 }

 public void setEmailId(String emailId) {
  this.emailId = emailId;
 }
}
To implement auditing refer Spring Data JPA Auditing with Spring Boot 2 and MySQL Example
You can implement logging using Spring Boot 2 Logging SLF4j Logback and LOG4j2 Example
You can implement Exception Handling using Spring Boot 2 Exception Handling for REST APIs
You can implement custom bean validation using Spring Boot CRUD REST APIs Validation Example
9. Create Spring Data JPA Repository - UserRepository.java
package net.guides.springboot2.springbootjerseyrestcrudjpa.repository;

import org.springframework.data.jpa.repository.JpaRepository;
import org.springframework.stereotype.Repository;

import net.guides.springboot2.springbootjerseyrestcrudjpa.model.User;

@Repository
public interface UserRepository extends JpaRepository<User, Long>{

}
10. Create ResourceNotFoundException.java Class
package net.guides.springboot2.springbootjerseyrestcrudjpa.exception;

import org.springframework.http.HttpStatus;
import org.springframework.web.bind.annotation.ResponseStatus;

@ResponseStatus(value = HttpStatus.NOT_FOUND)
public class ResourceNotFoundException extends Exception{

 private static final long serialVersionUID = 1L;

 public ResourceNotFoundException(String message){
     super(message);
    }
}
11. Running the Application
We have successfully developed all the CRUD Rest API for User model. now it's time to deploy our application in a servlet container(embedded tomcat). Two ways we can start the standalone Spring boot application.
- From the root directory of the application and type the following command to run it -
$ mvn spring-boot:run
- From your IDE, run the SpringbootJerseyRestCrudJpaApplication.main() method as a standalone Java class that will start the embedded Tomcat server on port 8080 and point the browser to http://localhost:8080/.
12. Testing via Postman Client
- Create User REST API
- HTTP Method: POST
- RequestURL: http://localhost:8080/api/v1/users

- Get User by ID REST API
- HTTP Method: GET
- Request URL: http://localhost:8080/boot-jersey/api/v1/users/21

- Get all users REST API
- HTTP Method: GET
- Request URL: http://localhost:8080/api/v1/users

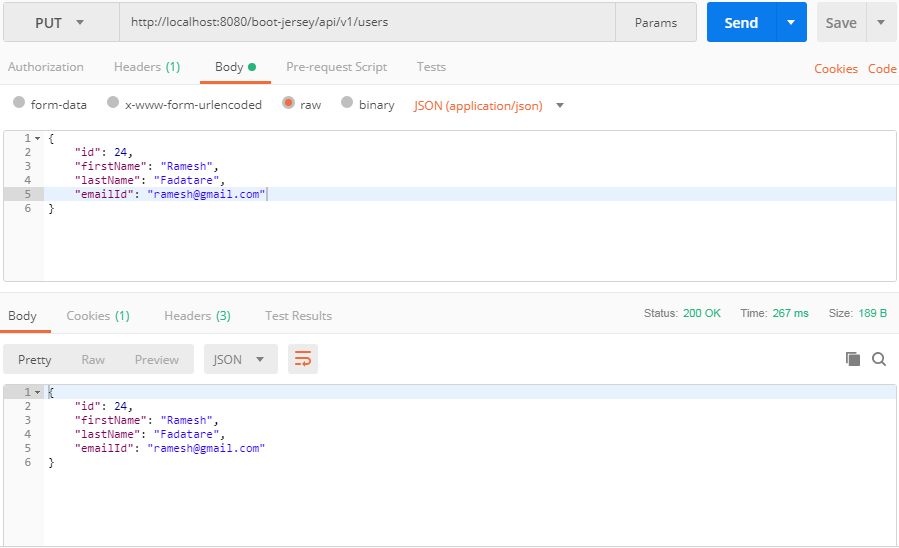
- Update User REST API
- HTTP Method: GET
- Request URL: http://localhost:8080/api/v1/users
- Delete User REST API
- HTTP Method: DELETE
- Request URL: http://localhost:8080/api/v1/users/25

Spring Boot REST API Development Articles
My Top and Bestseller Udemy Courses. The sale is going on with a 70 - 80% discount. The discount coupon has been added to each course below:

Build REST APIs with Spring Boot 4, Spring Security 7, and JWT
🆕 High-Demand
80–90% OFF
![[NEW] Learn Apache Maven with IntelliJ IDEA and Java 25](https://img-c.udemycdn.com/course/750x422/6852721_b512_2.jpg "[NEW] Learn Apache Maven with IntelliJ IDEA and Java 25")
[NEW] Learn Apache Maven with IntelliJ IDEA and Java 25
🆕 High-Demand
80–90% OFF

ChatGPT + Generative AI + Prompt Engineering for Beginners
🚀 Trending Now
80–90% OFF
")
Spring 7 and Spring Boot 4 for Beginners (Includes 8 Projects)
🔥 Bestseller
80–90% OFF
Available in Udemy for Business
Available in Udemy for Business

Building Real-Time REST APIs with Spring Boot - Blog App
🔥 Bestseller
80–90% OFF
Available in Udemy for Business
Available in Udemy for Business

Building Microservices with Spring Boot and Spring Cloud
🌟 Top Rated
80–90% OFF
Available in Udemy for Business
Available in Udemy for Business

Java Full-Stack Developer Course with Spring Boot and React JS
🔥 Bestseller
80–90% OFF
Available in Udemy for Business
Available in Udemy for Business

Build 5 Spring Boot Projects with Java: Line-by-Line Coding
🌟 Top Rated
80–90% OFF

Testing Spring Boot Application with JUnit and Mockito
🔥 Bestseller
80–90% OFF
Available in Udemy for Business
Available in Udemy for Business

Spring Boot Thymeleaf Real-Time Web Application - Blog App
🔥 Bestseller
80–90% OFF
Available in Udemy for Business
Available in Udemy for Business

Master Spring Data JPA with Hibernate
🔥 Bestseller
80–90% OFF
Available in Udemy for Business
Available in Udemy for Business

Spring Boot + Apache Kafka Course - The Practical Guide
🎓 Student Favorite
80–90% OFF
Available in Udemy for Business
Available in Udemy for Business


")

HI , I did as the tutorial exactly but when testing I get 404 error. thanks
ReplyDeleteI get the same 404 error.
ReplyDeleteHello Ramesh:
ReplyDeleteI got below mySQL connection issue while using this tutorial, can please advise what's wrong with it ? Thanks in advance.
com.mysql.cj.jdbc.exceptions.CommunicationsException: Communications link failure
The last packet sent successfully to the server was 0 milliseconds ago. The driver has not received any packets from the server.
Hello Ramesh:
ReplyDeleteI saw your post said need MYSQL - 5.1.47 under 2. Tools and Technologies used, is that mean i need to download/install MYSQL ? If yes, then that's may be the reason i got above MYSQL connection issue as i didn't do it yet, please advise, thanks in advance.