
🎓 Check Out My Top 25 Udemy Courses (80-90% Discount): My Udemy Courses - Ramesh Fadatare
When a Spring application starts, it goes through a series of steps to create, configure, and manage the lifecycle of its beans. Understanding this lifecycle is critical for building robust, maintainable, and resource-efficient Spring applications.
In this article, we’ll walk through the Spring bean lifecycle, explain the key lifecycle methods, and demonstrate each with clear examples and best practices.
What Is the Spring Bean Lifecycle?
A Spring bean goes through multiple phases from the moment it’s instantiated to the point it’s destroyed. These phases include:
- Instantiation
- Property Injection
- Initialization
- Use (Application logic)
- Destruction
Spring provides various hooks and interfaces that allow you to run custom logic at different points in this lifecycle.
🧬 Common Lifecycle Methods in Spring

Let’s look at each one in detail.
1. Using @PostConstruct for Initialization
This annotation is used on a method that should run after the bean is constructed and dependencies are injected.
Example:
@Component
public class EmailService {

    @PostConstruct
    public void init() {
        System.out.println("EmailService initialized");
    }
}
Best Practice:
Use @PostConstruct for lightweight, dependency-based initialization logic like setting defaults, logging, or preloading data.
2. Implementing InitializingBean
If you want more control or avoid annotations, implement InitializingBean.
Example:
@Component
public class PaymentService implements InitializingBean {

    @Override
    public void afterPropertiesSet() {
        System.out.println("PaymentService has been initialized via InitializingBean");
    }
}
Best Practice:
Use InitializingBean when working with frameworks or libraries that require interface-based initialization logic.
3. Using Custom initMethod in @Bean
You can define an initialization method explicitly in a configuration class.
Example:
@Configuration
public class AppConfig {

    @Bean(initMethod = "init")
    public NotificationService notificationService() {
        return new NotificationService();
    }
}
public class NotificationService {
public void init() {
System.out.println("NotificationService custom init method called");
}
}Best Practice:
Good for third-party classes where you can’t annotate or implement interfaces.
🧹 4. Using @PreDestroy for Cleanup
This hook runs just before the Spring container destroys the bean.
Example:
@Component
public class CacheManager {

    @PreDestroy
    public void cleanUp() {
        System.out.println("CacheManager cleaned up before shutdown");
    }
}
Best Practice:
Use @PreDestroy for releasing resources like file handles, threads, or connections.
5. Implementing DisposableBean for Cleanup
Like InitializingBean, you can use this interface for bean destruction logic.
Example:
@Component
public class FileWriterService implements DisposableBean {

    @Override
    public void destroy() {
        System.out.println("FileWriterService resources released");
    }
}
Best Practice:
Use when annotation-free or interface-based design is preferred.
6. Using Custom destroyMethod in @Bean
Configure a destroy method in a @Bean definition.
Example:
@Configuration
public class ShutdownConfig {

    @Bean(destroyMethod = "shutdown")
    public TaskProcessor taskProcessor() {
        return new TaskProcessor();
    }
}
public class TaskProcessor {
public void shutdown() {
System.out.println("TaskProcessor shutting down cleanly...");
}
}Best Practice:
Useful for external libraries where annotations and interfaces can’t be added.
🧭 Lifecycle Flow Recap (Execution Order)
- Constructor called
- Dependencies injected
@PostConstructmethod calledafterPropertiesSet()(if implemented)- Custom
initMethod(if defined) - Application runs…
@PreDestroycalled on shutdowndestroy()method (if implemented)- Custom
destroyMethod(if defined)
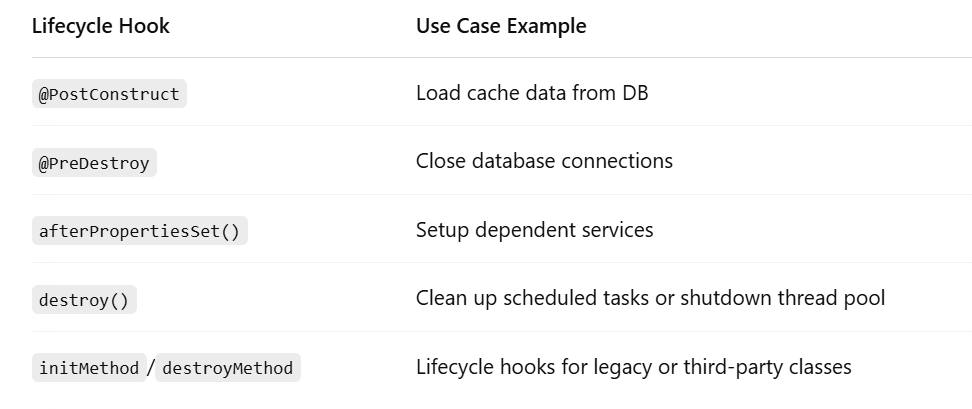
🧠 Real-World Use Cases
Best Practices for Bean Lifecycle Management
- Prefer
@PostConstructand@PreDestroyfor modern Spring apps. - Use
@Bean(initMethod = "...", destroyMethod = "...")for external classes. - Avoid using multiple lifecycle mechanisms in the same class.
- Don’t perform heavy operations (like API calls or blocking IO) directly in lifecycle methods — consider background tasks.
✅ Conclusion
Spring provides multiple ways to hook into the bean lifecycle, giving you flexibility for both initialization and cleanup. Choose the right one based on your use case:
- Annotations (
@PostConstruct,@PreDestroy) → Clean and easy for modern apps. - Interfaces (
InitializingBean,DisposableBean) → Useful for frameworks or legacy code. @Beanmethods withinitMethod/destroyMethod→ Great for third-party classes.
Understanding lifecycle methods helps you write robust, maintainable, and resource-efficient Spring applications.
My Top and Bestseller Udemy Courses. The sale is going on with a 70 - 80% discount. The discount coupon has been added to each course below:

Build REST APIs with Spring Boot 4, Spring Security 7, and JWT
![[NEW] Learn Apache Maven with IntelliJ IDEA and Java 25](https://img-c.udemycdn.com/course/750x422/6852721_b512_2.jpg "[NEW] Learn Apache Maven with IntelliJ IDEA and Java 25")
[NEW] Learn Apache Maven with IntelliJ IDEA and Java 25

ChatGPT + Generative AI + Prompt Engineering for Beginners
")
Spring 7 and Spring Boot 4 for Beginners (Includes 8 Projects)
Available in Udemy for Business

Building Real-Time REST APIs with Spring Boot - Blog App
Available in Udemy for Business

Building Microservices with Spring Boot and Spring Cloud
Available in Udemy for Business

Java Full-Stack Developer Course with Spring Boot and React JS
Available in Udemy for Business

Build 5 Spring Boot Projects with Java: Line-by-Line Coding

Testing Spring Boot Application with JUnit and Mockito
Available in Udemy for Business

Spring Boot Thymeleaf Real-Time Web Application - Blog App
Available in Udemy for Business

Master Spring Data JPA with Hibernate
Available in Udemy for Business

Spring Boot + Apache Kafka Course - The Practical Guide
Available in Udemy for Business


")

Comments
Post a Comment
Leave Comment