
🎓 Check Out My Top 25 Udemy Courses (80-90% Discount): My Udemy Courses - Ramesh Fadatare
If you’ve built even a single application with Spring or Spring Boot, you’ve already been using the Spring container — even if you didn’t realize it.
You’ve annotated your classes with @Service, @Repository, or @Component, and magically, they were created, injected, and managed without any manual new calls.
But what exactly is this “Spring container”? And what happens under the hood when your application starts?
In this article, we’ll break down exactly how the Spring container works behind the scenes — from classpath scanning to bean creation, dependency injection, and lifecycle management.
First: What Is the Spring Container?
The Spring container is the core part of the Spring Framework that manages the lifecycle and configuration of application beans.
It is responsible for:
- Creating objects (beans)
- Injecting dependencies
- Managing bean scopes (singleton, prototype, etc.)
- Handling the complete lifecycle of each bean
The container uses Inversion of Control (IoC) and Dependency Injection (DI) principles.
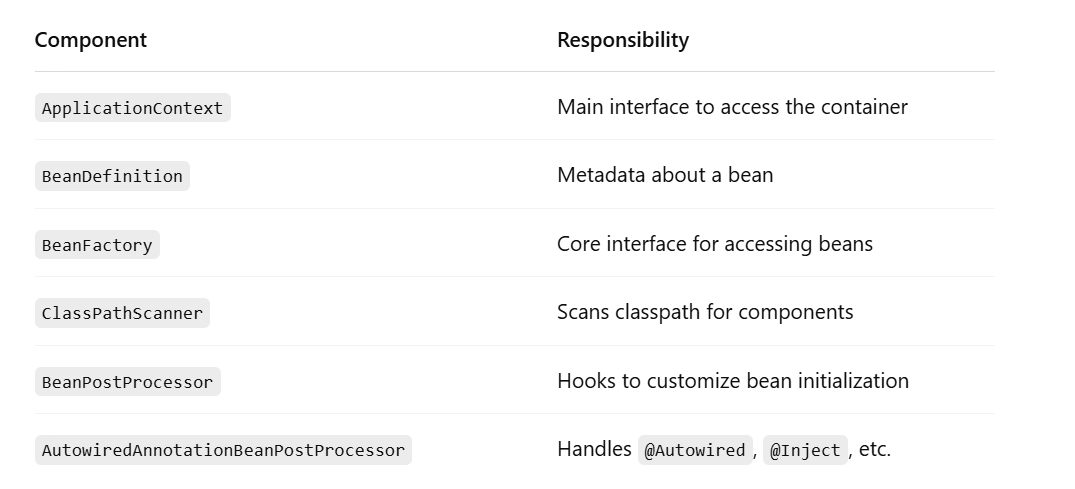
🔍 Key Components Behind the Container
🧭 Spring Container Workflow: Step-by-Step
Let’s walk through how Spring creates and manages your beans — behind the scenes.
🔹 1. Application Starts
When you run a Spring Boot app, the entry point is usually:
@SpringBootApplication
public class MyApp {
  public static void main(String[] args) {
    SpringApplication.run(MyApp.class, args);
  }
}
SpringApplication.run() does a lot behind the scenes, including:
- Creating an instance of
ApplicationContext - Loading configurations
- Starting the container
🔹 2. Component Scan Begins
Using @ComponentScan, Spring scans all the classes in your base package and sub-packages.
It looks for:
@Component@Service@Repository@Controller@Configuration
Each matching class is registered as a bean definition.
🔹 3. Bean Definitions Are Registered
Each discovered class is turned into a BeanDefinition — a metadata object that tells Spring:
- What class to use
- What dependencies it needs
- Its scope (singleton, prototype, etc.)
- Lifecycle callbacks (
@PostConstruct,@PreDestroy, etc.)
At this stage, no beans are created yet. It’s just preparing blueprints.
🔹 4. BeanFactoryPostProcessors Run
Before bean creation begins, any BeanFactoryPostProcessor beans are invoked. These are used to modify bean definitions before actual beans are instantiated.
Example:
PropertySourcesPlaceholderConfigurerreplaces${}placeholders with actual values.
🔹 5. Beans Are Instantiated (Created)
Now the container starts creating beans.
If you’re using constructor injection, Spring looks at the constructor:
@Service
public class OrderService {
  public OrderService(OrderRepository repo) {
    ...
  }
}
It looks into the constructor, finds required dependencies (OrderRepository), and recursively resolves those first.
🔹 6. Dependencies Are Injected
Dependencies are injected using:
- Constructor Injection
- Setter Injection
- Field Injection (via reflection)
Spring uses reflection to find dependencies and inject them into the appropriate place.
It checks for:
@Autowired@Inject@Value
🔹 7. BeanPostProcessors Are Invoked
Before and after initialization, Spring allows special beans called BeanPostProcessors to run.
These are hooks for:
- Custom logic (e.g., wrapping beans with proxies)
- Annotation handling (
@Autowired,@Transactional) - Logging or debugging bean creation
Example: AutowiredAnnotationBeanPostProcessor processes the @Autowired annotation.
🔹 8. Lifecycle Callbacks Are Triggered
If your bean implements:
InitializingBean– callsafterPropertiesSet()DisposableBean– callsdestroy()
Or if you’ve defined:
@PostConstruct– called after dependency injection@PreDestroy– called before the bean is destroyed
These are lifecycle methods managed by the container.
🔹 9. Beans Are Cached (If Singleton)
If the bean scope is singleton (which it is by default), Spring stores it in a cache so that the same instance is reused everywhere.
For prototype scope, a new bean is created every time getBean() is called.
🔹 10. ApplicationContext Is Ready
Once all beans are created and initialized, the container is fully loaded.
Now your application can start serving requests, processing data, or interacting with external systems.
🧪 Real Example: Let’s Debug a Simple App
Let’s say you have:
@Service
public class ProductService {
    private final ProductRepository repo;

    public ProductService(ProductRepository repo) {
        this.repo = repo;
    }
}
@Repository
public class ProductRepository {
public List<String> findAll() {
return List.of("Apple", "Banana");
}
}What Spring Does Behind the Scenes:
- Scans
ProductServiceandProductRepository - Registers them as bean definitions
- Detects that
ProductServiceneedsProductRepository - Creates
ProductRepository - Injects it into
ProductServicevia constructor - Caches the instances
- Makes both beans available via
context.getBean(...)
All automatically. No new, no wiring, no XML.
🔍 Why Is This Design So Powerful?
Because Spring:
- Decouples object creation from logic
- Allows easy testing with mocks and stubs
- Provides flexibility to change implementations via configuration
- Automatically wires dependencies even in large apps
And with tools like Spring Boot, most of this wiring is auto-configured.
🧱 Quick Summary: Spring Container Lifecycle
Application Starts
↓
Component Scanning
↓
BeanDefinition Registration
↓
BeanFactoryPostProcessors
↓
Bean Instantiation
↓
Dependency Injection
↓
BeanPostProcessors
↓
Lifecycle Annotations (@PostConstruct)
↓
Ready to Use!
✅ Final Thoughts
The Spring container is a beautiful piece of engineering. It quietly handles hundreds of tiny tasks for you — like instantiating objects, injecting dependencies, managing scopes, and running lifecycle hooks.
Understanding what’s happening behind the scenes helps you:
- Write better Spring code
- Debug issues faster
- Design applications that scale
You don’t need to configure everything manually. But you should know what Spring is doing on your behalf.
My Top and Bestseller Udemy Courses. The sale is going on with a 70 - 80% discount. The discount coupon has been added to each course below:

Build REST APIs with Spring Boot 4, Spring Security 7, and JWT
![[NEW] Learn Apache Maven with IntelliJ IDEA and Java 25](https://img-c.udemycdn.com/course/750x422/6852721_b512_2.jpg "[NEW] Learn Apache Maven with IntelliJ IDEA and Java 25")
[NEW] Learn Apache Maven with IntelliJ IDEA and Java 25

ChatGPT + Generative AI + Prompt Engineering for Beginners
")
Spring 7 and Spring Boot 4 for Beginners (Includes 8 Projects)
Available in Udemy for Business

Building Real-Time REST APIs with Spring Boot - Blog App
Available in Udemy for Business

Building Microservices with Spring Boot and Spring Cloud
Available in Udemy for Business

Java Full-Stack Developer Course with Spring Boot and React JS
Available in Udemy for Business

Build 5 Spring Boot Projects with Java: Line-by-Line Coding

Testing Spring Boot Application with JUnit and Mockito
Available in Udemy for Business

Spring Boot Thymeleaf Real-Time Web Application - Blog App
Available in Udemy for Business

Master Spring Data JPA with Hibernate
Available in Udemy for Business

Spring Boot + Apache Kafka Course - The Practical Guide
Available in Udemy for Business


")

Comments
Post a Comment
Leave Comment