
🎓 Check Out My Top 25 Udemy Courses (80-90% Discount): My Udemy Courses - Ramesh Fadatare
Autowiring is one of Spring’s most powerful features — just add @Autowired, and boom — your dependencies are injected. But have you ever wondered how this works under the hood?
In this article, we’ll peel back the layers and show you how Spring autowiring actually works internally — step by step, with examples, real internals, and best practices.
In this article, we will discuss a very important Spring dependency injection annotation that is a @Autowired…www.javaguides.net
What Is Autowiring?
Autowiring is Spring’s way of automatically resolving and injecting beans into your classes without you manually instantiating or wiring them.
@Service
public class OrderService {

    @Autowired
    private PaymentService paymentService;
}
Here, Spring will scan for a PaymentService bean and inject it into OrderService. But how does this happen?
Step-by-Step: What Happens Internally?
1. Component Scanning and Bean Definitions
When your app starts, Spring performs component scanning (via @ComponentScan or @SpringBootApplication) and creates BeanDefinition objects for each annotated class (@Component, @Service, etc.).
At this point, OrderService and PaymentService are just definitions — they haven’t been created yet.
2. BeanPostProcessors Are Registered
Before beans are created, Spring registers a number of BeanPostProcessor implementations.
One of them is:
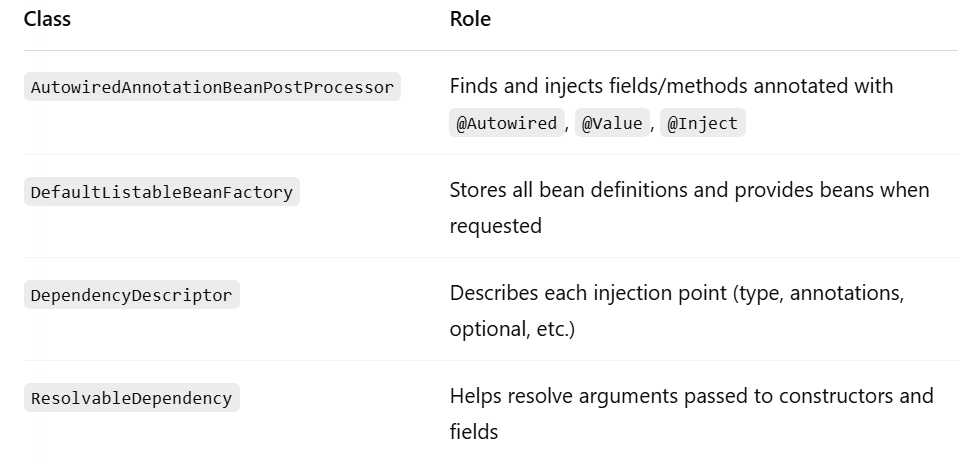
org.springframework.beans.factory.annotation.AutowiredAnnotationBeanPostProcessorThis class is responsible for:
- Finding fields, constructors, or methods annotated with
@Autowired - Resolving dependencies
- Injecting the correct bean
3. Bean Instantiation Begins
When Spring decides it’s time to create a bean (e.g., OrderService), it goes through these phases:
- Constructor resolution
- Dependency injection
- Lifecycle callbacks
If you’ve annotated a constructor with @Autowired, Spring will resolve its arguments first:
@Service
public class OrderService {

    private final PaymentService paymentService;

    @Autowired
    public OrderService(PaymentService paymentService) {
        this.paymentService = paymentService;
    }
}
Spring resolves PaymentService from the container, injects it, and creates the object.
4. Field Injection (Reflection)
If you use field injection:
@Autowired
private PaymentService paymentService;
Then AutowiredAnnotationBeanPostProcessor will:
- Use Java Reflection to find the field
- Check the type (
PaymentService) - Ask the container for a matching bean
- Use
field.setAccessible(true)to inject it manually
5. Handling Multiple Beans
If multiple candidates are found, Spring checks:
- If one is marked
@Primary - If one is explicitly marked via
@Qualifier
If ambiguity remains, Spring throws an error:
NoUniqueBeanDefinitionException6. Optional Dependencies
If a dependency is optional:
@Autowired(required = false)
private EmailService emailService;
Spring will inject null if the bean doesn’t exist — and will not throw an error.
7. Lifecycle Continues
Once all dependencies are injected, Spring proceeds to:
- Call
@PostConstructmethods - Register the bean in the context
- Make it available to other beans
Under the Hood: Key Classes
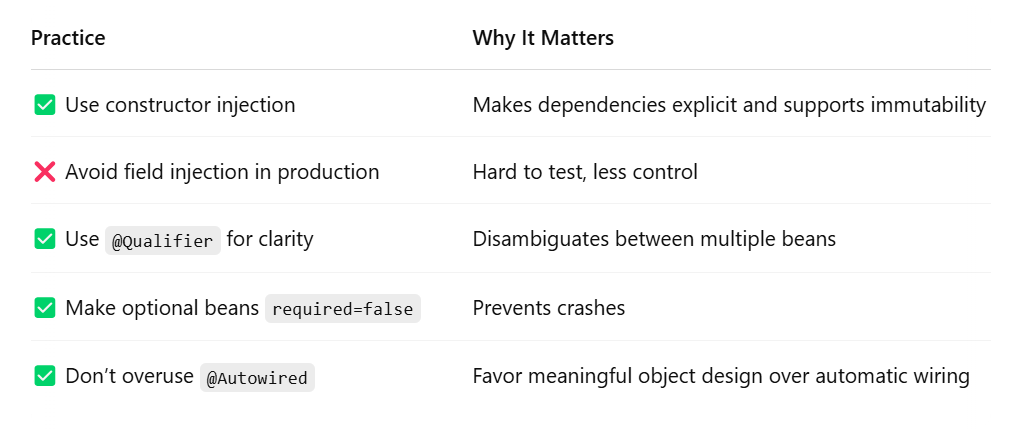
Best Practices for Autowiring
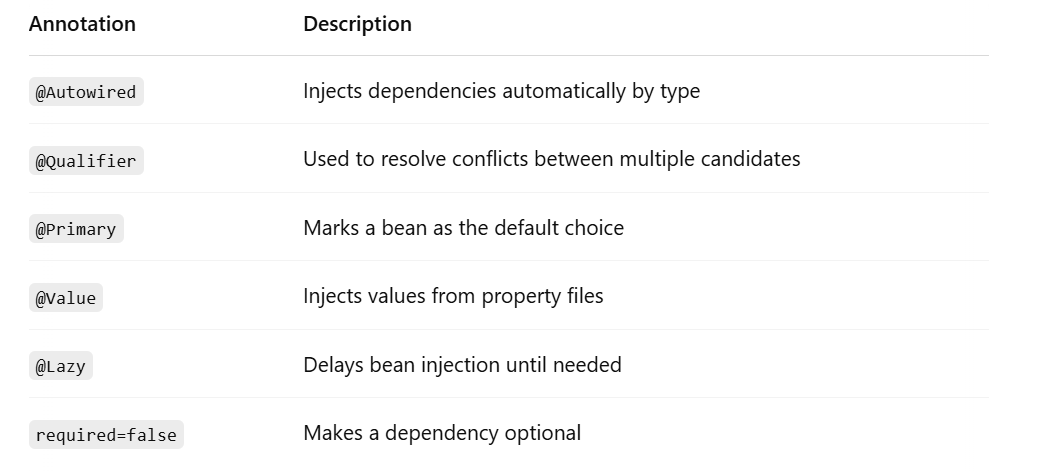
📋 Summary Table
✅ Final Thoughts
Spring’s autowiring is magical — but under the hood, it’s just smart use of reflection, configuration metadata, and post-processors.
By understanding how @Autowired works internally, you can:
- Debug more effectively
- Write more predictable code
- Avoid hidden errors in large-scale applications
Autowiring is convenient. But with great power comes great responsibility — always use it with clarity and intent.
My Top and Bestseller Udemy Courses. The sale is going on with a 70 - 80% discount. The discount coupon has been added to each course below:

Build REST APIs with Spring Boot 4, Spring Security 7, and JWT
![[NEW] Learn Apache Maven with IntelliJ IDEA and Java 25](https://img-c.udemycdn.com/course/750x422/6852721_b512_2.jpg "[NEW] Learn Apache Maven with IntelliJ IDEA and Java 25")
[NEW] Learn Apache Maven with IntelliJ IDEA and Java 25

ChatGPT + Generative AI + Prompt Engineering for Beginners
")
Spring 7 and Spring Boot 4 for Beginners (Includes 8 Projects)
Available in Udemy for Business

Building Real-Time REST APIs with Spring Boot - Blog App
Available in Udemy for Business

Building Microservices with Spring Boot and Spring Cloud
Available in Udemy for Business

Java Full-Stack Developer Course with Spring Boot and React JS
Available in Udemy for Business

Build 5 Spring Boot Projects with Java: Line-by-Line Coding

Testing Spring Boot Application with JUnit and Mockito
Available in Udemy for Business

Spring Boot Thymeleaf Real-Time Web Application - Blog App
Available in Udemy for Business

Master Spring Data JPA with Hibernate
Available in Udemy for Business

Spring Boot + Apache Kafka Course - The Practical Guide
Available in Udemy for Business


")

Comments
Post a Comment
Leave Comment