
🎓 Top 15 Udemy Courses (80-90% Discount): My Udemy Courses - Ramesh Fadatare — All my Udemy courses are real-time and project oriented courses.
▶️ Subscribe to My YouTube Channel (178K+ subscribers): Java Guides on YouTube
▶️ For AI, ChatGPT, Web, Tech, and Generative AI, subscribe to another channel: Ramesh Fadatare on YouTube
This step-by-step tutorial is a part of the Spring Boot Course:
We’ll begin from scratch and go step-by-step, covering everything from the basics to advanced concepts. We’ll also…medium.com
In this chapter, you will learn how to build a real-world CRUD REST API using Spring Boot, Spring Data JPA, Hibernate, and MySQL database. We will use the Postman REST client to test the CRUD REST endpoints.
If you are absolutely new to Spring Boot, then learn Spring Boot from scratch here:
🧩 Technologies Used
- Java 21
- Spring Boot 3+
- Spring Data JPA (uses Hibernate under the hood)
- MySQL (for persistent storage)
- Postman (for testing the REST API)
Create a Spring Boot Application and Import in IntelliJ IDEA
You can use the Spring Initializer website (start.spring.io) or the Spring Boot CLI to generate a new Spring Boot project with the necessary dependencies.
Add below dependencies:
- Spring Web
- Spring Data JPA
- MySQL Driver
Click on the Generate button to download the Spring Boot project as a zip file. Unzip the zip file and import the Spring Boot project into IntelliJ IDEA.
Here is the pom.xml file for your reference:
<dependency>
   <groupId>org.springframework.boot</groupId>
   <artifactId>spring-boot-starter-data-jpa</artifactId>
  </dependency>
  <dependency>
   <groupId>org.springframework.boot</groupId>
   <artifactId>spring-boot-starter-web</artifactId>
  </dependency>

  <dependency>
   <groupId>com.mysql</groupId>
   <artifactId>mysql-connector-j</artifactId>
   <scope>runtime</scope>
  </dependency>
Add the following dependencies to parse the dates while converting JSON:
<dependency>
   <groupId>com.fasterxml.jackson.datatype</groupId>
   <artifactId>jackson-datatype-jsr310</artifactId>
   <version>2.15.2</version> <!-- Use a compatible version with your Spring Boot version -->
</dependency>
Configuring MySQL Database
Since we’re using MySQL as our database, we need to configure the URL, username, and password so that our Spring Boot can establish a connection with the database on startup.
Open the src/main/resources/application.properties file and add the following properties to it:
spring.datasource.url=jdbc:mysql://localhost:3306/user_management
spring.datasource.username=root
spring.datasource.password=Mysql@123

spring.jpa.properties.hibernate.dialect=org.hibernate.dialect.MySQLDialect
spring.jpa.hibernate.ddl-auto=update
Don’t forget to change the spring.datasource.username and spring.datasource.password as per your MySQL installation.
Also, create a database named user_management in MySQL before proceeding to the next section.
You don’t need to create any tables. The tables will automatically be created by Hibernate from the User entity that we will define in the next step. This is made possible by the property spring.jpa.hibernate.ddl-auto = update.
Create User Entity
This class maps the user table in the database using JPA annotations.
package net.javaguides.usermanagement.entity;

import jakarta.persistence.*;
import java.time.LocalDate;

@Table(name = "user")
@Entity
public class User {
    @Id
    @GeneratedValue(strategy = GenerationType.IDENTITY)
    private Long id;

    private String firstName;
    private String lastName;
    private String email;
    private LocalDate dateOfBirth;

    // Getters and Setters
    public Long getId() {
        return id;
    }

    public void setId(Long id) {
        this.id = id;
    }

    public String getFirstName() {
        return firstName;
    }

    public void setFirstName(String firstName) {
        this.firstName = firstName;
    }

    public String getLastName() {
        return lastName;
    }

    public void setLastName(String lastName) {
        this.lastName = lastName;
    }

    public String getEmail() {
        return email;
    }

    public void setEmail(String email) {
        this.email = email;
    }

    public LocalDate getDateOfBirth() {
        return dateOfBirth;
    }

    public void setDateOfBirth(LocalDate dateOfBirth) {
        this.dateOfBirth = dateOfBirth;
    }
}@Entity: Marks the class as a database entity.@Table(name = "user"): Maps the class to the tableuser.@Idand@GeneratedValue: Markidas the primary key and auto-generate its value.
DTO (Data Transfer Object)
DTOs help to decouple the database layer from the API layer.
✅ UserDto
package net.javaguides.usermanagement.dto;

import com.fasterxml.jackson.annotation.JsonFormat;

import java.time.LocalDate;

public record UserDto(
    Long id,
    String firstName,
    String lastName,
    String email,
    @JsonFormat(shape = JsonFormat.Shape.STRING, pattern = "yyyy-MM-dd")
    LocalDate dateOfBirth
) {}
We use Java 21 record to define an immutable DTO.If you want to know more about DTO, check out:
Mapper Layer
Maps between User (Entity) and UserDto.
✅ UserMapper
package net.javaguides.usermanagement.mapper;

import net.javaguides.usermanagement.dto.UserDto;
import net.javaguides.usermanagement.entity.User;
import org.springframework.stereotype.Component;

@Component
public class UserMapper {
    public UserDto toDto(User user) {
        return new UserDto(
            user.getId(),
            user.getFirstName(),
            user.getLastName(),
            user.getEmail(),
            user.getDateOfBirth()
        );
    }

    public User toEntity(UserDto userDto) {
        User user = new User();
        user.setId(userDto.id());
        user.setFirstName(userDto.firstName());
        user.setLastName(userDto.lastName());
        user.setEmail(userDto.email());
        user.setDateOfBirth(userDto.dateOfBirth());
        return user;
    }
}
This layer avoids tightly coupling our database model with the controller.
Repository Layer
This layer talks directly to the database using Spring Data JPA.
✅ UserRepository
package net.javaguides.usermanagement.repository;

import net.javaguides.usermanagement.entity.User;
import org.springframework.data.jpa.repository.JpaRepository;

public interface UserRepository extends JpaRepository<User, Long> {}
You don’t need to write SQL. Spring Data provides methods likesave(),findById(),deleteById(), etc.
Well, Spring Data JPA comes with a JpaRepository interface that defines methods for all the CRUD operations on the entity, and a default implementation of JpaRepository called SimpleJpaRepository.
🚨 Custom Exception Class — ResourceNotFoundException
package net.javaguides.usermanagement.exception;

import org.springframework.http.HttpStatus;
import org.springframework.web.bind.annotation.ResponseStatus;

@ResponseStatus(value = HttpStatus.NOT_FOUND)
public class ResourceNotFoundException extends RuntimeException{

    public ResourceNotFoundException(String message){
        super(message);
    }
}
Used when a user with the requested ID does not exist.
Service Layer — Business Logic
The Service Layer contains core business logic. It interacts with the repository layer and prepares the response for the controller.
✅ Interface: UserService
package net.javaguides.usermanagement.service;

import net.javaguides.usermanagement.dto.UserDto;

import java.util.List;

public interface UserService {
    UserDto createUser(UserDto userDto);
    UserDto getUserById(Long id);
    List<UserDto> getAllUsers();
    UserDto updateUser(Long id, UserDto userDto);
    void deleteUser(Long id);
}
✅ Implementation: UserServiceImpl
package net.javaguides.usermanagement.service.impl;

import net.javaguides.usermanagement.dto.UserDto;
import net.javaguides.usermanagement.entity.User;
import net.javaguides.usermanagement.exception.ResourceNotFoundException;
import net.javaguides.usermanagement.mapper.UserMapper;
import net.javaguides.usermanagement.repository.UserRepository;
import net.javaguides.usermanagement.service.UserService;
import org.springframework.stereotype.Service;

import java.util.List;
import java.util.stream.Collectors;

@Service
public class UserServiceImpl implements UserService {
    private final UserRepository userRepository;
    private final UserMapper userMapper;

    public UserServiceImpl(UserRepository userRepository, UserMapper userMapper) {
        this.userRepository = userRepository;
        this.userMapper = userMapper;
    }

    @Override
    public UserDto createUser(UserDto userDto) {
        User user = userMapper.toEntity(userDto);
        User savedUser = userRepository.save(user);
        return userMapper.toDto(savedUser);
    }

    @Override
    public UserDto getUserById(Long id) {
        User user = userRepository.findById(id)
            .orElseThrow(() -> new ResourceNotFoundException("User not found with id: " + id));
        return userMapper.toDto(user);
    }

    @Override
    public List<UserDto> getAllUsers() {
        return userRepository.findAll()
            .stream()
            .map(userMapper::toDto)
            .collect(Collectors.toList());
    }

    @Override
    public UserDto updateUser(Long id, UserDto userDto) {
        User user = userRepository.findById(id)
            .orElseThrow(() -> new ResourceNotFoundException("User not found with id: " + id));
        user.setFirstName(userDto.firstName());
        user.setLastName(userDto.lastName());
        user.setEmail(userDto.email());
        user.setDateOfBirth(userDto.dateOfBirth());
        User updatedUser = userRepository.save(user);
        return userMapper.toDto(updatedUser);
    }

    @Override
    public void deleteUser(Long id) {
        if (!userRepository.existsById(id)) {
            throw new ResourceNotFoundException("User not found with id: " + id);
        }
        userRepository.deleteById(id);
    }
}@Servicetells Spring to register this class as a service bean.
Spring injectsUserRepositoryandUserMappervia constructor (Constructor Injection is preferred).
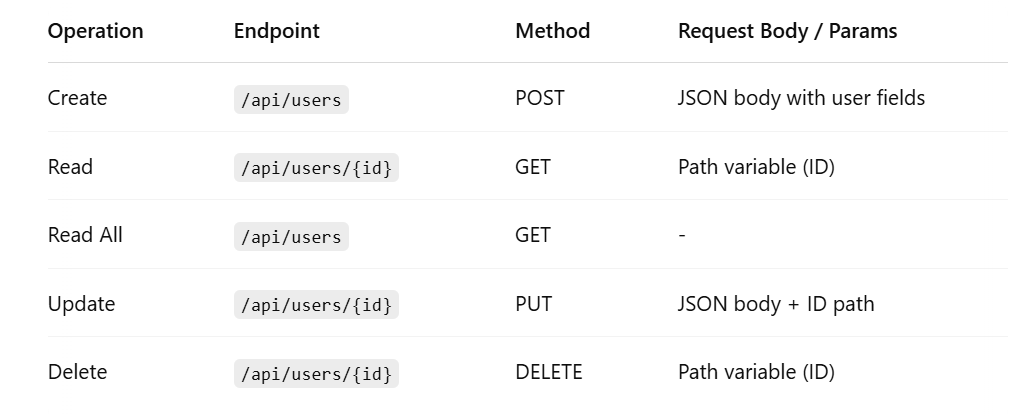
Controller Layer — REST API Endpoints
This layer handles HTTP requests and sends responses.
✅ UserController
package net.javaguides.usermanagement.controller;

import io.swagger.v3.oas.annotations.Operation;
import io.swagger.v3.oas.annotations.media.Content;
import io.swagger.v3.oas.annotations.media.Schema;
import io.swagger.v3.oas.annotations.responses.ApiResponse;
import io.swagger.v3.oas.annotations.responses.ApiResponses;
import io.swagger.v3.oas.annotations.tags.Tag;
import net.javaguides.usermanagement.dto.UserDto;
import net.javaguides.usermanagement.service.UserService;
import org.springframework.http.HttpStatus;
import org.springframework.http.ResponseEntity;
import org.springframework.web.bind.annotation.*;

import java.util.List;
@RestController
@RequestMapping("/api/users")
public class UserController {

    private final UserService userService;

    public UserController(UserService userService) {
        this.userService = userService;
    }

    @PostMapping
    public ResponseEntity<UserDto> createUser(@RequestBody UserDto userDto) {
        return ResponseEntity.status(HttpStatus.CREATED).body(userService.createUser(userDto));
    }

    @GetMapping("/{id}")
    public ResponseEntity<UserDto> getUserById(@PathVariable Long id) {
        return ResponseEntity.ok(userService.getUserById(id));
    }

    @GetMapping
    public ResponseEntity<List<UserDto>> getAllUsers() {
        return ResponseEntity.ok(userService.getAllUsers());
    }

    @PutMapping("/{id}")
    public ResponseEntity<UserDto> updateUser(
            @PathVariable Long id,
            @RequestBody UserDto userDto) {
        return ResponseEntity.ok(userService.updateUser(id, userDto));
    }

    @DeleteMapping("/{id}")
    public ResponseEntity<String> deleteUser(@PathVariable Long id) {
        userService.deleteUser(id);
        return ResponseEntity.ok("User deleted successfully!");
    }
}
🔍 Explanation:
@RestController: Marks it as a RESTful controller.@RequestMapping: Base URL for all endpoints.- Each method uses annotations like
@PostMapping,@GetMapping, etc. - We use constructor injection to get an instance of
UserService.
🧪 Testing Your API with Postman
Use Postman to test the CRUD operations:
✅Create User REST API — Test Using Postman
URL: http://localhost:8080/api/users
HTTP Method: POST
Request JSON:
{
    "firstName": "Ram",
    "lastName": "Jadhav",
    "email": "ram@gmail.com",
    "dateOfBirth": "1991-01-01"
}Response:

✅Get User By ID REST API — Test Using Postman
URL: http://localhost:8080/api/users/1
HTTP Method: GET
Request JSON: none
Response:

Use Case: If a User with ID does not exist in the database

✅Get All Users REST API — Test Using Postman
Insert a couple of Users using the Create User REST.
URL: http://localhost:8080/api/users
HTTP Method: GET
Request JSON: none
Response:

✅Update User REST API — Test Using Postman
URL: http://localhost:8080/api/users/1
HTTP Method: PUT
Request JSON:
Let’s update the email and date of birth fields.
{
    "firstName": "Ram",
    "lastName": "Jadhav",
    "email": "ram.jadhav@gmail.com",
    "dateOfBirth": "1991-02-02"
}
Response:

✅Delete User REST API — Test Using Postman
URL: http://localhost:8080/api/users/1
HTTP Method: DELETE
Request JSON: none
Response:

Key Points for Beginners

Final Thoughts
This CRUD project is a strong foundation for building full-fledged applications using Spring Boot. You’ve learned:
- How to build a structured Spring Boot app
- Use of Spring Data JPA with MySQL
- Clean layering with DTOs, services, and repositories
- How to test your API using Postman
Mastering these fundamentals will make you job-ready and well-prepared for building enterprise-grade Java applications.
My Top and Bestseller Udemy Courses. The sale is going on with a 70 - 80% discount. The discount coupon has been added to each course below:

Build REST APIs with Spring Boot 4, Spring Security 7, and JWT
![[NEW] Learn Apache Maven with IntelliJ IDEA and Java 25](https://img-c.udemycdn.com/course/750x422/6852721_b512_2.jpg "[NEW] Learn Apache Maven with IntelliJ IDEA and Java 25")
[NEW] Learn Apache Maven with IntelliJ IDEA and Java 25

ChatGPT + Generative AI + Prompt Engineering for Beginners
")
Spring 7 and Spring Boot 4 for Beginners (Includes 8 Projects)
Available in Udemy for Business

Building Real-Time REST APIs with Spring Boot - Blog App
Available in Udemy for Business

Building Microservices with Spring Boot and Spring Cloud
Available in Udemy for Business

Java Full-Stack Developer Course with Spring Boot and React JS
Available in Udemy for Business

Build 5 Spring Boot Projects with Java: Line-by-Line Coding

Testing Spring Boot Application with JUnit and Mockito
Available in Udemy for Business

Spring Boot Thymeleaf Real-Time Web Application - Blog App
Available in Udemy for Business

Master Spring Data JPA with Hibernate
Available in Udemy for Business

Spring Boot + Apache Kafka Course - The Practical Guide
Available in Udemy for Business


")

Comments
Post a Comment
Leave Comment