
🎓 Check Out My Top 25 Udemy Courses (80-90% Discount): My Udemy Courses - Ramesh Fadatare
This tutorial will teach you how to build CRUD REST APIs using Spring Boot 3, Spring Data JPA, and MySQL Database.
Learn Spring boot at https://www.javaguides.net/p/spring-boot-tutorial.html.
1. Create a Spring Boot Application and Import in IntelliJ IDEA
You can use the Spring Initializer website (start.spring.io) or the Spring Boot CLI to generate a new Spring Boot project with the necessary dependencies.
Refer to the below screenshot to enter details while creating the spring boot application using the spring initializr:

Click on Generate button to download the Spring boot project as a zip file. Unzip the zip file and import the Spring boot project in IntelliJ IDEA.
Here is the pom.xml file for your reference:
<?xml version="1.0" encoding="UTF-8"?>
<project xmlns="http://maven.apache.org/POM/4.0.0" xmlns:xsi="http://www.w3.org/2001/XMLSchema-instance"
	xsi:schemaLocation="http://maven.apache.org/POM/4.0.0 https://maven.apache.org/xsd/maven-4.0.0.xsd">
	<modelVersion>4.0.0</modelVersion>
	<parent>
		<groupId>org.springframework.boot</groupId>
		<artifactId>spring-boot-starter-parent</artifactId>
		<version>3.0.0-M4</version>
		<relativePath/> <!-- lookup parent from repository -->
	</parent>
	<groupId>net.javaguides</groupId>
	<artifactId>springboot-restful-webservices</artifactId>
	<version>0.0.1-SNAPSHOT</version>
	<name>springboot-restful-webservices</name>
	<description>Demo project for Spring Boot Restful Webservices</description>
	<properties>
		<java.version>17</java.version>
	</properties>
	<dependencies>
		<dependency>
			<groupId>org.springframework.boot</groupId>
			<artifactId>spring-boot-starter-data-jpa</artifactId>
		</dependency>
		<dependency>
			<groupId>org.springframework.boot</groupId>
			<artifactId>spring-boot-starter-web</artifactId>
		</dependency>

		<dependency>
			<groupId>mysql</groupId>
			<artifactId>mysql-connector-java</artifactId>
			<scope>runtime</scope>
		</dependency>
		<dependency>
			<groupId>org.projectlombok</groupId>
			<artifactId>lombok</artifactId>
			<optional>true</optional>
		</dependency>
		<dependency>
			<groupId>org.springframework.boot</groupId>
			<artifactId>spring-boot-starter-test</artifactId>
			<scope>test</scope>
		</dependency>
	</dependencies>

	<build>
		<plugins>
			<plugin>
				<groupId>org.springframework.boot</groupId>
				<artifactId>spring-boot-maven-plugin</artifactId>
				<configuration>
					<excludes>
						<exclude>
							<groupId>org.projectlombok</groupId>
							<artifactId>lombok</artifactId>
						</exclude>
					</excludes>
				</configuration>
			</plugin>
		</plugins>
	</build>
	<repositories>
		<repository>
			<id>spring-milestones</id>
			<name>Spring Milestones</name>
			<url>https://repo.spring.io/milestone</url>
			<snapshots>
				<enabled>false</enabled>
			</snapshots>
		</repository>
	</repositories>
	<pluginRepositories>
		<pluginRepository>
			<id>spring-milestones</id>
			<name>Spring Milestones</name>
			<url>https://repo.spring.io/milestone</url>
			<snapshots>
				<enabled>false</enabled>
			</snapshots>
		</pluginRepository>
	</pluginRepositories>

</project>
2. Project Structure
Refer to the below screenshot to create a project structure or a packing structure for our Spring boot application:

3. Configuring MySQL Database
spring.datasource.url=jdbc:mysql://localhost:3306/user_management
spring.datasource.username=root
spring.datasource.password=Mysql@123

spring.jpa.properties.hibernate.dialect=org.hibernate.dialect.MySQLDialect
spring.jpa.hibernate.ddl-auto=update4. Create JPA Entity - User.java
- id - primary key
- firstName - user first name
- lastName - user last name
- email - user email ID
package net.javaguides.springboot.entity;

import jakarta.persistence.*;
import lombok.AllArgsConstructor;
import lombok.Getter;
import lombok.NoArgsConstructor;
import lombok.Setter;

@Getter
@Setter
@NoArgsConstructor
@AllArgsConstructor
@Entity
@Table(name = "users")
public class User {

    @Id
    @GeneratedValue(strategy = GenerationType.IDENTITY)
    private Long id;
    @Column(nullable = false)
    private String firstName;
    @Column(nullable = false)
    private String lastName;
    @Column(nullable = false, unique = true)
    private String email;
}
Note that we are using Lombok annotations to reduce the boilerplate code such as getter/setter methods, and constructors.
5. Create Spring Data JPA Repository for User JPA Entity
package net.javaguides.springboot.repository;

import net.javaguides.springboot.entity.User;
import org.springframework.data.jpa.repository.JpaRepository;

public interface UserRepository extends JpaRepository<User, Long> {
}
6. Service Layer Implementation
UserService Interface
package net.javaguides.springboot.service;

import net.javaguides.springboot.entity.User;

import java.util.List;

public interface UserService {
    User createUser(User user);

    User getUserById(Long userId);

    List<User> getAllUsers();

    User updateUser(User user);

    void deleteUser(Long userId);
}
UserServiceImpl Class
package net.javaguides.springboot.service.impl;

import lombok.AllArgsConstructor;
import net.javaguides.springboot.entity.User;
import net.javaguides.springboot.repository.UserRepository;
import net.javaguides.springboot.service.UserService;
import org.apache.logging.log4j.util.Strings;
import org.springframework.stereotype.Service;
import org.springframework.util.StringUtils;

import java.util.List;
import java.util.Objects;
import java.util.Optional;

@Service
@AllArgsConstructor
public class UserServiceImpl implements UserService {

    private UserRepository userRepository;

    @Override
    public User createUser(User user) {
        return userRepository.save(user);
    }

    @Override
    public User getUserById(Long userId) {
        Optional<User> optionalUser = userRepository.findById(userId);
        return optionalUser.get();
    }

    @Override
    public List<User> getAllUsers() {
        return userRepository.findAll();
    }

    @Override
    public User updateUser(User user) {
        User existingUser = userRepository.findById(user.getId()).get();
        existingUser.setFirstName(user.getFirstName());
        existingUser.setLastName(user.getLastName());
        existingUser.setEmail(user.getEmail());
        User updatedUser = userRepository.save(existingUser);
        return updatedUser;
    }

    @Override
    public void deleteUser(Long userId) {
        userRepository.deleteById(userId);
    }
}
7. Creating UserController - Building CRUD Rest APIs
package net.javaguides.springboot.controller;

import lombok.AllArgsConstructor;
import net.javaguides.springboot.entity.User;
import net.javaguides.springboot.service.UserService;
import org.springframework.http.HttpStatus;
import org.springframework.http.ResponseEntity;
import org.springframework.web.bind.annotation.*;

import java.util.List;

@RestController
@AllArgsConstructor
@RequestMapping("api/users")
public class UserController {

    private UserService userService;

    // build create User REST API
    @PostMapping
    public ResponseEntity<User> createUser(@RequestBody User user){
        User savedUser = userService.createUser(user);
        return new ResponseEntity<>(savedUser, HttpStatus.CREATED);
    }

    // build get user by id REST API
    // http://localhost:8080/api/users/1
    @GetMapping("{id}")
    public ResponseEntity<User> getUserById(@PathVariable("id") Long userId){
        User user = userService.getUserById(userId);
        return new ResponseEntity<>(user, HttpStatus.OK);
    }

    // Build Get All Users REST API
    // http://localhost:8080/api/users
    @GetMapping
    public ResponseEntity<List<User>> getAllUsers(){
        List<User> users = userService.getAllUsers();
        return new ResponseEntity<>(users, HttpStatus.OK);
    }

    // Build Update User REST API
    @PutMapping("{id}")
    // http://localhost:8080/api/users/1
    public ResponseEntity<User> updateUser(@PathVariable("id") Long userId,
                                           @RequestBody User user){
        user.setId(userId);
        User updatedUser = userService.updateUser(user);
        return new ResponseEntity<>(updatedUser, HttpStatus.OK);
    }

    // Build Delete User REST API
    @DeleteMapping("{id}")
    public ResponseEntity<String> deleteUser(@PathVariable("id") Long userId){
        userService.deleteUser(userId);
        return new ResponseEntity<>("User successfully deleted!", HttpStatus.OK);
    }
}
8. Running the Application
$ mvn spring-boot:run
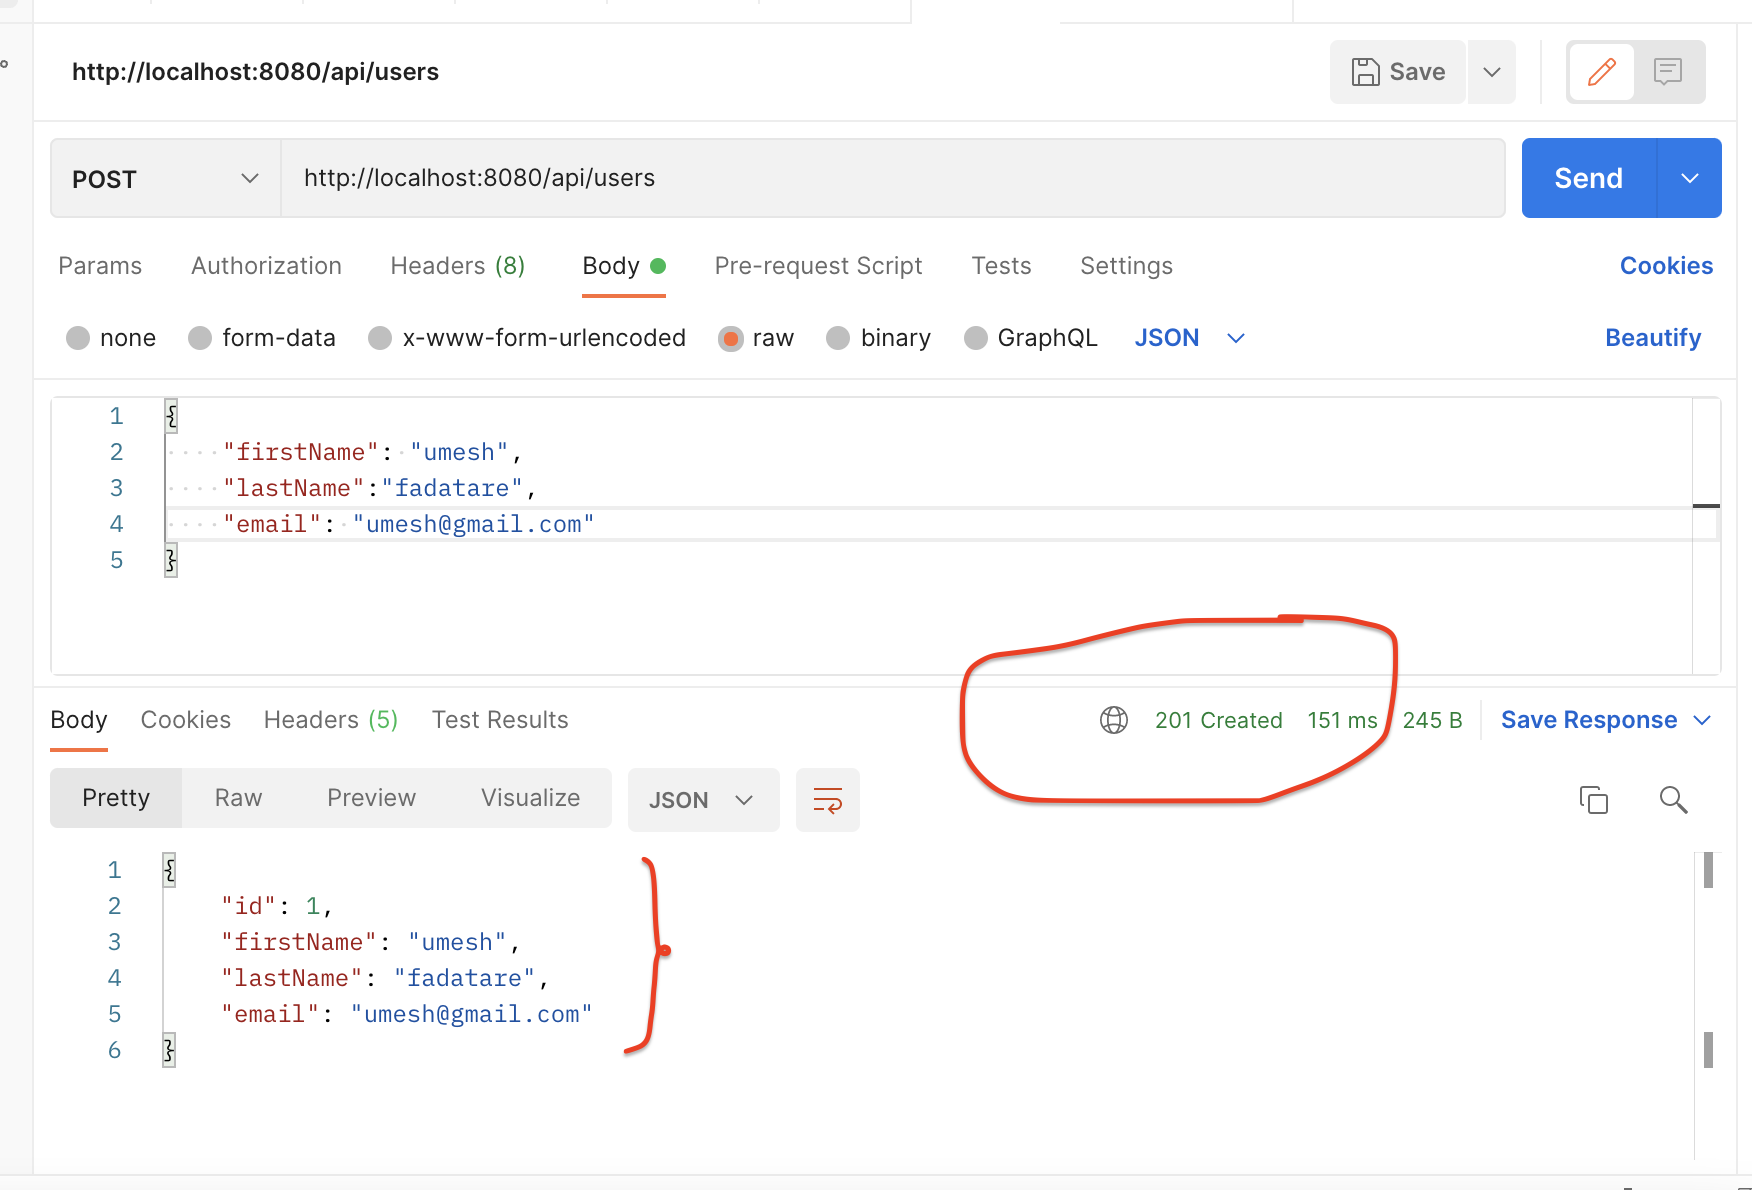
9. Test Spring Boot CRUD REST APIs using Postman Client
Create User REST API:
Get Single User REST API:

Update User REST API:

Get All Users REST API:

Delete User REST API:

10. Conclusion
My Top and Bestseller Udemy Courses. The sale is going on with a 70 - 80% discount. The discount coupon has been added to each course below:

Build REST APIs with Spring Boot 4, Spring Security 7, and JWT
![[NEW] Learn Apache Maven with IntelliJ IDEA and Java 25](https://img-c.udemycdn.com/course/750x422/6852721_b512_2.jpg "[NEW] Learn Apache Maven with IntelliJ IDEA and Java 25")
[NEW] Learn Apache Maven with IntelliJ IDEA and Java 25

ChatGPT + Generative AI + Prompt Engineering for Beginners
")
Spring 7 and Spring Boot 4 for Beginners (Includes 8 Projects)
Available in Udemy for Business

Building Real-Time REST APIs with Spring Boot - Blog App
Available in Udemy for Business

Building Microservices with Spring Boot and Spring Cloud
Available in Udemy for Business

Java Full-Stack Developer Course with Spring Boot and React JS
Available in Udemy for Business

Build 5 Spring Boot Projects with Java: Line-by-Line Coding

Testing Spring Boot Application with JUnit and Mockito
Available in Udemy for Business

Spring Boot Thymeleaf Real-Time Web Application - Blog App
Available in Udemy for Business

Master Spring Data JPA with Hibernate
Available in Udemy for Business

Spring Boot + Apache Kafka Course - The Practical Guide
Available in Udemy for Business


")

Comments
Post a Comment
Leave Comment