
🎓 Check Out My Top 25 Udemy Courses (80-90% Discount): My Udemy Courses - Ramesh Fadatare
In this tutorial, we will learn how to create Kafka Producer and Consumer in Spring Boot Kafka project.
If you are new to Apache Kafka then you should check out my article - Apache Kafka Core Concepts.
The Spring Team provides Spring for Apache Kafka dependency to work with the development of Kafka-based messaging solutions.Video
1. Install and Setup Apache Kafka
2. Extract Kafka zip in the local file system
# Start the ZooKeeper service
# Note: Soon, ZooKeeper will no longer be required by Apache Kafka.
$ bin/zookeeper-server-start.sh config/zookeeper.properties
4. Start Kafka Broker
# Start the Kafka broker service
$ bin/kafka-server-start.sh config/server.properties2. Create and Setup Spring Boot Project in IntelliJ
Add dependencies:
<dependency>
      <groupId>org.springframework.boot</groupId>
      <artifactId>spring-boot-starter-web</artifactId>
</dependency>

 <dependency>
      <groupId>org.springframework.kafka</groupId>
      <artifactId>spring-kafka</artifactId>
</dependency>
3. Configure Kafka Producer and Consumer in an application.properties File
In the application.properties file, add Kafka broker address as well as Consumer and Producer related configuration.
Open the application.properties file and the following content to it:
spring.kafka.consumer.bootstrap-servers: localhost:9092
spring.kafka.consumer.group-id: group-id
spring.kafka.consumer.auto-offset-reset: earliest
spring.kafka.consumer.key-deserializer: org.apache.kafka.common.serialization.StringDeserializer
spring.kafka.consumer.value-deserializer: org.apache.kafka.common.serialization.StringDeserializer

spring.kafka.producer.bootstrap-servers: localhost:9092
spring.kafka.producer.key-serializer: org.apache.kafka.common.serialization.StringSerializer
spring.kafka.producer.value-serializer: org.apache.kafka.common.serialization.StringSerializer
Let's understand the above spring boot provided Kafka properties:
spring.kafka.consumer.group-id - specifies a unique string that identifies the consumer group this consumer belongs to.spring.kafka.consumer.auto-offset-reset property - specifies what to do when there is no initial offset in Kafka or if the current offset does not exist anymore on the server (e.g. because that data has been deleted):
- earliest: automatically reset the offset to the earliest offset
- latest: automatically reset the offset to the latest offset
- none: throw an exception to the consumer if no previous offset is found for the consumer’s group
- anything else: throw an exception to the consumer.
spring.kafka.consumer.key-deserializer - specifies the deserializer class for keys.
spring.kafka.consumer.value-deserializer - specifies the deserializer class for values.
spring.kafka.producer.key-deserializer - specifies the serializer class for keys.
spring.kafka.producer.value-deserializer - specifies the serializer class for values.
4. Create Kafka Topic
To create a topic on startup, add a bean of type NewTopic. If the topic already exists, the bean is ignored. We will use the topic name "javaguides" in this example.
Let's create a KafkaTopicConfig file and add the following content:package net.javaguides.springbootkafka;
import org.apache.kafka.clients.admin.NewTopic;
import org.springframework.context.annotation.Bean;
import org.springframework.context.annotation.Configuration;
import org.springframework.kafka.config.TopicBuilder;
@Configuration
public class KafkaTopicConfig {
@Bean
public NewTopic javaguidesTopic(){
return TopicBuilder.name("javaguides")
.build();
}
}
5. Create Kafka Producer
Creating a producer will write our messages on the topic.
KafkaTemplate
Well, Spring boot provides an auto-configuration for Spring’s KafkaTemplate so you can autowire it directly in your own beans.
For example:
package net.javaguides.springbootkafka.kafka;

import net.javaguides.springbootkafka.utils.AppConstants;
import org.apache.kafka.clients.admin.NewTopic;
import org.slf4j.Logger;
import org.slf4j.LoggerFactory;
import org.springframework.beans.factory.annotation.Autowired;
import org.springframework.kafka.core.KafkaTemplate;
import org.springframework.stereotype.Service;

@Service
public class KafkaProducer {

    private static final Logger LOGGER = LoggerFactory.getLogger(KafkaProducer.class);

    @Autowired
    private KafkaTemplate<String, String> kafkaTemplate;

    public void sendMessage(String message){
        LOGGER.info(String.format("Message sent -> %s", message));
        kafkaTemplate.send(AppConstants.TOPIC_NAME, message);
    }
}
Create a utils package and within this package create AppConstants with the following content:
package net.javaguides.springbootkafka.utils;

public class AppConstants {
    public static final String TOPIC_NAME = "javaguides";
    public static final String GROUP_ID = "group_id";
}
KafKaProducer class uses KafkaTemplate to send messages to the configured topic name.
6. Create REST API to Send Message
Create controller package, within controller package create KafkaProducerController with the following content to it:
package net.javaguides.springbootkafka;
import net.javaguides.springbootkafka.kafka.KafkaProducer;
import org.springframework.http.ResponseEntity;
import org.springframework.web.bind.annotation.*;
@RestController
@RequestMapping("/api/v1/kafka")
public class KafkaProducerController {
private KafkaProducer kafkaProducer;
public KafkaProducerController(KafkaProducer kafkaProducer) {
this.kafkaProducer = kafkaProducer;
}
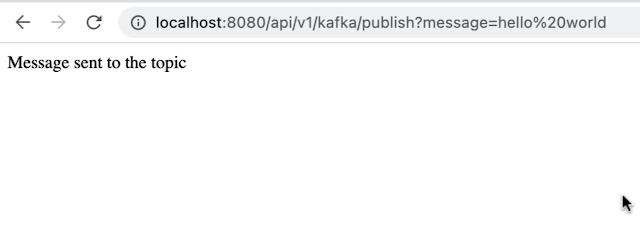
@GetMapping("/publish")
public ResponseEntity<String> publish(@RequestParam("message") String message){
kafkaProducer.sendMessage(message);
return ResponseEntity.ok("Message sent to kafka topic");
}
}See Topic Messages via Command Line:
bin/kafka-console-consumer.sh --topic javaguides --from-beginning --bootstrap-server localhost:9092
Make sure to change the topic name. In our case "javaguides" is the topic name.
7. Create Kafka Consumer
Kafka Consumer is the service that will be responsible for reading messages and processing them according to the needs of your own business logic.
To set it up, enter the following:
package net.javaguides.springbootkafka.kafka;

import net.javaguides.springbootkafka.utils.AppConstants;
import org.slf4j.Logger;
import org.slf4j.LoggerFactory;
import org.springframework.kafka.annotation.KafkaListener;
import org.springframework.stereotype.Service;

@Service
public class KafKaConsumer {

    private static final Logger LOGGER = LoggerFactory.getLogger(KafKaConsumer.class);

    @KafkaListener(topics = AppConstants.TOPIC_NAME,
                    groupId = AppConstants.GROUP_ID)
    public void consume(String message){
        LOGGER.info(String.format("Message received -> %s", message));
    }
}
Here, we told our method void to consume (String message) to subscribe to the user’s topic and just emit every message to the application log. In your real application, you can handle messages the way your business requires you to.
KafkaListener endpoint:
    @KafkaListener(topics = AppConstants.TOPIC_NAME,
                    groupId = AppConstants.GROUP_ID)
    public void consume(String message){
        LOGGER.info(String.format("Message received -> %s", message));
    }
8. Demo


Conclusion
My Top and Bestseller Udemy Courses. The sale is going on with a 70 - 80% discount. The discount coupon has been added to each course below:

Build REST APIs with Spring Boot 4, Spring Security 7, and JWT
![[NEW] Learn Apache Maven with IntelliJ IDEA and Java 25](https://img-c.udemycdn.com/course/750x422/6852721_b512_2.jpg "[NEW] Learn Apache Maven with IntelliJ IDEA and Java 25")
[NEW] Learn Apache Maven with IntelliJ IDEA and Java 25

ChatGPT + Generative AI + Prompt Engineering for Beginners
")
Spring 7 and Spring Boot 4 for Beginners (Includes 8 Projects)
Available in Udemy for Business

Building Real-Time REST APIs with Spring Boot - Blog App
Available in Udemy for Business

Building Microservices with Spring Boot and Spring Cloud
Available in Udemy for Business

Java Full-Stack Developer Course with Spring Boot and React JS
Available in Udemy for Business

Build 5 Spring Boot Projects with Java: Line-by-Line Coding

Testing Spring Boot Application with JUnit and Mockito
Available in Udemy for Business

Spring Boot Thymeleaf Real-Time Web Application - Blog App
Available in Udemy for Business

Master Spring Data JPA with Hibernate
Available in Udemy for Business

Spring Boot + Apache Kafka Course - The Practical Guide
Available in Udemy for Business


")

Comments
Post a Comment
Leave Comment