
Registration + Login Example using Spring Boot, Spring Security, Spring Data JPA, Hibernate, MySQL, Thymeleaf
🎓 Check Out My Top 25 Udemy Courses (80-90% Discount): My Udemy Courses - Ramesh Fadatare
In this tutorial, we will develop a Registration and Login example using Spring Boot 3, Spring Security 6, Hibernate, Thymeleaf, and MySQL database.
In Spring Security 5.7.0-M2, WebSecurityConfigurerAdapter class is deprecated and the Spring team encourages users to move towards a component-based security configuration.
In this tutorial, we will use a new approach which is component-based security configuration.
Note: In this tutorial, we are going to use the latest Spring Boot 3 and Spring Security 6.
Spring Security is a framework that provides authentication, authorization, and protection against common attacks. With first-class support for securing both imperative and reactive applications, it is the de-facto standard for securing Spring-based applications.
Tools and Technologies Used
In this tutorial, we will use the latest version of all the tools and technologies:
- Spring boot 3
- Spring MVC 6
- Spring Security 6
- Hibernate 6
- Thymeleaf 3
- MySQL 8
- Maven
We validate the user registration fields with Java bean validation annotations with Hibernate validator implementation.
Basically, we will develop a simple User Registration Module using Role-based Spring security which can use in any spring MVC-based project.
Let's create a Spring boot project from the scratch and implement the Registration + Login Example step by step.
1. Create Spring Boot Project
Spring Boot provides a web tool called Spring Initializer to bootstrap an application quickly. Just go to https://start.spring.io/ and generate a new spring boot project.
Use the below details in the Spring boot creation:
- Generate: Maven Project
- Java Version: 1.8 (Default)
- Spring Boot:2.0.4
- Group: net.guides.springboot
- Artifact: registration-login-system
- Name: registration-login-system
- Description: Demo project for Spring Boot and Registration Login System
- Package Name : net.javaguides.springboot
- Packaging: jar (This is the default value)
- Dependencies: Web, JPA, MySQL, Thymeleaf, Security
Click on the Generate Project button. Now you can extract the downloaded ZIP file and import it into your favorite IDE.
Here is the pom.xml file for your reference:
<?xml version="1.0" encoding="UTF-8"?>
<project xmlns="http://maven.apache.org/POM/4.0.0" xmlns:xsi="http://www.w3.org/2001/XMLSchema-instance"
	xsi:schemaLocation="http://maven.apache.org/POM/4.0.0 https://maven.apache.org/xsd/maven-4.0.0.xsd">
	<modelVersion>4.0.0</modelVersion>
	<parent>
		<groupId>org.springframework.boot</groupId>
		<artifactId>spring-boot-starter-parent</artifactId>
		<version>3.0.0</version>
		<relativePath/> <!-- lookup parent from repository -->
	</parent>
	<groupId>net.javaguides</groupId>
	<artifactId>registration-login-system</artifactId>
	<version>0.0.1-SNAPSHOT</version>
	<name>registration-login-system</name>
	<description>Demo project for Spring Boot and Registration Login System</description>
	<properties>
		<java.version>17</java.version>
	</properties>
	<dependencies>
		<dependency>
			<groupId>org.springframework.boot</groupId>
			<artifactId>spring-boot-starter-data-jpa</artifactId>
		</dependency>
		<dependency>
			<groupId>org.springframework.boot</groupId>
			<artifactId>spring-boot-starter-thymeleaf</artifactId>
		</dependency>
		<dependency>
			<groupId>org.springframework.boot</groupId>
			<artifactId>spring-boot-starter-validation</artifactId>
		</dependency>
		<dependency>
			<groupId>org.springframework.boot</groupId>
			<artifactId>spring-boot-starter-web</artifactId>
		</dependency>

		<dependency>
			<groupId>mysql</groupId>
			<artifactId>mysql-connector-java</artifactId>
			<scope>runtime</scope>
		</dependency>
		<dependency>
			<groupId>org.projectlombok</groupId>
			<artifactId>lombok</artifactId>
			<optional>true</optional>
		</dependency>
		<dependency>
			<groupId>org.springframework.boot</groupId>
			<artifactId>spring-boot-starter-test</artifactId>
			<scope>test</scope>
		</dependency>
		<dependency>
			<groupId>org.springframework.boot</groupId>
			<artifactId>spring-boot-starter-security</artifactId>
		</dependency>
	</dependencies>

	<build>
		<plugins>
			<plugin>
				<groupId>org.springframework.boot</groupId>
				<artifactId>spring-boot-maven-plugin</artifactId>
				<configuration>
					<excludes>
						<exclude>
							<groupId>org.projectlombok</groupId>
							<artifactId>lombok</artifactId>
						</exclude>
					</excludes>
				</configuration>
			</plugin>
		</plugins>
	</build>
	<repositories>
		<repository>
			<id>spring-milestones</id>
			<name>Spring Milestones</name>
			<url>https://repo.spring.io/milestone</url>
			<snapshots>
				<enabled>false</enabled>
			</snapshots>
		</repository>
	</repositories>
	<pluginRepositories>
		<pluginRepository>
			<id>spring-milestones</id>
			<name>Spring Milestones</name>
			<url>https://repo.spring.io/milestone</url>
			<snapshots>
				<enabled>false</enabled>
			</snapshots>
		</pluginRepository>
	</pluginRepositories>

</project>
2. Configure MySQL database
Let's use the MySQL database to store and retrieve the data in this example and we gonna use Hibernate properties to create and drop tables.
Open the application.properties file and add the following configuration to it:spring.datasource.url=jdbc:mysql://localhost:3306/login_system
spring.datasource.username=root
spring.datasource.password=Mysql@123
spring.jpa.properties.hibernate.dialect = org.hibernate.dialect.MySQLDialect
spring.jpa.hibernate.ddl-auto = update
Let's use the MySQL database to store and retrieve the data in this example and we gonna use Hibernate properties to create and drop tables.
Open the application.properties file and add the following configuration to it:
spring.datasource.url=jdbc:mysql://localhost:3306/login_system
spring.datasource.username=root
spring.datasource.password=Mysql@123

spring.jpa.properties.hibernate.dialect = org.hibernate.dialect.MySQLDialect

spring.jpa.hibernate.ddl-auto = update
Make sure that you will create a login_system database before running the Spring boot application. Also, change the MySQL username and password as per your MySQL installation on your machine.
3. Create Project Structure or Packing Structure
Create packaging structure as per the below screenshot:
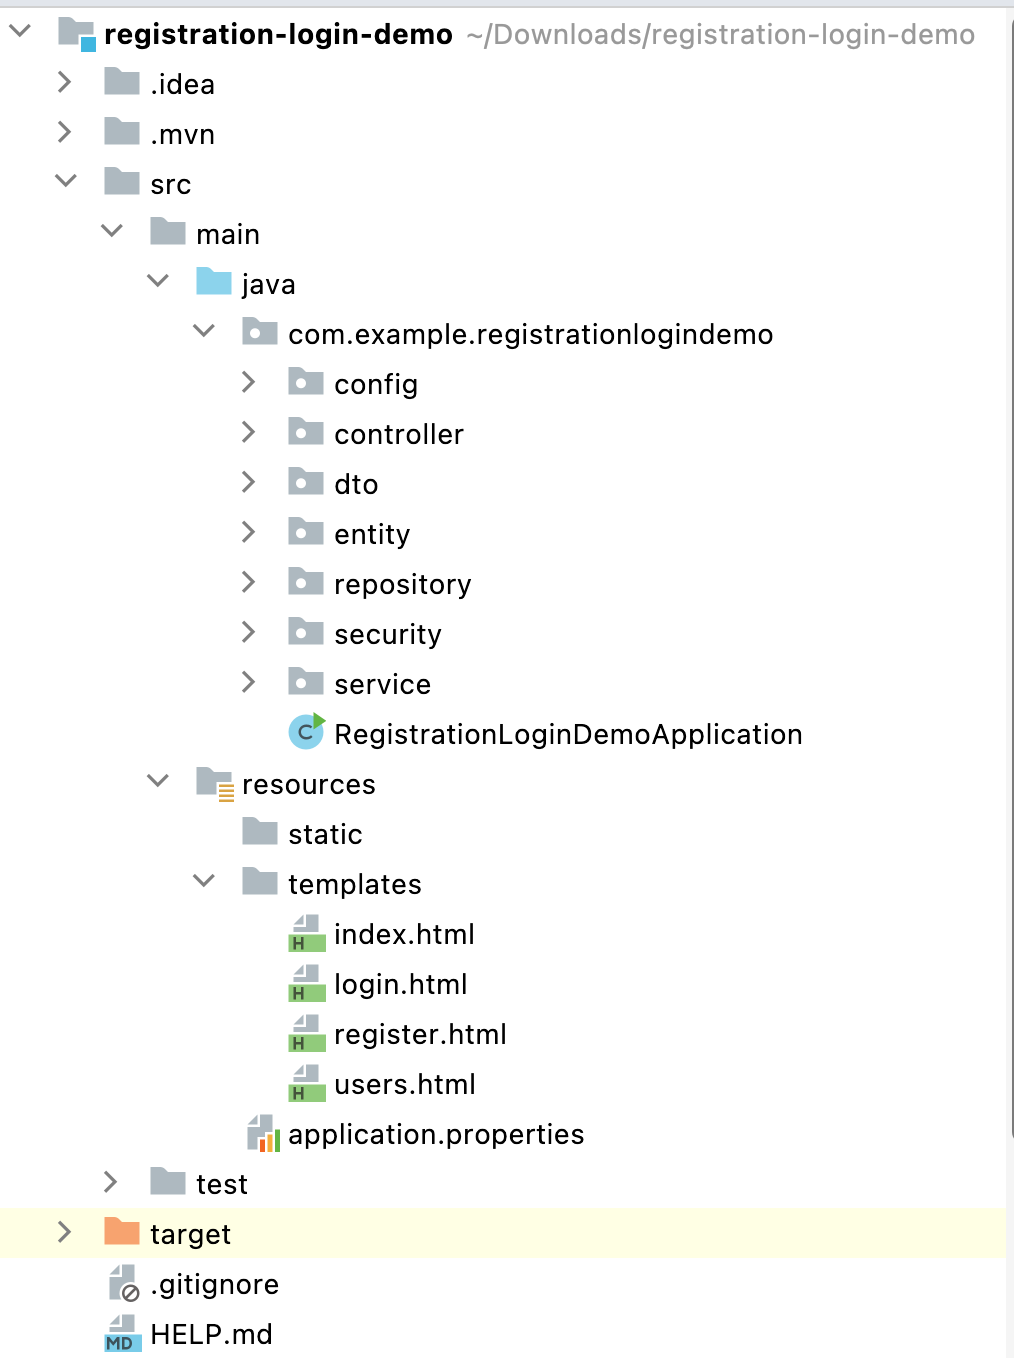
4. Create JPA Entities - User and Role
Let's create User and Role JPA entities and establish a many-to-many mapping between them - one user can have multiple roles and one role can be assigned to multiple users.
The @ManyToMany JPA annotation is used to link the source entity with the target entity.
A many-to-many association always uses an intermediate join table to store the association that joins two entities. The join table is defined using the @JoinTable JPA annotation.
User
package net.javaguides.springboot.entity;

import jakarta.persistence.*;
import lombok.AllArgsConstructor;
import lombok.Getter;
import lombok.NoArgsConstructor;
import lombok.Setter;

import java.util.ArrayList;
import java.util.List;

@Getter
@Setter
@AllArgsConstructor
@NoArgsConstructor
@Entity
@Table(name = "users")
public class User {

    @Id
    @GeneratedValue(strategy = GenerationType.IDENTITY)
    private Long id;
    @Column(nullable = false)
    private String name;
    @Column(nullable = false, unique = true)
    private String email;
    @Column(nullable = false)
    private String password;
    @ManyToMany(fetch = FetchType.EAGER, cascade = CascadeType.ALL)
    @JoinTable(
            name = "users_roles",
            joinColumns = { @JoinColumn(name = "user_id", referencedColumnName = "id") },
            inverseJoinColumns = { @JoinColumn(name = "role_id", referencedColumnName = "id") }
    )
    private List<Role> roles = new ArrayList<>();
}
Role
package net.javaguides.springboot.entity;

import jakarta.persistence.*;
import lombok.AllArgsConstructor;
import lombok.Getter;
import lombok.NoArgsConstructor;
import lombok.Setter;

import java.util.ArrayList;
import java.util.List;

@Getter
@Setter
@NoArgsConstructor
@AllArgsConstructor
@Entity
@Table(name = "roles")
public class Role {
    @Id
    @GeneratedValue(strategy = GenerationType.IDENTITY)
    private Long id;
    @Column(nullable = false, unique = true)
    private String name;
    @ManyToMany(mappedBy = "roles")
    private List<User> users = new ArrayList<>();
}
5. Create UserRepository and RoleRepository
Next, let's create Spring Data JPA repositories for User and Role JPA Entities.
UserRepository
package net.javaguides.springboot.repository;

import net.javaguides.springboot.entity.User;
import org.springframework.data.jpa.repository.JpaRepository;

public interface UserRepository extends JpaRepository<User, Long> {

    User findByEmail(String email);

}
RoleRepository
package net.javaguides.springboot.repository;

import net.javaguides.springboot.entity.Role;
import org.springframework.data.jpa.repository.JpaRepository;

public interface RoleRepository extends JpaRepository<Role, Long> {

    Role findByName(String name);
}
6. Create Thymeleaf Template for Home Page
Let's create an AuthController Spring MVC controller class and add the following content:
package net.javaguides.springboot.controller;
import org.springframework.stereotype.Controller;
import org.springframework.ui.Model;
import org.springframework.web.bind.annotation.GetMapping;

@Controller
public class AuthController {

    // handler method to handle home page request
    @GetMapping("/index")
    public String home(){
        return "index";
    }
}
Thymeleaf Template - Index.html
Next, let's create an index Thymeleaf template view. Note that we are using bootstrap CSS CDN links in below the Thymeleaf HTML page.
<!DOCTYPE html>
<html lang="en"
    xmlns:th="http://www.thymeleaf.org"
>
<head>
    <meta charset="UTF-8">
    <title>Registration and Login System</title>
    <link href="https://cdn.jsdelivr.net/npm/bootstrap@5.0.2/dist/css/bootstrap.min.css"
          rel="stylesheet"
          integrity="sha384-EVSTQN3/azprG1Anm3QDgpJLIm9Nao0Yz1ztcQTwFspd3yD65VohhpuuCOmLASjC"
          crossorigin="anonymous">
</head>
<body>
<nav class="navbar navbar-expand-lg navbar-dark bg-dark">
    <div class="container-fluid">
        <a class="navbar-brand" th:href="@{/index}">Registration and Login System</a>
        <button class="navbar-toggler" type="button" data-bs-toggle="collapse" data-bs-target="#navbarSupportedContent" aria-controls="navbarSupportedContent" aria-expanded="false" aria-label="Toggle navigation">
            <span class="navbar-toggler-icon"></span>
        </button>
        <div class="collapse navbar-collapse" id="navbarSupportedContent">
            <ul class="navbar-nav me-auto mb-2 mb-lg-0">
                <li class="nav-item">
                    <a class="nav-link active" aria-current="page" th:href="@{/register}">Register</a>
                </li>
            </ul>
        </div>
    </div>
</nav>
<br /><br />
<div class="container">
    <div class="row">
        <h1 class="text-center"> Registration and Login System </h1>
    </div>
</div>
</body>
</html>
7. Create Service Layer
UserService Interface
package net.javaguides.springboot.service;

import net.javaguides.springboot.dto.UserDto;
import net.javaguides.springboot.entity.User;

import java.util.List;

public interface UserService {
    void saveUser(UserDto userDto);

    User findUserByEmail(String email);

    List<UserDto> findAllUsers();
}
UserServiceImpl class
package net.javaguides.springboot.service.impl;

import net.javaguides.springboot.dto.UserDto;
import net.javaguides.springboot.entity.Role;
import net.javaguides.springboot.entity.User;
import net.javaguides.springboot.repository.RoleRepository;
import net.javaguides.springboot.repository.UserRepository;
import net.javaguides.springboot.service.UserService;
import org.springframework.security.crypto.password.PasswordEncoder;
import org.springframework.stereotype.Service;

import java.util.Arrays;
import java.util.List;
import java.util.stream.Collectors;

@Service
public class UserServiceImpl implements UserService {

    private UserRepository userRepository;
    private RoleRepository roleRepository;
    private PasswordEncoder passwordEncoder;

    public UserServiceImpl(UserRepository userRepository,
                           RoleRepository roleRepository,
                           PasswordEncoder passwordEncoder) {
        this.userRepository = userRepository;
        this.roleRepository = roleRepository;
        this.passwordEncoder = passwordEncoder;
    }

    @Override
    public void saveUser(UserDto userDto) {
        User user = new User();
        user.setName(userDto.getFirstName() + " " + userDto.getLastName());
        user.setEmail(userDto.getEmail());
        // encrypt the password using spring security
        user.setPassword(passwordEncoder.encode(userDto.getPassword()));

        Role role = roleRepository.findByName("ROLE_ADMIN");
        if(role == null){
            role = checkRoleExist();
        }
        user.setRoles(Arrays.asList(role));
        userRepository.save(user);
    }

    @Override
    public User findUserByEmail(String email) {
        return userRepository.findByEmail(email);
    }

    @Override
    public List<UserDto> findAllUsers() {
        List<User> users = userRepository.findAll();
        return users.stream()
                .map((user) -> mapToUserDto(user))
                .collect(Collectors.toList());
    }

    private UserDto mapToUserDto(User user){
        UserDto userDto = new UserDto();
        String[] str = user.getName().split(" ");
        userDto.setFirstName(str[0]);
        userDto.setLastName(str[1]);
        userDto.setEmail(user.getEmail());
        return userDto;
    }

    private Role checkRoleExist(){
        Role role = new Role();
        role.setName("ROLE_ADMIN");
        return roleRepository.save(role);
    }
}
8. Create UserDto Model Class
We use UserDto class to transfer the data between the controller layer and view layer. We also use UserDto class for form binding.
package net.javaguides.springboot.dto;

import jakarta.validation.constraints.Email;
import jakarta.validation.constraints.NotEmpty;
import lombok.AllArgsConstructor;
import lombok.Getter;
import lombok.NoArgsConstructor;
import lombok.Setter;

@Getter
@Setter
@NoArgsConstructor
@AllArgsConstructor
public class UserDto {
    private Long id;
    @NotEmpty
    private String firstName;
    @NotEmpty
    private String lastName;
    @NotEmpty(message = "Email should not be empty")
    @Email
    private String email;
    @NotEmpty(message = "Password should be empty")
    private String password;
}
9. User Registration Feature Implementation
Let's first add a handler method in AuthController to handle User registration requests:
package net.javaguides.springboot.controller;

import jakarta.validation.Valid;
import net.javaguides.springboot.dto.UserDto;
import org.springframework.stereotype.Controller;
import org.springframework.ui.Model;
import org.springframework.web.bind.annotation.GetMapping;

@Controller
public class AuthController {

    // handler method to handle home page request
    @GetMapping("/index")
    public String home(){
        return "index";
    }

    // handler method to handle user registration form request
    @GetMapping("/register")
    public String showRegistrationForm(Model model){
        // create model object to store form data
        UserDto user = new UserDto();
        model.addAttribute("user", user);
        return "register";
    }
}
Next, let's create a register.html Thymeleaf template and design a User Registration form:
<!DOCTYPE html>
<html lang="en"
  xmlns:th="http://www.thymeleaf.org"
>
<head>
    <meta charset="UTF-8">
    <title>Registration and Login System</title>
  <link href="https://cdn.jsdelivr.net/npm/bootstrap@5.0.2/dist/css/bootstrap.min.css"
        rel="stylesheet"
        integrity="sha384-EVSTQN3/azprG1Anm3QDgpJLIm9Nao0Yz1ztcQTwFspd3yD65VohhpuuCOmLASjC"
        crossorigin="anonymous">
</head>
<body>
<nav class="navbar navbar-expand-lg navbar-dark bg-dark">
  <div class="container-fluid">
    <a class="navbar-brand" th:href="@{/index}">Registration and Login System</a>
    <button class="navbar-toggler" type="button" data-bs-toggle="collapse" data-bs-target="#navbarSupportedContent" aria-controls="navbarSupportedContent" aria-expanded="false" aria-label="Toggle navigation">
      <span class="navbar-toggler-icon"></span>
    </button>
    <div class="collapse navbar-collapse" id="navbarSupportedContent">
      <ul class="navbar-nav me-auto mb-2 mb-lg-0">
        <li class="nav-item">
          <a class="nav-link active" aria-current="page" th:href="@{/login}">Login</a>
        </li>
      </ul>
    </div>
  </div>
</nav>
<br /><br /><br />
<div class="container">
  <div class="row col-md-8 offset-md-2">
    <div class="card">
      <div class="card-header">
          <h2 class="text-center">Registration</h2>
      </div>
      <div th:if="${param.success}">
          <div class="alert alert-info">
            You have successfully registered our app!
          </div>
      </div>
      <div class="card-body">
          <form
            method="post"
            role="form"
            th:action="@{/register/save}"
            th:object="${user}"
          >
            <div class="form-group mb-3">
              <label class="form-label">First Name</label>
              <input
                      class="form-control"
                      id="firstName"
                      name="firstName"
                      placeholder="Enter first name"
                      th:field="*{firstName}"
                      type="text"
              />
              <p th:errors = "*{firstName}" class="text-danger"
              th:if="${#fields.hasErrors('firstName')}"></p>
            </div>

            <div class="form-group mb-3">
              <label class="form-label">Last Name</label>
              <input
                      class="form-control"
                      id="lastName"
                      name="lastName"
                      placeholder="Enter last name"
                      th:field="*{lastName}"
                      type="text"
              />
              <p th:errors = "*{lastName}" class="text-danger"
                 th:if="${#fields.hasErrors('lastName')}"></p>
            </div>

            <div class="form-group mb-3">
              <label class="form-label">Email</label>
              <input
                      class="form-control"
                      id="email"
                      name="email"
                      placeholder="Enter email address"
                      th:field="*{email}"
                      type="email"
              />
              <p th:errors = "*{email}" class="text-danger"
                 th:if="${#fields.hasErrors('email')}"></p>
            </div>

            <div class="form-group mb-3">
              <label class="form-label">Password</label>
              <input
                      class="form-control"
                      id="password"
                      name="password"
                      placeholder="Enter password"
                      th:field="*{password}"
                      type="password"
              />
              <p th:errors = "*{password}" class="text-danger"
                 th:if="${#fields.hasErrors('password')}"></p>
            </div>
            <div class="form-group">
              <button class="btn btn-primary" type="submit">Register</button>
              <span>Already registered? <a th:href="@{/login}">Login here</a></span>
            </div>
          </form>
      </div>
    </div>
  </div>
</div>
</body>
</html>
Next, let's create a handler method to save User registration data into the MySQL database.
package net.javaguides.springboot.controller;

import jakarta.validation.Valid;
import net.javaguides.springboot.dto.UserDto;
import net.javaguides.springboot.entity.User;
import net.javaguides.springboot.service.UserService;
import org.springframework.stereotype.Controller;
import org.springframework.ui.Model;
import org.springframework.validation.BindingResult;
import org.springframework.web.bind.annotation.GetMapping;
import org.springframework.web.bind.annotation.ModelAttribute;
import org.springframework.web.bind.annotation.PostMapping;

import java.util.List;

@Controller
public class AuthController {

    private UserService userService;

    public AuthController(UserService userService) {
        this.userService = userService;
    }

    // handler method to handle home page request
    @GetMapping("/index")
    public String home(){
        return "index";
    }

    // handler method to handle user registration form request
    @GetMapping("/register")
    public String showRegistrationForm(Model model){
        // create model object to store form data
        UserDto user = new UserDto();
        model.addAttribute("user", user);
        return "register";
    }

    // handler method to handle user registration form submit request
    @PostMapping("/register/save")
    public String registration(@Valid @ModelAttribute("user") UserDto userDto,
                               BindingResult result,
                               Model model){
        User existingUser = userService.findUserByEmail(userDto.getEmail());

        if(existingUser != null && existingUser.getEmail() != null && !existingUser.getEmail().isEmpty()){
            result.rejectValue("email", null,
                    "There is already an account registered with the same email");
        }

        if(result.hasErrors()){
            model.addAttribute("user", userDto);
            return "/register";
        }

        userService.saveUser(userDto);
        return "redirect:/register?success";
    }
}
10. Display List Registered Users
Next, let's create a handler method in AuthController to handle Get Registered Users requests from the MySQL database.
    // handler method to handle list of users
    @GetMapping("/users")
    public String users(Model model){
        List<UserDto> users = userService.findAllUsers();
        model.addAttribute("users", users);
        return "users";
    }
Here is the complete code for AuthController:
package net.javaguides.springboot.controller;

import jakarta.validation.Valid;
import net.javaguides.springboot.dto.UserDto;
import net.javaguides.springboot.entity.User;
import net.javaguides.springboot.service.UserService;
import org.springframework.stereotype.Controller;
import org.springframework.ui.Model;
import org.springframework.validation.BindingResult;
import org.springframework.web.bind.annotation.GetMapping;
import org.springframework.web.bind.annotation.ModelAttribute;
import org.springframework.web.bind.annotation.PostMapping;

import java.util.List;

@Controller
public class AuthController {

    private UserService userService;

    public AuthController(UserService userService) {
        this.userService = userService;
    }

    // handler method to handle home page request
    @GetMapping("/index")
    public String home(){
        return "index";
    }

    // handler method to handle login request
    @GetMapping("/login")
    public String login(){
        return "login";
    }

    // handler method to handle user registration form request
    @GetMapping("/register")
    public String showRegistrationForm(Model model){
        // create model object to store form data
        UserDto user = new UserDto();
        model.addAttribute("user", user);
        return "register";
    }

    // handler method to handle user registration form submit request
    @PostMapping("/register/save")
    public String registration(@Valid @ModelAttribute("user") UserDto userDto,
                               BindingResult result,
                               Model model){
        User existingUser = userService.findUserByEmail(userDto.getEmail());

        if(existingUser != null && existingUser.getEmail() != null && !existingUser.getEmail().isEmpty()){
            result.rejectValue("email", null,
                    "There is already an account registered with the same email");
        }

        if(result.hasErrors()){
            model.addAttribute("user", userDto);
            return "/register";
        }

        userService.saveUser(userDto);
        return "redirect:/register?success";
    }

    // handler method to handle list of users
    @GetMapping("/users")
    public String users(Model model){
        List<UserDto> users = userService.findAllUsers();
        model.addAttribute("users", users);
        return "users";
    }
}
Next, let's create a Thymeleaf template to display a list of registered users:
<!DOCTYPE html>
<html lang="en"
    xmlns:th="http://www.thymeleaf.org"
>
<head>
    <meta charset="UTF-8">
    <title>Registration and Login System</title>
    <link href="https://cdn.jsdelivr.net/npm/bootstrap@5.0.2/dist/css/bootstrap.min.css"
          rel="stylesheet"
          integrity="sha384-EVSTQN3/azprG1Anm3QDgpJLIm9Nao0Yz1ztcQTwFspd3yD65VohhpuuCOmLASjC"
          crossorigin="anonymous">
</head>
<body>
<nav class="navbar navbar-expand-lg navbar-dark bg-dark">
    <div class="container-fluid">
        <a class="navbar-brand" th:href="@{/index}">Registration and Login System</a>
        <button class="navbar-toggler" type="button" data-bs-toggle="collapse" data-bs-target="#navbarSupportedContent" aria-controls="navbarSupportedContent" aria-expanded="false" aria-label="Toggle navigation">
            <span class="navbar-toggler-icon"></span>
        </button>
        <div class="collapse navbar-collapse" id="navbarSupportedContent">
            <ul class="navbar-nav me-auto mb-2 mb-lg-0">
                <li class="nav-item">
                    <a class="nav-link active" aria-current="page" th:href="@{/logout}">Logout</a>
                </li>
            </ul>
        </div>
    </div>
</nav>
<div class="container">
    <div class="row col-md-10">
        <h2>List of Registered Users</h2>
    </div>
    <table class="table table-bordered table-hover">
        <thead class="table-dark">
            <tr>
                <th>First Name</th>
                <th>Last Name</th>
                <th>Email</th>
            </tr>
        </thead>
        <tbody>
            <tr th:each = "user : ${users}">
                <td th:text = "${user.firstName}"></td>
                <td th:text = "${user.lastName}"></td>
                <td th:text = "${user.email}"></td>
            </tr>
        </tbody>
    </table>
</div>
</body>
</html>
11. Create Custom Login Form
Let's create a handler method to handle login requests in AuthController:
    // handler method to handle login request
    @GetMapping("/login")
    public String login(){
        return "login";
    }
Next, let's create a login.html Thymeleaf template and design a login form:
<!DOCTYPE html>
<html lang="en"
    xmlns:th="http://www.thymeleaf.org"
>
<head>
    <meta charset="UTF-8">
    <title>Registration and Login System</title>
    <link href="https://cdn.jsdelivr.net/npm/bootstrap@5.0.2/dist/css/bootstrap.min.css"
          rel="stylesheet"
          integrity="sha384-EVSTQN3/azprG1Anm3QDgpJLIm9Nao0Yz1ztcQTwFspd3yD65VohhpuuCOmLASjC"
          crossorigin="anonymous">
</head>
<body>
<nav class="navbar navbar-expand-lg navbar-dark bg-dark">
    <div class="container-fluid">
        <a class="navbar-brand" th:href="@{/index}">Registration and Login System</a>
        <button class="navbar-toggler" type="button" data-bs-toggle="collapse" data-bs-target="#navbarSupportedContent" aria-controls="navbarSupportedContent" aria-expanded="false" aria-label="Toggle navigation">
            <span class="navbar-toggler-icon"></span>
        </button>
        <div class="collapse navbar-collapse" id="navbarSupportedContent">
            <ul class="navbar-nav me-auto mb-2 mb-lg-0">
                <li class="nav-item">
                    <a class="nav-link active" aria-current="page" th:href="@{/register}">Register</a>
                </li>
            </ul>
        </div>
    </div>
</nav>
<br /><br />
<div class="container">
    <div class="row">
        <div class="col-md-6 offset-md-3">

            <div th:if="${param.error}">
                <div class="alert alert-danger">Invalid Email or Password</div>
            </div>
            <div th:if="${param.logout}">
                <div class="alert alert-success"> You have been logged out.</div>
            </div>

            <div class="card">
                <div class="card-header">
                    <h2 class="text-center">Login Form</h2>
                </div>
                <div class="card-body">
                    <form
                        method="post"
                        role="form"
                        th:action="@{/login}"
                        class="form-horizontal"
                    >
                        <div class="form-group mb-3">
                            <label class="control-label"> Email</label>
                            <input
                                type="text"
                                id="username"
                                name="username"
                                class="form-control"
                                placeholder="Enter email address"
                            />
                        </div>

                        <div class="form-group mb-3">
                            <label class="control-label"> Password</label>
                            <input
                                    type="password"
                                    id="password"
                                    name="password"
                                    class="form-control"
                                    placeholder="Enter password"
                            />
                        </div>
                        <div class="form-group mb-3">
                            <button type="submit" class="btn btn-primary" >Submit</button>
                            <span> Not registered ?
                                <a th:href="@{/register}">Register/Signup here</a>
                            </span>
                        </div>
                    </form>
                </div>
            </div>
        </div>
    </div>
</div>
</body>
</html>
12. Configure Spring Security
In Spring Security 5.7.0-M2, WebSecurityConfigurerAdapter class is deprecated and the Spring team encourages users to move towards a component-based security configuration.
In this tutorial, we will use a new approach which is component-based security configuration.
Let's create SpringSecurity class and add the following security configuration:
package com.example.registrationlogindemo.config;

import org.springframework.beans.factory.annotation.Autowired;
import org.springframework.context.annotation.Bean;
import org.springframework.context.annotation.Configuration;
import org.springframework.security.config.annotation.authentication.builders.AuthenticationManagerBuilder;
import org.springframework.security.config.annotation.web.builders.HttpSecurity;
import org.springframework.security.config.annotation.web.configuration.EnableWebSecurity;
import org.springframework.security.core.userdetails.UserDetailsService;
import org.springframework.security.crypto.bcrypt.BCryptPasswordEncoder;
import org.springframework.security.crypto.password.PasswordEncoder;
import org.springframework.security.web.SecurityFilterChain;
import org.springframework.security.web.util.matcher.AntPathRequestMatcher;

@Configuration
@EnableWebSecurity
public class SpringSecurity {

    @Autowired
    private UserDetailsService userDetailsService;

    @Bean
    public static PasswordEncoder passwordEncoder(){
        return new BCryptPasswordEncoder();
    }

    @Bean
    public SecurityFilterChain filterChain(HttpSecurity http) throws Exception {
        http.csrf().disable()
                .authorizeHttpRequests((authorize) ->
                        authorize.requestMatchers("/register/**").permitAll()
                                .requestMatchers("/index").permitAll()
                                .requestMatchers("/users").hasRole("ADMIN")
                ).formLogin(
                        form -> form
                                .loginPage("/login")
                                .loginProcessingUrl("/login")
                                .defaultSuccessUrl("/users")
                                .permitAll()
                ).logout(
                        logout -> logout
                                .logoutRequestMatcher(new AntPathRequestMatcher("/logout"))
                                .permitAll()
                );
        return http.build();
    }

    @Autowired
    public void configureGlobal(AuthenticationManagerBuilder auth) throws Exception {
        auth
                .userDetailsService(userDetailsService)
                .passwordEncoder(passwordEncoder());
    }
}
@EnableWebSecurity annotation is used to enable Spring Security’s web security support and provide the Spring MVC integration.
The BCryptPasswordEncoder implementation uses the widely supported bcrypt algorithm to hash the passwords.
13. Database Authentication Implementation
We are implementing database authentication so let's load the User from the database.
CustomUserDetailsService
Let's create CustomUserDetailsService class with the following content:package net.javaguides.springboot.security;
import net.javaguides.springboot.entity.User;
import net.javaguides.springboot.repository.UserRepository;
import org.springframework.security.core.authority.SimpleGrantedAuthority;
import org.springframework.security.core.userdetails.UserDetails;
import org.springframework.security.core.userdetails.UserDetailsService;
import org.springframework.security.core.userdetails.UsernameNotFoundException;
import org.springframework.stereotype.Service;
import java.util.stream.Collectors;
@Service
public class CustomUserDetailsService implements UserDetailsService {
private UserRepository userRepository;
public CustomUserDetailsService(UserRepository userRepository) {
this.userRepository = userRepository;
}
@Override
public UserDetails loadUserByUsername(String usernameOrEmail) throws UsernameNotFoundException {
User user = userRepository.findByEmail(usernameOrEmail);
if(user != null){
return new org.springframework.security.core.userdetails.User(user.getEmail()
, user.getPassword(),
user.getRoles().stream()
.map((role) -> new SimpleGrantedAuthority(role.getName()))
.collect(Collectors.toList()));
}else {
throw new UsernameNotFoundException("Invalid email or password");
}
}
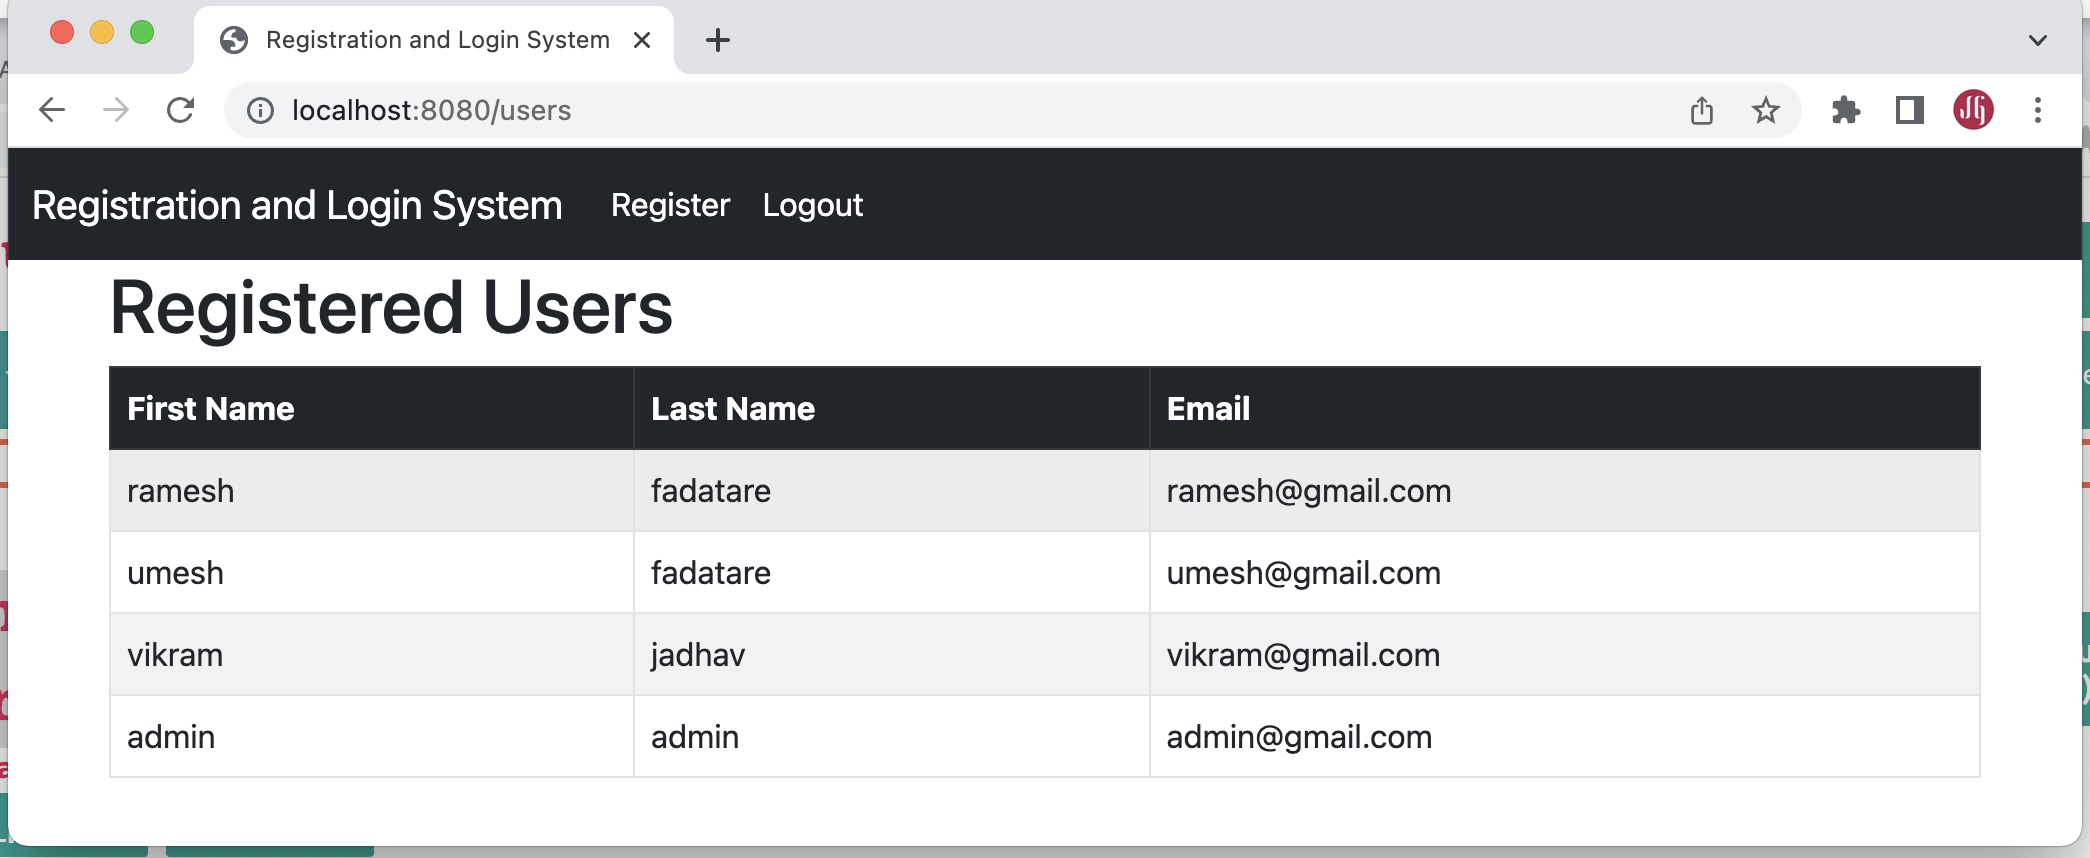
}14. Demo
Let's run the spring boot application using the main entry point class and let's have a demo.
Let's access the http://localhost:8080/ link from the browser will result in the home page:

Click on the Register link to navigate to the Registration page:

Click on the Login link to navigate to the Login page:

ADMIN user will access this Registered Users Page:
15. Source Code on GitHub
The source code of this tutorial is available on my GitHub profile at https://github.com/RameshMF/registration-login-springboot-security-thymeleaf
16. Conclusion
In this tutorial, we have seen how to create a Spring Boot User Registration and Login Module using Spring Boot, Spring Security, Hibernate, and Thymeleaf.
In this tutorial, we have used the latest version of all the tools and technologies.
My Top and Bestseller Udemy Courses. The sale is going on with a 70 - 80% discount. The discount coupon has been added to each course below:

Build REST APIs with Spring Boot 4, Spring Security 7, and JWT
🆕 High-Demand
80–90% OFF
![[NEW] Learn Apache Maven with IntelliJ IDEA and Java 25](https://img-c.udemycdn.com/course/750x422/6852721_b512_2.jpg "[NEW] Learn Apache Maven with IntelliJ IDEA and Java 25")
[NEW] Learn Apache Maven with IntelliJ IDEA and Java 25
🆕 High-Demand
80–90% OFF

ChatGPT + Generative AI + Prompt Engineering for Beginners
🚀 Trending Now
80–90% OFF
")
Spring 7 and Spring Boot 4 for Beginners (Includes 8 Projects)
🔥 Bestseller
80–90% OFF
Available in Udemy for Business
Available in Udemy for Business

Building Real-Time REST APIs with Spring Boot - Blog App
🔥 Bestseller
80–90% OFF
Available in Udemy for Business
Available in Udemy for Business

Building Microservices with Spring Boot and Spring Cloud
🌟 Top Rated
80–90% OFF
Available in Udemy for Business
Available in Udemy for Business

Java Full-Stack Developer Course with Spring Boot and React JS
🔥 Bestseller
80–90% OFF
Available in Udemy for Business
Available in Udemy for Business

Build 5 Spring Boot Projects with Java: Line-by-Line Coding
🌟 Top Rated
80–90% OFF

Testing Spring Boot Application with JUnit and Mockito
🔥 Bestseller
80–90% OFF
Available in Udemy for Business
Available in Udemy for Business

Spring Boot Thymeleaf Real-Time Web Application - Blog App
🔥 Bestseller
80–90% OFF
Available in Udemy for Business
Available in Udemy for Business

Master Spring Data JPA with Hibernate
🔥 Bestseller
80–90% OFF
Available in Udemy for Business
Available in Udemy for Business

Spring Boot + Apache Kafka Course - The Practical Guide
🎓 Student Favorite
80–90% OFF
Available in Udemy for Business
Available in Udemy for Business


")

Very good example, check out source code on my github repository.
ReplyDeletegreat community work!!!
ReplyDeletehi!
ReplyDeleteThe source code is working well , really appericated.
ReplyDeleteOnly one problem is appear in my case,
Actually, can you tell me why cannot store data to DB (MySQL\\\)
|
How thymeleaf can work with:
Deletespring.mvc.view.prefix=/WEB-INF/jsp/
spring.mvc.view.suffix=.jsp
https://github.com/Urunov/SpringBoot-Projects-FullStack/tree/master/Part-8%20Spring%20Boot%20Real%20Projects/8.SpringRegistrationPage
ReplyDeleteSource code
spring.mvc.view.prefix=/WEB-INF/jsp/
ReplyDeletespring.mvc.view.suffix=.jsp
For thymeleaf ?
It's my bad. Updated the tutorial. Thanks for reporting.
Deleteuserserviceimpl class:
ReplyDeletereturn roles.stream()
.map(role - > new SimpleGrantedAuthority(role.getName()))
.collect(Collectors.toList());
in this line i have an error.
Multiple markers at this line
- role cannot be resolved
- role cannot be resolved to a
variable
- role cannot be resolved to a
variable
- Syntax error on token "-", --
expected
I thought you are not using java 8. please check. this syntax only support about java 8
DeleteHi, seems the webjars do not work for me, my display does not look the same as yours.
ReplyDeleteAlso thank you for this post!
DeleteSo after accessing localhost:8080 it redirects you to /login.
ReplyDeleteBut how can you set the first page as index and after you access another site it redirects you to /login page?