
🎓 Check Out My Top 25 Udemy Courses (80-90% Discount): My Udemy Courses - Ramesh Fadatare
In this article, we will create a WebSocket implementation using Spring boot and STOMP that sends messages back and forth, between a browser and the server.
WebSocket is a very thin, lightweight layer above TCP. It makes it very suitable to use "subprotocols" to embed messages. In this article, we’ll dive in and use STOMP messaging with Spring boot to create an interactive web application.
Before getting started, let's familiarize a few concepts like what is WebSocket, STOMP, SOCKJS, etc.
WebSocket Overview?
The WebSocket protocol provides a standardized way to establish a full-duplex, two-way communication channel between client and server over a single TCP connection. It is a different TCP protocol from HTTP but is designed to work over HTTP, using ports 80 and 443 and allowing the re-use of existing firewall rules.A WebSocket interaction begins with an HTTP request that uses the HTTP Upgrade header to upgrade or, in this case, to switch to the WebSocket protocol.
The following example shows such an interaction:
GET /spring-websocket-portfolio/portfolio HTTP/1.1
Host: localhost:8080
Upgrade: websocket
Connection: Upgrade
Sec-WebSocket-Key: Uc9l9TMkWGbHFD2qnFHltg==
Sec-WebSocket-Protocol: v10.stomp, v11.stomp
Sec-WebSocket-Version: 13
Origin: http://localhost:8080- The Upgrade header.
- Using the Upgrade connection.
HTTP/1.1 101 Switching Protocols
Upgrade: websocket
Connection: Upgrade
Sec-WebSocket-Accept: 1qVdfYHU9hPOl4JYYNXF623Gzn0=
Sec-WebSocket-Protocol: v10.stomp
Protocol switch
After a successful handshake, the TCP socket underlying the HTTP upgrade request remains open for both the client and the server to continue to send and receive messages.
The below diagram demonstrates how WebSocket interaction begins with an HTTP request that uses the HTTP Upgrade header to upgrade or, in this case, to switch to the WebSocket protocol.

The below diagram demonstrates how WebSocket interaction begins with an HTTP request that uses the HTTP Upgrade header to upgrade or, in this case, to switch to the WebSocket protocol.
What is STOMP?
STOMP stands for Simple Text Oriented Messaging Protocol. It is a messaging protocol that defines the format and rules for data exchange. Why do we need STOMP?
Well, WebSocket is just a communication protocol. It doesn’t define things like - How to send a message only to users who are subscribed to a particular topic, or how to send a message to a particular user. We need STOMP for these functionalities.
What is SockJS?
SockJS is a browser JavaScript library that provides a WebSocket-like object. SockJS gives you a coherent, cross-browser, Javascript API which creates a low latency, full duplex, cross-domain communication channel between the browser and the web server.Under the hood, SockJS tries to use native WebSockets first. If that fails it can use a variety of browser-specific transport protocols and presents them through WebSocket-like abstractions.
SockJS is used to enable fallback options for browsers that don’t support WebSocket. Spring provides a server-side implementation of SockJS and we will see how to use the same in this example.
Spring WebSocket
Spring WebSocket is the Spring module that enables WebSocket-style messaging support. As Spring WebSocket’s documentation states, the WebSocket protocol defines an important new capability for web applications: full-duplex, two-way communication between client and server.Well, now that we know what WebSocket, STOMP, SockJS, and Spring WebSocket are. Next, let’s jump into the implementation of our Spring boot WebSocket Application.
Tools and Technologies Used
- Spring Boot - 3+
- JDK - 17 or later
- Spring Framework - 6+
- webjars
- SOCKJS
- STOMP
- Spring WebSocket
- Maven - 3.2+
- IDE - Eclipse or Spring Tool Suite (STS)
1. Creating a Spring Boot Application
There are many ways to create a Spring Boot application. You can refer below articles to create a Spring Boot application.
>> Create Spring Boot Project With Spring Initializer
>> Create Spring Boot Project in Spring Tool Suite [STS]
>> Create Spring Boot Project in Spring Tool Suite [STS]
2. Project Structure
Refer below screenshot to create a project or packaging structure: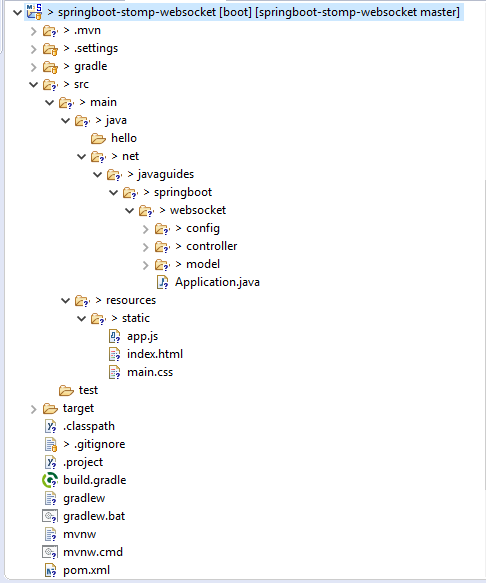
3. Create a resource representation class
We are exchanging messages in JSON format over STOMP protocol so let's create two Java classes Greeting and HelloMessage.HelloMessage
package net.javaguides.springboot.websocket.model

public class HelloMessage {

    private String name;

    public HelloMessage() {}

    public HelloMessage(String name) {
        this.name = name;
    }

    public String getName() {
        return name;
    }

    public void setName(String name) {
        this.name = name;
    }
}
Greeting
package net.javaguides.springboot.websocket.model

public class Greeting {

    private String content;

    public Greeting() {}

    public Greeting(String content) {
        this.content = content;
    }

    public String getContent() {
        return content;
    }
}
Next, you’ll create a controller to receive the hello message and send a greeting message.
4. Create a message-handling controller
In Spring’s approach to working with STOMP messaging, STOMP messages can be routed to @Controller classes. For example, the GreetingController is mapped to handle messages to the destination "/hello".package net.javaguides.springboot.websocket.controller;
import org.springframework.messaging.handler.annotation.MessageMapping;
import org.springframework.messaging.handler.annotation.SendTo;
import org.springframework.stereotype.Controller;
import org.springframework.web.util.HtmlUtils;
import net.javaguides.springboot.websocket.model.Greeting;
import net.javaguides.springboot.websocket.model.HelloMessage;
@Controller
public class GreetingController {
@MessageMapping("/hello")
@SendTo("/topic/greetings")
public Greeting greeting(HelloMessage message) throws Exception {
Thread.sleep(1000); // simulated delay
return new Greeting("Hello, " + HtmlUtils.htmlEscape(message.getName()) + "!");
}
}
5. Configure Spring for STOMP messaging
Now that the essential components of the service are created, you can configure Spring to enable WebSocket and STOMP messaging.Create a Java class named WebSocketConfig that looks like this:
package net.javaguides.springboot.websocket.config;

import org.springframework.context.annotation.Configuration;
import org.springframework.messaging.simp.config.MessageBrokerRegistry;
import org.springframework.web.socket.config.annotation.EnableWebSocketMessageBroker;
import org.springframework.web.socket.config.annotation.StompEndpointRegistry;
import org.springframework.web.socket.config.annotation.WebSocketMessageBrokerConfigurer;

@Configuration
@EnableWebSocketMessageBroker
public class WebSocketConfig implements WebSocketMessageBrokerConfigurer {

    @Override
    public void configureMessageBroker(MessageBrokerRegistry config) {
        config.enableSimpleBroker("/topic");
        config.setApplicationDestinationPrefixes("/app");
    }

    @Override
    public void registerStompEndpoints(StompEndpointRegistry registry) {
        registry.addEndpoint("/ws").withSockJS();
    }

}
6. Create a browser client
With the server-side pieces in place, now let’s turn our attention to the JavaScript client that will send messages to and receive messages from the server side.Create an index.html file that looks like this:
<!DOCTYPE html>
<html>
<head>
    <title>Hello WebSocket</title>
    <link href="/webjars/bootstrap/css/bootstrap.min.css" rel="stylesheet">
    <link href="/main.css" rel="stylesheet">
    <script src="/webjars/jquery/jquery.min.js"></script>
    <script src="/webjars/sockjs-client/sockjs.min.js"></script>
    <script src="/webjars/stomp-websocket/stomp.min.js"></script>
    <script src="/app.js"></script>
    <script type="text/javascript" src="/stompobject.js"></script>
</head>
<body>
<noscript><h2 style="color: #ff0000">Seems your browser doesn't support Javascript! Websocket relies on Javascript being
    enabled. Please enable
    Javascript and reload this page!</h2></noscript>
<div id="main-content" class="container">
  <div class="row">
   <h1> Spring Boot + Websocket Demo</h1>
  </div>
  <br>
    <div class="row">
        <div class="col-md-6">
            <form class="form-inline">
                <div class="form-group">
                    <label for="connect">WebSocket connection:</label>
                    <button id="connect" class="btn btn-default" type="submit">Connect</button>
                    <button id="disconnect" class="btn btn-default" type="submit" disabled="disabled">Disconnect
                    </button>
                </div>
            </form>

            <br>
             <form class="form-inline">
                <div class="form-group">
                    <label for="name">What is your name?</label>
                    <input type="text" id="name" class="form-control" placeholder="Your name here...">
                </div>
                <button id="send" class="btn btn-default" type="submit">Send</button>
            </form>
        </div>
    </div>
    <div class="row">
        <div class="col-md-6">
            <table id="conversation" class="table table-striped">
                <thead>
                <tr>
                    <th>Greetings</th>
                </tr>
                </thead>
                <tbody id="greetings">
                </tbody>
            </table>
        </div>
    </div>
</div>
</body>
</html>
Let’s create that file: src/main/resources/static/app.js:
var stompClient = null;

function setConnected(connected) {
    $("#connect").prop("disabled", connected);
    $("#disconnect").prop("disabled", !connected);
    if (connected) {
        $("#conversation").show();
    }
    else {
        $("#conversation").hide();
    }
    $("#greetings").html("");
}

function connect() {
    var socket = new SockJS('/ws');
    stompClient = Stomp.over(socket);
    stompClient.connect({}, function (frame) {
        setConnected(true);
        console.log('Connected: ' + frame);
        stompClient.subscribe('/topic/greetings', function (greeting) {
            showGreeting(JSON.parse(greeting.body).content);
        });
    });

    displayStompObject();
}

function disconnect() {
    if (stompClient !== null) {
        stompClient.disconnect();
    }
    setConnected(false);
    console.log("Disconnected");
}

function showGreeting(message) {
    $("#greetings").append("<tr><td>" + message + "</td></tr>");
}

function sendName() {
 stompClient.send("/app/hello", {}, JSON.stringify({
  'name' : $("#name").val()
 }));
}


$(function () {
    $("form").on('submit', function (e) {
        e.preventDefault();
    });
    $( "#connect" ).click(function() { connect(); });
    $( "#disconnect" ).click(function() { disconnect(); });
    $( "#send" ).click(function() { sendName(); });
});
7. Running the Application
We have successfully developed a Spring boot WebSocket example. Now it's time to deploy our application in a servlet container(embedded tomcat).Two ways we can start the standalone Spring boot application.
From the root directory of the application and type the following command to run it -
From your IDE, run the Application.main() method as a standalone Java class that will start the embedded Tomcat server on port 8080 and point the browser to http://localhost:8080/.
$ mvn spring-boot:run
From your IDE, run the Application.main() method as a standalone Java class that will start the embedded Tomcat server on port 8080 and point the browser to http://localhost:8080/.
Demo
Watch this GIF for a complete end to end demo of this spring boot WebSocket example: GitHub Repository
The source code examples are available on my GitHub Repository.
My Top and Bestseller Udemy Courses. The sale is going on with a 70 - 80% discount. The discount coupon has been added to each course below:

Build REST APIs with Spring Boot 4, Spring Security 7, and JWT
🆕 High-Demand
80–90% OFF
![[NEW] Learn Apache Maven with IntelliJ IDEA and Java 25](https://img-c.udemycdn.com/course/750x422/6852721_b512_2.jpg "[NEW] Learn Apache Maven with IntelliJ IDEA and Java 25")
[NEW] Learn Apache Maven with IntelliJ IDEA and Java 25
🆕 High-Demand
80–90% OFF

ChatGPT + Generative AI + Prompt Engineering for Beginners
🚀 Trending Now
80–90% OFF
")
Spring 7 and Spring Boot 4 for Beginners (Includes 8 Projects)
🔥 Bestseller
80–90% OFF
Available in Udemy for Business
Available in Udemy for Business

Building Real-Time REST APIs with Spring Boot - Blog App
🔥 Bestseller
80–90% OFF
Available in Udemy for Business
Available in Udemy for Business

Building Microservices with Spring Boot and Spring Cloud
🌟 Top Rated
80–90% OFF
Available in Udemy for Business
Available in Udemy for Business

Java Full-Stack Developer Course with Spring Boot and React JS
🔥 Bestseller
80–90% OFF
Available in Udemy for Business
Available in Udemy for Business

Build 5 Spring Boot Projects with Java: Line-by-Line Coding
🌟 Top Rated
80–90% OFF

Testing Spring Boot Application with JUnit and Mockito
🔥 Bestseller
80–90% OFF
Available in Udemy for Business
Available in Udemy for Business

Spring Boot Thymeleaf Real-Time Web Application - Blog App
🔥 Bestseller
80–90% OFF
Available in Udemy for Business
Available in Udemy for Business

Master Spring Data JPA with Hibernate
🔥 Bestseller
80–90% OFF
Available in Udemy for Business
Available in Udemy for Business

Spring Boot + Apache Kafka Course - The Practical Guide
🎓 Student Favorite
80–90% OFF
Available in Udemy for Business
Available in Udemy for Business


")

Comments
Post a Comment
Leave Comment