
🎓 Top 15 Udemy Courses (80-90% Discount): My Udemy Courses - Ramesh Fadatare — All my Udemy courses are real-time and project oriented courses.
▶️ Subscribe to My YouTube Channel (178K+ subscribers): Java Guides on YouTube
▶️ For AI, ChatGPT, Web, Tech, and Generative AI, subscribe to another channel: Ramesh Fadatare on YouTube
In this tutorial, we will learn how to build CRUD REST APIs using Spring Boot, JPA/Hibernate, and the PostgreSQL database. We will use the latest version of Spring Boot 3 in this tutorial.
YouTube Video
Before development, make sure that the PostgreSQL database is installed on your machine.
Check out these two links to download and install a PostgreSQL database on your machine.
- https://www.postgresql.org/docs/9.3/tutorial-install.html
- http://www.postgresqltutorial.com/install-postgresql/
1. What we’ll build

2. Tools and Technologies Used
- Spring Boot 3
- JDK - 17 or later
- Spring Framework
- Spring Data JPA (Hibernate)
- Maven
- IDE - Eclipse or Spring Tool Suite (STS)
- PostgreSQL
3. Development Steps
Step 1: Create a Spring Boot Application
Spring Boot provides a web tool called Spring Initializer to bootstrap an application quickly. Just go to https://start.spring.io/ and generate a new spring boot project.
Use the below details in the Spring boot creation:
Project Name: springboot-backend
Project Type: Maven
Choose dependencies: Spring Web, Spring Data JPA, PostgreSQL, Dev Tools
Package name: net.javaguides.springboot
Step 2: Maven dependencies
<?xml version="1.0" encoding="UTF-8"?>
<project xmlns="http://maven.apache.org/POM/4.0.0" xmlns:xsi="http://www.w3.org/2001/XMLSchema-instance"
	xsi:schemaLocation="http://maven.apache.org/POM/4.0.0 https://maven.apache.org/xsd/maven-4.0.0.xsd">
	<modelVersion>4.0.0</modelVersion>
	<parent>
		<groupId>org.springframework.boot</groupId>
		<artifactId>spring-boot-starter-parent</artifactId>
		<version>3.0.4</version>
		<relativePath/> <!-- lookup parent from repository -->
	</parent>
	<groupId>net.javaguides</groupId>
	<artifactId>springboot-backend</artifactId>
	<version>0.0.1-SNAPSHOT</version>
	<name>springboot-backend</name>
	<description>Demo project for Spring Boot</description>

	<properties>
		<java.version>17</java.version>
	</properties>

	<dependencies>
		<dependency>
			<groupId>org.springframework.boot</groupId>
			<artifactId>spring-boot-starter-data-jpa</artifactId>
		</dependency>
		<dependency>
			<groupId>org.springframework.boot</groupId>
			<artifactId>spring-boot-starter-web</artifactId>
		</dependency>

		<dependency>
			<groupId>org.springframework.boot</groupId>
			<artifactId>spring-boot-devtools</artifactId>
			<scope>runtime</scope>
			<optional>true</optional>
		</dependency>

		<dependency>
			<groupId>org.postgresql</groupId>
			<artifactId>postgresql</artifactId>
			<scope>runtime</scope>
		</dependency>

		<dependency>
			<groupId>org.springframework.boot</groupId>
			<artifactId>spring-boot-starter-test</artifactId>
			<scope>test</scope>
		</dependency>

	</dependencies>

	<build>
		<plugins>
			<plugin>
				<groupId>org.springframework.boot</groupId>
				<artifactId>spring-boot-maven-plugin</artifactId>
			</plugin>
		</plugins>
	</build>
</project>
Step 3: Configuring PostgreSQL Database
First, you need to create a database in the PostgreSQL server. You can use the following command to create a database in the PostgreSQL server:CREATE DATABASE employees;
Open the src/main/resources/application.properties file and add the following content to it:spring.datasource.url=jdbc:postgresql://localhost:5432/employees
spring.datasource.username=postgres
spring.datasource.password=root
spring.jpa.show-sql=true
## Hibernate Properties
# The SQL dialect makes Hibernate generate better SQL for the chosen database
spring.jpa.properties.hibernate.dialect = org.hibernate.dialect.PostgreSQLDialect
# Hibernate ddl auto (create, create-drop, validate, update)
spring.jpa.hibernate.ddl-auto = update
CREATE DATABASE employees;spring.datasource.url=jdbc:postgresql://localhost:5432/employees spring.datasource.username=postgres spring.datasource.password=root spring.jpa.show-sql=true ## Hibernate Properties # The SQL dialect makes Hibernate generate better SQL for the chosen database spring.jpa.properties.hibernate.dialect = org.hibernate.dialect.PostgreSQLDialect # Hibernate ddl auto (create, create-drop, validate, update) spring.jpa.hibernate.ddl-auto = update
Step 4: Create JPA Entity - Employee.java
package net.javaguides.springboot.model;

import jakarta.persistence.*;

@Entity
@Table(name = "employees")
public class Employee {

	@Id
	@GeneratedValue(strategy = GenerationType.IDENTITY)
	private long id;

	@Column(name = "first_name")
	private String firstName;

	@Column(name = "last_name")
	private String lastName;

	@Column(name = "email_address")
	private String emailId;

	public Employee() {

	}

	public Employee(String firstName, String lastName, String emailId) {
		super();
		this.firstName = firstName;
		this.lastName = lastName;
		this.emailId = emailId;
	}
	public long getId() {
		return id;
	}
	public void setId(long id) {
		this.id = id;
	}
	public String getFirstName() {
		return firstName;
	}
	public void setFirstName(String firstName) {
		this.firstName = firstName;
	}
	public String getLastName() {
		return lastName;
	}
	public void setLastName(String lastName) {
		this.lastName = lastName;
	}
	public String getEmailId() {
		return emailId;
	}
	public void setEmailId(String emailId) {
		this.emailId = emailId;
	}
}
Step 5: Create a Spring Data Repository - EmployeeRepository.java
package net.javaguides.springboot.repository;

import org.springframework.data.jpa.repository.JpaRepository;

import net.javaguides.springboot.model.Employee;

public interface EmployeeRepository extends JpaRepository<Employee, Long>{

}
Step 6: Create a Custom Exception
package net.javaguides.springboot.exception;

import org.springframework.http.HttpStatus;
import org.springframework.web.bind.annotation.ResponseStatus;

@ResponseStatus(value = HttpStatus.NOT_FOUND)
public class ResourceNotFoundException extends RuntimeException{

	private static final long serialVersionUID = 1L;

	public ResourceNotFoundException(String message) {
		super(message);
	}
}
Step 7: Create Spring Rest Controller - EmployeeController.java
package net.javaguides.springboot.controller;
import java.util.HashMap;
import java.util.List;
import java.util.Map;
import org.springframework.beans.factory.annotation.Autowired;
import org.springframework.http.ResponseEntity;
import org.springframework.web.bind.annotation.CrossOrigin;
import org.springframework.web.bind.annotation.DeleteMapping;
import org.springframework.web.bind.annotation.GetMapping;
import org.springframework.web.bind.annotation.PathVariable;
import org.springframework.web.bind.annotation.PostMapping;
import org.springframework.web.bind.annotation.PutMapping;
import org.springframework.web.bind.annotation.RequestBody;
import org.springframework.web.bind.annotation.RequestMapping;
import org.springframework.web.bind.annotation.RestController;
import net.javaguides.springboot.exception.ResourceNotFoundException;
import net.javaguides.springboot.model.Employee;
import net.javaguides.springboot.repository.EmployeeRepository;
@CrossOrigin(origins = "http://localhost:4200")
@RestController
@RequestMapping("/api/v1/")
public class EmployeeController {
@Autowired
private EmployeeRepository employeeRepository;
// get all employees
@GetMapping("/employees")
public List<Employee> getAllEmployees(){
return employeeRepository.findAll();
}
// create employee rest api
@PostMapping("/employees")
public Employee createEmployee(@RequestBody Employee employee) {
return employeeRepository.save(employee);
}
// get employee by id rest api
@GetMapping("/employees/{id}")
public ResponseEntity<Employee> getEmployeeById(@PathVariable Long id) {
Employee employee = employeeRepository.findById(id)
.orElseThrow(() -> new ResourceNotFoundException("Employee not exist with id :" + id));
return ResponseEntity.ok(employee);
}
// update employee rest api
@PutMapping("/employees/{id}")
public ResponseEntity<Employee> updateEmployee(@PathVariable Long id, @RequestBody Employee employeeDetails){
Employee employee = employeeRepository.findById(id)
.orElseThrow(() -> new ResourceNotFoundException("Employee not exist with id :" + id));
employee.setFirstName(employeeDetails.getFirstName());
employee.setLastName(employeeDetails.getLastName());
employee.setEmailId(employeeDetails.getEmailId());
Employee updatedEmployee = employeeRepository.save(employee);
return ResponseEntity.ok(updatedEmployee);
}
// delete employee rest api
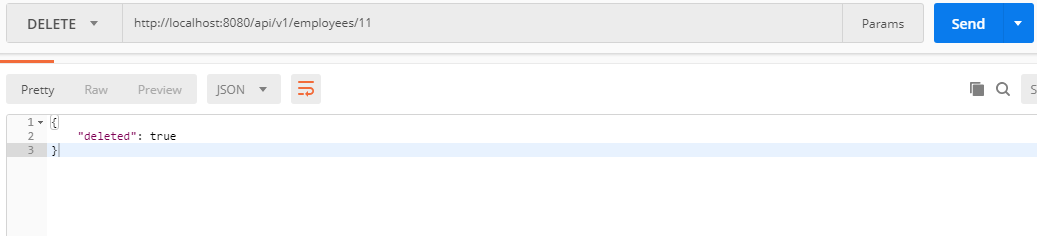
@DeleteMapping("/employees/{id}")
public ResponseEntity<Map<String, Boolean>> deleteEmployee(@PathVariable Long id){
Employee employee = employeeRepository.findById(id)
.orElseThrow(() -> new ResourceNotFoundException("Employee not exist with id :" + id));
employeeRepository.delete(employee);
Map<String, Boolean> response = new HashMap<>();
response.put("deleted", Boolean.TRUE);
return ResponseEntity.ok(response);
}
}Optional Step for Client Applications (React/Angular): Enable CORS on the Server
To enable CORS on the server, add a @CrossOrigin annotation to the EmployeeController:@CrossOrigin(origins = "http://localhost:4200")
@RestController
@RequestMapping("/api/v1/")
public class EmployeeController {
// ..
}
@CrossOrigin(origins = "http://localhost:4200")
@RestController
@RequestMapping("/api/v1/")
public class EmployeeController {
// ..
}
Step 8: Running Spring Boot Application
This spring boot application has an entry point Java class called SpringbootBackendApplication with the public static void main(String[] args) method, which you can run to start the application.package net.javaguides.springboot;
import org.springframework.boot.SpringApplication;
import org.springframework.boot.autoconfigure.SpringBootApplication;
@SpringBootApplication
public class SpringbootBackendApplication {
public static void main(String[] args) {
SpringApplication.run(SpringbootBackendApplication.class, args);
}
}
Step 9: Testing CRUD REST APIs via Postman Client
1. Create Employee REST API

2. Get Employee by ID REST API

3. Get all Employees REST API

4. Update Employee REST API

5. Delete Employee REST API
Conclusion
In conclusion, this tutorial has illustrated how to create a fully functional CRUD RESTful API for a simple Employee Management System using Spring Boot, PostgreSQL, and JPA/Hibernate. By utilizing Spring Boot and Spring Data JPA, we were able to develop a scalable and maintainable API with minimal boilerplate code.My Top and Bestseller Udemy Courses. The sale is going on with a 70 - 80% discount. The discount coupon has been added to each course below:

Build REST APIs with Spring Boot 4, Spring Security 7, and JWT
![[NEW] Learn Apache Maven with IntelliJ IDEA and Java 25](https://img-c.udemycdn.com/course/750x422/6852721_b512_2.jpg "[NEW] Learn Apache Maven with IntelliJ IDEA and Java 25")
[NEW] Learn Apache Maven with IntelliJ IDEA and Java 25

ChatGPT + Generative AI + Prompt Engineering for Beginners
")
Spring 7 and Spring Boot 4 for Beginners (Includes 8 Projects)
Available in Udemy for Business

Building Real-Time REST APIs with Spring Boot - Blog App
Available in Udemy for Business

Building Microservices with Spring Boot and Spring Cloud
Available in Udemy for Business

Java Full-Stack Developer Course with Spring Boot and React JS
Available in Udemy for Business

Build 5 Spring Boot Projects with Java: Line-by-Line Coding

Testing Spring Boot Application with JUnit and Mockito
Available in Udemy for Business

Spring Boot Thymeleaf Real-Time Web Application - Blog App
Available in Udemy for Business

Master Spring Data JPA with Hibernate
Available in Udemy for Business

Spring Boot + Apache Kafka Course - The Practical Guide
Available in Udemy for Business


")

Good Tutorial, Thank you. :)
ReplyDeleteThanks
ReplyDeleteeasy understand tutorial, Thank you.
ReplyDeleteWhere is the implementation of findAll() method inside Repository class
ReplyDelete