
🎓 Check Out My Top 25 Udemy Courses (80-90% Discount): My Udemy Courses - Ramesh Fadatare
In this tutorial, we will learn how to build a Spring Boot MVC web application using Spring MVC and Spring Data JPA.
We will be using the H2 in-memory database for storing the data.
Tools and Technologies Used
- Java 17+
- Spring boot 3+
- Spring framework 6+
- Spring Data JPA
- H2 Database
- Eclipse STS
Development Process
1. Create a Spring Boot Project
2. Create JPA Entity
3. Configure Database
4. Create JPA Repository
5. Create Spring MVC Controller
6. Create a Thymeleaf template
7. Run the Spring boot project
8. Demo
1. Create a Spring Boot Project
Use the below guide to create a Spring boot project in Eclipse STS IDE:-> Create Spring Boot Project in Spring Tool Suite [STS]
Make sure that you have added below Maven dependencies:
    <dependency>
      <groupId>org.springframework.boot</groupId>
      <artifactId>spring-boot-starter-data-jpa</artifactId>
    </dependency>
    <dependency>
      <groupId>org.springframework.boot</groupId>
      <artifactId>spring-boot-starter-web</artifactId>
    </dependency>

    <dependency>
      <groupId>com.h2database</groupId>
      <artifactId>h2</artifactId>
      <scope>runtime</scope>
    </dependency>
Create project structure as per the below screenshot:
2. Create JPA Entity
Let's create a User entity under the domain package and add the following content to it:
import jakarta.persistence.*;

@Entity
@Table(name = "users")
public class User {

	@Id
	@GeneratedValue(strategy = GenerationType.AUTO)
	private Integer id;

	@Column(name = "name")
	private String name;

	public User() {
	}

	public User(Integer id, String name) {
		this.id = id;
		this.name = name;
	}

	public Integer getId() {
		return id;
	}

	public void setId(Integer id) {
		this.id = id;
	}

	public String getName() {
		return name;
	}

	public void setName(String name) {
		this.name = name;
	}

}
3. Configure Database
Spring boot automatically configures database details for the H2 in-memory database so we do not need to explicitly add the database configuration in the application.properties file.
Let's add the following properties to the application.properties file:
logging.level.org.springframework=INFO

################### Hibernate Configuration ##########################
spring.jpa.hibernate.ddl-auto=update
spring.jpa.show-sql=true
SQL Script - Sample Data
Create a data.sql file under /resources folder and add the following content to it:
delete from users;

insert into users(id, name) values(1,'Admin');
insert into users(id, name) values(2,'Ram');
insert into users(id, name) values(3,'Krishna');
4. Create JPA Repository
Let's create a UserRepository for the User entity which gives CRUD database operations for the User:
import org.springframework.data.jpa.repository.JpaRepository;

public interface UserRepository extends JpaRepository<User, Integer>
{

}
5. Create Spring MVC Controller
Let's create UserController to handle HTTP GET requests and return a simple view ( Thymeleaf):
import org.springframework.beans.factory.annotation.Autowired;

import org.springframework.stereotype.Controller;
import org.springframework.ui.Model;
import org.springframework.web.bind.annotation.GetMapping;

import net.sourcecodeexamples.springboot.repositories.UserRepository;

/**
 * @author https://www.sourcecodeexamples.net/
 * HomeController handles HTTP Get request
 *
 */
@Controller
public class HomeController
{
	@Autowired UserRepository userRepository;

	@GetMapping("/")
	public String home(Model model)
	{
		model.addAttribute("users", userRepository.findAll());
		return "index";
	}
}
6. Create a Thymeleaf template
Let's create an index.html file under the /resources/templates folder and add the following content to it:
<!DOCTYPE html>
<html xmlns="http://www.w3.org/1999/xhtml"
	  xmlns:th="http://www.thymeleaf.org">
<head>
<meta charset="utf-8"/>
<title>Spring Boot Web App using Spring MVC and Spring Data JPA</title>
</head>
<body>
	<h1>Spring Boot Web App using Spring MVC and Spring Data JPA</h1>
	<hr />
	<table>
		<thead>
			<tr>
				<th>Id</th>
				<th>Name</th>
			</tr>
		</thead>
		<tbody>
			<tr th:each="user : ${users}">
				<td th:text="${user.id}">Id</td>
				<td th:text="${user.name}">Name</td>
			</tr>
		</tbody>
	</table>
</body>
</html>
7. Run the Spring boot project
This is Spring Boot's main entity class. From your IDE, run the Application.main() method as a standalone Java class that will start the embedded Tomcat server on port 8080 and point the browser to http://localhost:8080/.
import org.springframework.boot.SpringApplication;
import org.springframework.boot.autoconfigure.SpringBootApplication;

@SpringBootApplication
public class Application
{
	public static void main(String[] args)
	{
		SpringApplication.run(Application.class, args);
	}
}
Or use the below command to run the Spring boot app:
$ mvn spring-boot:run8. Demo
Hit this URL in a browser: http://localhost:8080/
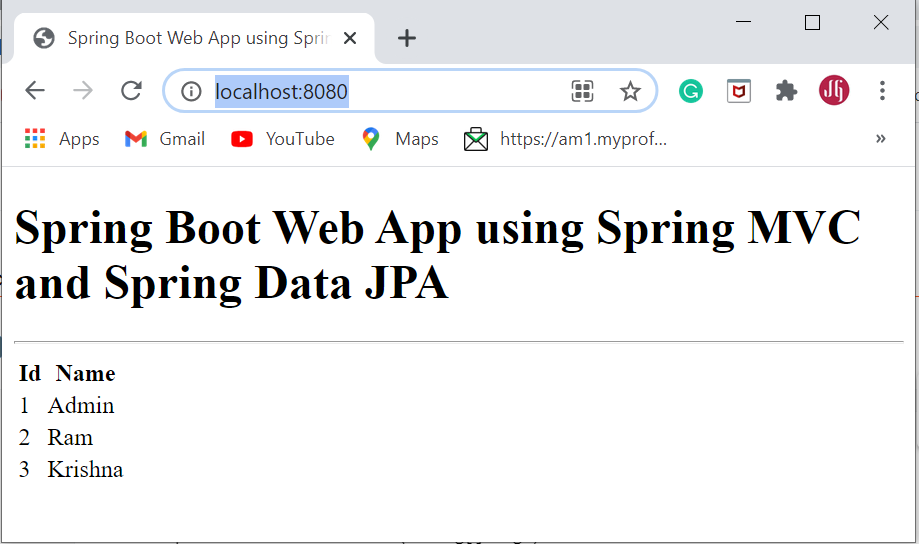
Conclusion
In conclusion, this tutorial provided a comprehensive guide on building a Spring Boot MVC web application using Spring MVC and Spring Data JPA. We explored the key concepts and components of a Spring Boot web application, including controllers, views, and data access objects. By leveraging Spring MVC, we were able to handle HTTP requests and map them to appropriate controller methods. Additionally, Spring Data JPA facilitated seamless integration with the database, enabling efficient data persistence and retrieval. Armed with the knowledge gained from this tutorial, you are now equipped to embark on your journey of developing robust and scalable web applications using the Spring Boot framework. So go ahead and start building amazing web applications with Spring Boot!My Top and Bestseller Udemy Courses. The sale is going on with a 70 - 80% discount. The discount coupon has been added to each course below:

Build REST APIs with Spring Boot 4, Spring Security 7, and JWT
🆕 High-Demand
80–90% OFF
![[NEW] Learn Apache Maven with IntelliJ IDEA and Java 25](https://img-c.udemycdn.com/course/750x422/6852721_b512_2.jpg "[NEW] Learn Apache Maven with IntelliJ IDEA and Java 25")
[NEW] Learn Apache Maven with IntelliJ IDEA and Java 25
🆕 High-Demand
80–90% OFF

ChatGPT + Generative AI + Prompt Engineering for Beginners
🚀 Trending Now
80–90% OFF
")
Spring 7 and Spring Boot 4 for Beginners (Includes 8 Projects)
🔥 Bestseller
80–90% OFF
Available in Udemy for Business
Available in Udemy for Business

Building Real-Time REST APIs with Spring Boot - Blog App
🔥 Bestseller
80–90% OFF
Available in Udemy for Business
Available in Udemy for Business

Building Microservices with Spring Boot and Spring Cloud
🌟 Top Rated
80–90% OFF
Available in Udemy for Business
Available in Udemy for Business

Java Full-Stack Developer Course with Spring Boot and React JS
🔥 Bestseller
80–90% OFF
Available in Udemy for Business
Available in Udemy for Business

Build 5 Spring Boot Projects with Java: Line-by-Line Coding
🌟 Top Rated
80–90% OFF

Testing Spring Boot Application with JUnit and Mockito
🔥 Bestseller
80–90% OFF
Available in Udemy for Business
Available in Udemy for Business

Spring Boot Thymeleaf Real-Time Web Application - Blog App
🔥 Bestseller
80–90% OFF
Available in Udemy for Business
Available in Udemy for Business

Master Spring Data JPA with Hibernate
🔥 Bestseller
80–90% OFF
Available in Udemy for Business
Available in Udemy for Business

Spring Boot + Apache Kafka Course - The Practical Guide
🎓 Student Favorite
80–90% OFF
Available in Udemy for Business
Available in Udemy for Business


")

Comments
Post a Comment
Leave Comment